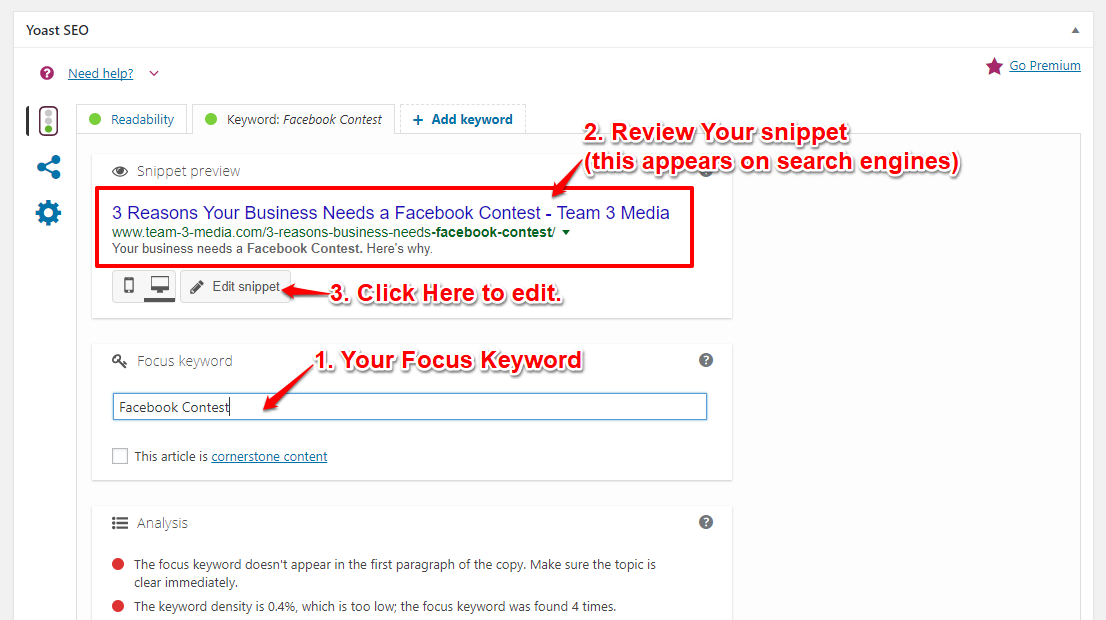
[convertkit]

Closing My Email Lists

Hey There!

It’s been a while since I wrote a newsletter or even published a new blog post, but I wanted to reach out today to say that I’m closing down the email lists associated with this site, BuildEmailListsFast.com, and CassieWitt.com.

You see, over the last year and a half, my business and life has slowly morphed into something else. Because of that, I’ve been reluctant to push the same old things on you. That’s also why you’ve heard from me so infrequently. And about 2 months ago I accepted a large contract job that is taking up a lot of my time and energy. So for now, I am shuttering the email lists.

What that means, is that, if you were signed up, I’m deleting your email off that list. I just sent the last email out to my subscribers, so you may be seeing this message twice.

Will I relaunch my lists for Team-3-Media.com, BuildEmailListsFast.com, and CassieWitt.com? Probably, but at this point, I don’t really know what that’s going to look like. I have some ideas, but no real plans. And I don’t intend to make any plans until after the holidays (at the very least).

When or if I decide to relaunch my list, I will post about it here or on one of the sites above.

As an FYI, I may still post blog posts here or on my other sites, but for now, will not be sending them in any email newsletters.

No More [Random] Location Tagging from Third-party Apps to Facebook and Instagram

On November 2, Facebook rolled out a change to the API for both Facebook and Instagram that is, in a word, frustrating. Before you could attach a location that was not your own to an image, video, or even just a block of text you wanted to post from a third-party app. Now, you can’t. 

I regularly used this feature to tag job locations for a client who refinishes and refaces cabinets to show that they not only did work in that area, but also that they could do work in that area. It helped answer a common question that they receive about what areas they service. It also allowed my client to show up if someone typed that city or town into search, which could lead to a bigger audience. 

Why does this matter? Because a lot of Digital Marketers, Social Media Specialists, or anyone who is in charge of social media use third-party tools like Buffer, Hootsuite, and Sprout Social to help them save time. Third-party apps allow their users to create posts on their site that can be added to multiple platforms at once, or even scheduled to those platforms in the future. They’re a huge time-saver. Because these third-party tools connect through the API to publish those posts, this feature is no longer available to them. 

To be clear you can still tag other locations when making a post on Facebook or Instagram itself. How many of us, Digital Marketers, though, use third-party software (like Buffer or Hootsuite) to schedule out posts ahead of time? Honestly, I don’t know anyone professionally, who doesn’t.

There is a sort-of pseudo-fix that Buffer has added to their platform. However, it only allows you to use the location attached to your Facebook Page (if you have already set that up). If you’re wanting to use a location that’s not attached to your Facebook Page, then you are out of luck. 

So, your turn. Did you use this feature a lot? If so, what are your feelings on the fact that it’s gone?

How to Create Quick Shareable Social Media Images [Tutorial]

Want to maximize the visibility and sharing of your social media posts? Here is one quick tip that is sure to help: use an image.

Yes, it’s as simple as that. 

While there are many reasons a social media post performs better than another, a quick way to help it along is to add an image. And the stats back this up.

Social Media Image Stats

“When people hear information, they’re likely to remember only 10% of that information three days later. However, if a relevant image is paired with that same information, people retained 65% of the information three days later.”

-Source: Brain Rules

“Tweets with images receive 150% more retweets than tweets without images.”

-Source: Buffer

“There are more than 1 Billion Instagram users active every day.”

-Source: Instagram Business

“Facebook posts with images see 2.3X more engagement than those without images.”

-Source: Buzz Sumo

The range of platforms covered by these stats proves that this tactic isn’t just a one-trick pony.

When you consider that there are not one but three major social media platforms based on the popularity of sharing images: Instagram, Snapchat, and Pinterest, you have to admit that as a plugged-in society, we are mad about images!

It makes sense, too. Images are easy to glance at and understand. When an image catches our eye, we are able to analyze and deconstruct it faster than words. Our brains are literally wired to process visual things faster. It’s how we evolved. In fact, when we read words, we’re not just recognizing letters and turning those into understandable language. Our minds attribute pictures to specific words or sounds. In that way, we’re able to understand what the word means.

My Personal Take

While writing an in-depth Facebook post or Twitter threads can help you engage and connect on a deeper level with the people who want to learn more, sharing an image with a short caption can help you gain a wider audience, faster. If audience growth is your goal, then this is a tactic you should try.

What Kind of Images?

Before we get too far into the tool I’m going to show you, I need to explain what type of images we’re talking about.

One of the easiest types of images to produce that will resonate with a wide number of people are quote images. These are images with a quote overlaid over some kind of a background. Often, you will see an image in the background, but you can also use solid-colored backgrounds, or gradients, or any design that calls attention to the words, rather than the background elements. Below are three examples. These are all from Instagram, but they work equally as well on the other platforms.


Creating these “quote images” will allow you to broaden your audience more effectively than sharing brand images. Why? Because they resonate with more people. You can use this tactic to show off your philosophy and pull more people in. It’s tantamount to leading with your hobbies or interests at a business mixer, rather than what product you sell.


The Tool: Pablo by Buffer

Pros

  • No copyright issues (if you use the images provided by Pablo).
  • Easy to Get Started
  • Dead simple to use
  • Can Share Right From the App

Cons

  • Desktop only (no mobile or app version)
  • Has only a few features
  • Cannot skip beginning tutorial (if you haven’t accessed it for a while or if you access it on a new browser)


Copyright Issues

Before we get too far into this tool, I have to discuss the invisible elephant in the room: copyright issues. I’ve written before about being careful you choose an image which isn’t going to land you in hot water over copyright issues. Overlaying words over a photo doesn’t change that.

You still have to make sure you’re using a free-to-use image or paying for the correct type of licensing if it’s a paid stock photo.

Luckily, Pablo, the tool I’m writing about today, provides a way to search through a site of free images, so you don’t need to worry about it.


Introducing Pablo


Choosing Images

Your first step is to choose an image, and choosing the right one is half the battle. You want to choose a photo that portrays your message, or at least doesn’t detract from it.

Here’s what I’ve noticed, though. Many people use a lot of the same or very similar images to express what they want to say.

Have an inspirational quote? Why not layer it over an image of a beautiful mountain peak wreathed in clouds? Unfortunately, many people use this formula, and it only works some of the time.

I am just as guilty of this and it’s easy to do. After all, you’re in a hurry. Do you really have time to sort through a ton of photos to find one that is absolutely perfect?! Maybe not…

However, taking a few extra minutes to choose a photo that not only compliments your message, but is also unique will ensure that your image and message are more likely to stand out from the crowd.

Pablo gives you two ways to choose images. You can choose images from the free stock photos on the left or upload your own image. If you use the free stock photos, Pablo allows you to search by keyword or shuffle them if you just want to see more random images.

Fonts/Design

Now comes the fun part: adding your quote/words over the image and making sure everything looks right. That’s not fun, you say? Well maybe it’s just fun for me, then… 😉

If you want to overlay a quote over the image, this is the time to do that.

Just slapping some text on the photo isn’t enough, though. You’ll want to spend a few minutes tweaking the settings so that it looks right. Don’t forget to make sure that your text is readable. Below are some tips on that.

Start by clicking on the left and right arrows beside the “Add Quote” words. This will rotate through common quotes.

I’ve chosen a quote by Eleanor Roosevelt, which seems appropriate to not only the image, but something that I want to say today.

Once you have some text on there, you can start to play around with the options. They are not immediately apparent, as you have to click on the text to make them appear.

You can change the font family, size, boldness, alignment and color. You can even put your own text by selecting the text that is there and typing or pasting in the replacement words. In this way, you can customize your text to fit a certain mood, or just make it look more readable. You can also move the text around by clicking and dragging. As you’re moving the text, you will see blue lines appear both horizontally and vertically to indicate whether you have aligned the text perfectly. Below is a screenshot where you can see that I have the text aligned perfectly center and also how different the overall image looks when you play around with these settings just a little bit.

Now that you have your words the way you want them, it is time to tweak your image settings so that it looks really nice. First up, is adding a logo or other graphic, if you want. Many companies use this feature to brand their images so that people seeing them across the internet can identify the image with their business. If you want to do this, start by clicking on the words “Insert Logo or Graphic” and choose your logo or another small branding image from your files. You will likely want to use a logo with a transparent background (either in a .png or .gif format).

Once you add your logo, you can move it around by clicking, dragging, and dropping it in the spot you want.

You can also resize the logo with the slider buttons, but you may need to shift it a little bit, as making the image larger tends to move it around.

The next way you can dial your image in is to use filters. There are only a handful, but they can make a big difference in the way your image looks. You can find them to the right of the preview image with the rest of the settings.

Click on the down arrow beside the current filter that’s selected to see all choices. You can choose from.

  • None
  • Light Contrast
  • Heavy Contrast
  • Light Blur
  • Heavy Blur
  • Grayscale
  • Blur Grayscale
  • Blue Tint
  • Red Tint
  • Green Tint

I chose the blue tint option and I like the contrast of the blue with the yellow letters. Don’t be afraid to play around with the options until you like what you see.

You can also reposition the photo. This is found at the top of the image preview or canvas area. Click on “Reposition” to bring up the tool and drag the photo around, or zoom in or out until you are satisfied. Press “Done” to save the changes.


Sharing to Social Media

The last thing to do is export it for the different social media platforms. This is where I feel Pablo really shines. With just a couple of clicks you can instantly resize your photo and export the perfect size for the main social media platforms. I have Instagram selected as my first option.

When I click on Twitter and Facebook as an option, you can see my text is slightly running into the logo on the bottom right. I just need to do a few quick tweaks, either by moving the words or logo slightly or making them smaller to make it all fit. Depending on your setup, you may need to do more.

Just remember that when you start moving things around, it will save it. So get the elements where you want them then click the “Share & Download” button on the right. Pablo gives you several options to either share directly to social media platforms, import the image into the Buffer site, or download for later.

I’ve been using Pablo and other tools for a while to create quick shareable social media images. Over the years, I’ve learned some design tips to help make these types of images perform better.


Tips to Make Your Images Look Better

  • Use light words over a darker background, or vice versa.
  • Use the blur tool to bring your words into greater focus. Be careful with this, though… you can blur your image so much that it’s unrecognizable.
  • Choose a readable font. Yes, readable. Readable is always preferable over “cute”. Afterall, you want your users to actually read the text right?
  • Use your company logo on images to Brand them. You never know where your images will end up, as people share them across the internet.


What You Can Use This For

  • Instagram posts. Instagram is for pictures, after all. 😉
  • To flesh out your weekly content.
  • To promote a promotion, sale, blog post, etc.


Now get out there and create some easy to share images that will delight your followers and get you more engagement!


How to Handle Your Brand Message During a Crisis

I’ve seen a lot of emails come across my inbox about how different companies are handling their business and serving customers during the Covid-19 outbreak. Some of these emails read like they were all copied and pasted from one source. Yet, there are those that stand out. Some of the better emails have made me laugh, while others have reassured me. I’m sure you’ve seen some of the same emails. The question is, does your company need to send an email to your customers and if so, what should it say.

In light of what’s going on, I think it’s a good idea to talk about this in the context of how to handle your brand message during a crisis. 

In the old days, social media consultants and marketing managers would devise “crisis plans” that would help companies handle their brand messaging when something bad happened. I’ve created several of these in my time. Usually, they consist of checklists full of “things to remember to do” instructions on things to say and who should handle the messaging (including replies to comments or questions). In some ways I think those are still helpful, but this crisis is like nothing we’ve ever seen before. A checklist just isn’t going to cut it.

So, the first question… Should you say something? Yes, I think you should, and not just because everyone else is doing it. You should do it for two reasons. 

Reason #1: Tell Your Customers What to Expect

The first is so your customers will know what to expect from you. A great example of this is the email I got from my bank saying that they would be open and serving customers through drive thru and online services. The last thing we need to worry about right now is money. Since banks are considered an essential business, it’s only fitting that they would be open in some way. I was reassured when they sent that email. 

Possibly the most helpful email I got, though, was from the library. A library is not an essential business. The bookworm part of me, just staunchly disagreed with that statement, but it’s true. We don’t need the library to live. So, their email said that they would be closed until further notice, but the most impressive part was the list of links for free online resources they provide. I didn’t even know that half of these existed. It’s not all ebooks, either. There are free courses, free language learning sites, and even an app where you can stream free movies with your library card. They didn’t have to give me that giant list of free resources. They could have stopped with the announcement that they weren’t going to be open. Instead, they decided to provide value to a customer base who probably also didn’t know about half the free online options.

So, send your email and let your customers know what to expect during this unstable time. Maybe your email will need to say that you are shutting down for a while, and that’s okay. As businesses we all have to deal with this in different ways. The important thing is to let your customers know how you are dealing with it. They’ll understand.

Reason #2: You Can Help

The second reason to send an email is because, as a business, we are in a position where we can reach many people at the push of a button. That gives us an opportunity to help

Most of our companies can’t do anything valuable to help stop the spread of the virus, except for maybe not traveling between physical locations. Most of our companies also can’t help treat those who have already contacted it.

But we can help our customers feel safer. We can help them feel more reassured that we will get through this. I know as individuals, we won’t all get through this. But as a people, as a community, and as citizens of this world, we will come out the other side. We don’t yet know what that other side will look like, but we will get there. There is hope, and that’s the message we should be spreading right now.

How to Handle Your Brand Message

If you’re still worried about what to say and how to say it, you can do worse than these three guidelines below.

Be Authentic 

You know who you are as a company, so don’t let your message sound like someone else. You have a voice and a circumstance that is unique to your brand. Acknowledge it and use it.

Speak from the Heart

There has never been a better time to take off the corporate mask, and show the personality behind your brand. We are all in this together, as people. Let your customers see that you are human, too. 

Be Helpful

It’s okay to still sell, but just know that not everyone is going to be able to buy your product or services. The more important thing is to be helpful. What are some things that you already offer that are for free? If you don’t offer anything for free, does someone else have a free resource that you could pass along?

Hopefully, that helps you answer the question of what you should do during this unsure time.

Continually Grow Your Email List With This System

The Problem: A Stagnant Email List

Building an email list (and nurturing that list) is by far one of the best things you can do for your business. After a while, though, you’ll notice that people on your list will naturally become less responsive.

This is totally normal.

People get bored, distracted, or sometimes they just don’t want to hear from you anymore. Don’t take it personally. It happens to everyone. Some of these people will unsubscribe and some won’t. This is what we call “churn”, and it is just something you have to deal with when you build an email list.

Without managing this churn your email list will become stagnant and basically useless. There are two things you can do about this: manage those people who aren’t opening or interacting with your emails anymore and adding new people to your list.

Managing your reluctant unsubscribers is not in the scope of this post. Though, it’s a great idea for a later post. Instead, we’re going to look at solution number two: adding new people to your email list. Specifically, we’ll be focusing on how to put your email list growth on autopilot. what steps you can take to make sure people always have the opportunity to join your email list, and not just when you run a promotion or offer a free eBook.

Grow Your Email List Continually, Even When You’re Not Promoting It

Most email list growth tactics involved a giveaway or a contest of some sort. Those work great for giving your email list growth a huge boost. Those tactics only work for a short amount of time, though. You need a system that will give you a steady stream of people who want to join your email list even when you’re not promoting a free eBook. Enter the Automated Email Opt-In System.


The Automated Email Opt-In System

It takes three main steps to build your automated email sign-up system. Each of these steps can take a little while to implement, but once they’re set up, you’ll have a fully functioning system for continual email list growth.

  1. Add Email Signup to site & blog posts
  2. SEO
  3. Promote

Step 1: Setting Up the Email Opt-In

Most people have an email signup form somewhere on their site. Usually, it’s just in one place, like a pop up or as a welcome mat that shows up when a person first visits the website. There are many other places you can add a form to your website that will help put your email list building on autopilot. One of the best places is at the bottom of all your blog posts.

If you have WordPress, and don’t already have a plugin to add your email opt-in at the bottom of every blog post, I would suggest using Hustle from WPMU Dev. There’s a free version from on the WordPress plugins directory that you can use if you don’t want to pay for their pro version. It supports a lot of different email programs out of the box, including:

  • AWeber
  • ActiveCampaign
  • Campaignmonitor
  • MailChimp
  • ConstantContact
  • ConvertKit
  • GetResponse
  • Hubspot
  • Sendy
  • Mad Mimi
  • Mautic
  • Infusionsoft
  • SendinBlue

It’s also got a pretty simple wizard for building your popup. Below is a quick tutorial on how to use it.

Setting Up an Email Opt-In to Continually Grow Your List With Hustle

To get started find the “Hustle” menu item in your WordPress Dashboard and click it.

Below is a screenshot of what the first page looks like.

Since we’re going to be creating an opt-in to an email list, click “Create” beside the Opt-Ins option. There is a lot more you can use this plugin for, but for now let’s focus on getting that awesome email opt-in going.

The first bit of information you need to fill out is to give it a name. Only you will see this, so don’t worry about what you name it. Just make sure you can recognize it. Then decide whether you want to run the opt-in in test mode. This is probably a good idea if you don’t know what to expect. If your email provider isn’t in the list (see list above) then click to save your emails to a local list. Once people start signing up, you can set a reminder on your calendar to check this once a week, and export them out to upload them to your email provider. If your email provider is on the list, then don’t worry. Your emails will be added directly to your list once you set it up.

The screenshot below shows a partial list of the email providers that Hustle integrates with. It actually integrates with quite a few. The full list is near the beginning of this section.

In the next section you’ll connect to your email service. Each email service will ask for different information, and I can’t cover them all. When in doubt check the help files of your email service provider to find out where to get the information to connect. Once it’s connected, you’ll be able to choose which email list or form you want a new subscriber to be added to.

Designing Your Opt-In

The next section is where you’ll start designing the way your opt-in looks. There are two schools of thought on this: to make the colors mimic your design and to make the colors stand out from your design. I would try to stick close to your website’s overall design, but don’t be afraid to deviate a little bit in order to get a potential subscriber to notice your opt-in. The next seven screenshots show the formatting options available through the Hustle plugin.

Step 1:

Step 2:

Step 3:

Step 4:

Step 5:

Step 6:

Step 7:

Step 8:

Previewing Your Opt-In

When you are ready, click on the eyeball icon to preview your opt-in. The next three screenshots shows the different display options for your email signup: Slide-In, After Content, and Pop Up. Since we’re talking about an opt-in that’s different from a normal pop-up or welcome mat, I would stick with either the slide-in or after content options. These options work really well when you add them to every blog post, because they’ll seem more like a natural extension of a blog post rather than an advertisement.

Choose one display option to work on and use the formatting options in the previous section to make sure that your opt-in looks the way you want it to. You may need to do go back and forth multiple times between the formatting options and the preview before you are satisfied with the way it looks.

Slide In Preview:

After Content Preview:

Pop-Up Preview:


Turning On Your Email Opt-In

When you are ready to finish setting it up, Click the “Next Step” button at the end of the formatting options. Now you are ready to display the opt-in somewhere on your website. To get the most out of these tips, I would suggest turning on the “Enable after content opt-in” or “Enable slide-in opt-in” methods. If you know what you are doing, you can also use the shortcode to embed the form anywhere on your website.

Test, Test, Test

The last thing to do is to test it out and make sure that it works like you want it to. When I set mine up, I discovered that the color of some of the text was a dark color against a dark background, so it was virtually unreadable. It took just a moment to tweak it with css, but it’s always a good idea to test things out and make sure they are working right.

If you don’t want to mess with setting this up yourself, drop me a line. I’ve set up lots of email opt-ins for client’s websites and my rates are very reasonable.

Why Does this Work?

Usually when people see a popup if they don’t want to sign up for your email list, they will just dismiss it and forget about it. Even if the popup comes up again on another page, they may still dismiss it. As effective as pop ups are, they can become a tad annoying after a while. So, the form at the bottom of your blog post gives them another opportunity to join your email list, and it comes after you’ve already provided value to them through a tutorial, lesson, or however your blog post helped them. Once you help someone they are more inclined to listen to you again. Hitting them with an email signup at this point is a great way to capitalize on those feelings of goodwill.


Step 2: SEO the Shit Out of that Content

Now that you’ve gotten your form added to the bottom of all your blog posts. The next step is to get more people to read your blog posts. There are two ways you can do this: work on your search engine optimization (SEO), and promote your content. First, let’s talk about SEO. Search engine optimization is simply making sure your content is formatted so that Google will index and rank it for the keywords you think people will use to find your content.

The easiest way to do this on WordPress is to install and use the Yoast SEO plugin to optimize each blog post.

Choose Your Focus Keyword

Once the plugin is installed, navigate to a post you want to optimize for search engines and edit it. Once in the editing screen, scroll down until you see a section similar to the screenshot below. In the focus keyword box type in your focus keyword phrase. By focusing on one phrase, instead of many for a blog post, you can make sure that your keyword use is more effective.

If you’re having trouble figuring out what your keyword should be, think about what problem your post is trying to solve or what subject it’s talking about. Try to put yourself into the mind of your reader and think about how they would search. Then test out those keywords by searching Google yourself. By clicking on the different posts, you should be able to see how other websites have optimized their posts and get ideas for alternative keyword phrases. You may have to do quite a bit of research before you figure out a good keyword phrase to go for.

NOTE: Notice that Yoast allows multiple keywords, but each keyword has its own optimization box? That’s by design. When you optimize your post for one keyword at a time you will get more bang for your buck out of that keyword.

Optimizing Your Blog Post

Now that you have chosen a focus keyword phrase, the real work begins. To begin, review the snippets (what Google shows to searchers) to make sure your keyword phrase appears in your title, your url, and the excerpt. You can see where the snippet preview appears in the screenshot above. When you’re ready to change it, click the “Edit snippet” button.

The screenshot below shows where the SEO title, slug (url or address to post), and meta description are in the snippet. Edit the boxes to make sure your keyword phrase appears in each one. Make sure, however, that the keyword phrase sounds natural, and not forced. When you’re done click “Close snippet editor”.

Your SEO Checklist for Success

The screenshot below shows a convenient checklist that Yoast provides to help you optimize your blog post. Use it to identify areas to improve on your blog post. Improving these areas will help improve your ranking.


Why Does this Work to Continually Grow Your Email List?

When you optimize your post for SEO you’re helping Google and other search engines understand what type of content you’re delivering. This leads to more people seeing and (hopefully) clicking on your posts in search. Even though this is a small part of the automated email opt-in system, it’s important, because it’s building traffic to your email opt-in. Click to Tweet this.

Step 3: Promote, Promote, Promote

The next step after you SEO your blog posts is to start promoting them. This is why having social media accounts is important.

Did you know that you can promote your old blog posts over and over again and not just right after you publish?

In fact, if you setup your blog post promotion on a recurring schedule, you’ll increase the views on those blog posts and your website in general a lot more than if you didn’t.

For scheduling posts to social media over and over again, I prefer to use Buffer. I know that some people also use Meet Edgar, but I haven’t tried it out yet. Below is a tutorial on how promote your blog posts on a recurring schedule using Buffer.

First, Sign Up for Buffer

If you don’t already have buffer, I would suggest signing up for it. If you are really just trying it out, they have a free plan which allows you to hook up 1 social media account/platform: 1 Facebook Page or account, 1 Twitter account, 1 LinkedIn account, etc. It only allows you to schedule 10 posts per social account at a time, but that should be enough for you to test it out.

I’ve used Buffer for years to auto-schedule my social media posts. Buffer is a type of “social media scheduling tool” which you can use like others by “scheduling” your posts for a specific date and time or you can add your posts to your “queue”. The “queue” is basically a set of times your social media posts will go out. It could be only 1 time per day, or multiple. Buffer helps you not only plan out your social media posts and share them ahead of time, but also helps you share your posts at more “optimal” times.

Once you’ve signed up, you’ll want to hook up some social media accounts so you can auto-schedule some posts.

Add the Buffer Button to Your Browser

The next thing to do is add the Buffer button to your browser. This will allow you to start setting up your blog post promotion schedule with just one click.

Setting Up Your Blog Post Promotion Schedule With the “Power” Scheduler

The power scheduler is the best way to share that blog post to your social media accounts over and over again, so you can get the most of your new automated email opt-in system.

Launch Buffer

First, go to the post you want to share. Then click the Buffer button in your browser. It looks like the button in the screenshot below.

The buffer window will popup showing all of the accounts you can share to, along with some pre-set text for your post. This will only allow you to share your post once, though. We want to automate sharing the post over and over again. To do that, click on “Power Scheduler” in the top left.

Power Scheduling to Continually Grow Your Email List

A new window will open with the Power Scheduler in it. Your window will look similar to mine (with your own blog post and social media accounts, of course). There are several options, but once you know what they are, they are pretty easy to understand.

Across the top of the grid with pluses are your social media accounts. Click on any of them to remove that account, so you don’t share to it.

Pro Tip! Instagram is a pretty terrible place to share links to old blog posts, because the links aren’t clickable. If you’re going to post your blog post to Instagram, make sure it is the latest one and that you only use the top slot to schedule to Instagram. Then make sure there’s a link in your Instagram bio that goes to your blog (sometimes called an archive page). Instead of sharing the link in your Instagram post, just put “link in bio”.

On the left is the “schedule” for your posts. You can change any of the numbers, except for the top, “Next Available”. The “Next Available” slot will schedule it in your buffer for the next available slot in your queue. IYou don’t have to use this slot, if you don’t want to. Just don’t click on any of the “+” symbols in that row. You can also add more time slots. I usually leave the times for the 2nd and 3rd slot the same: 2 days and 7 days. After that, I add 14 days, then 30 days, and so on. That way my post gets shared over and over again, driving traffic back to my blog, which means more pop-ups and more chances for people to opt-in to my list.  

Once you have your times, figured out, start clicking on those “+” symbols to begin crafting your messages. Here’s is where it gets a little tedious. You will need to craft a message for each account, and for each time slot. However, Buffer makes this simpler by copying the last message used. So, if you want to share the same message across multiple social media accounts you can. The only social media account it will not copy for is Facebook. That’s because Facebook wants you to post something unique to their platform, and they ask their 3rd Party providers to uphold this.

Try to mix up the type of message that you share. Use different words, ask questions instead of making statements, use an image, etc. There are many, many options for the types of posts that you can craft. The point here is to get people interested enough to click. Avoid using “click-bait” tactics, and try to think about what interests your customer or potential customer. Knowing your audience is at least half the battle here.

Pro Tip! I know this part is tedious, but don’t share the same message for your blog post week after week. Not only is it against some social media platforms terms of service (see Twitter’s Rules), but it can also get boring and repetitive for your followers. Instead, change up what you say, or even the type of post. Also, be careful sharing the same message across different social media accounts. Especially for Twitter. You do have more characters now, 280 to be exact, but you can still go over if you’re using the same words you would post to Facebook, LinkedIn or Google+. When in doubt, try to keep your post short and sweet. It’ll be faster for your followers to read, and will entice them to click faster.

Why Does this Work?

By promoting your blog posts on social media on a recurring schedule, you’ll ensure that your audience is getting multiple chances to see them. Also, being more consistent with your social media posts can grow your audience on those platforms. This also works for any page on your website and not just blog posts. So, start thinking about pages you can promote.

Continually Grow Your Email List

To be clear this isn’t a tactic for building your email list really fast, but a way to make sure that your email list is always growing. Click to Tweet this. It’s slower than giving away a free ebook in exchange for an email sign up, but no less sure. In fact, I would hazard to say that it is more effective in the long run. After a while, a promotion like a free ebook will be less effective because most of your audience has already seen it. If you’re promoting your existing and new content your audience has more opportunities to sign up. Even if you’re not producing new content, implementing these steps will set your email list growth on autopilot.

You Can Now Schedule Posts to Instagram, Automatically

A couple of weeks ago Instagram announced that they were updating their API to allow businesses to schedule posts to their Instagram accounts. It’s about time they implemented something This feature has been requested for a long time.

Wait, You Couldn’t Schedule Posts to Instagram Automatically Before?!

No, you couldn’t schedule posts to Instagram before. There were many tools that would allow you to “schedule” the posts on a calendar provided by the tool. Then they would send you a “reminder” at the scheduled time to post to your account. It was an ingenious way to get around the fact that Instagram would not allow scheduling. It was good enough at the time. Thankfully, there’s now a way to schedule posts automatically without that extra step!

Limitations

There are some limitations to this great feature:

  • Auto-posting is only available for business profiles (not personal)
  • Auto-posting can only be done through a 3rd party software (apps like Hootsuite)
  • No auto-posting for videos
  • No auto-posting for image carousels (multiple photos in one post)
  • You can’t set a location tag on the scheduled post
  • You can’t tag users on your photos

What About Personal Accounts?

Sorry, this isn’t available for personal accounts, yet. If you do find a 3rd party service that allows you to do this, be forewarned that this is strictly against Instagram’s Terms of Service and can get your account banned if you use it.

There is a rumor that personal accounts will likely get the same functionality in 2019. That’s pretty typical of Facebook (Instagram’s owner) who regularly rolls out updates to one type of account before they release it to another. So, stay tuned for the ability to auto-post to your personal Instagram account in the future.

How Does This Help You?

So, now let’s get down to brass tacks. How does this help you?

If you have a business account, you can now save time by scheduling out photos for the entire week. You can also schedule posts at a time which is likely to get your posts better engagement.


Here’s a great post from Ad Espresso on the best times to post to Instagram.

Image Source: Simply Measured

Just keep in mind that timing isn’t everything. You still need to have great content that reflects who you are and what you do. Also, don’t forget to take advantage of features like hashtags, location tagging, tagging other people, and stories. Also, your optimal time to post may be completely different than the recommended time.

Which Tools Allow You to Schedule Posts to Instagram?

Below is a list of apps which have already implemented this feature. I’m sure there will be many more to come.

Will you use auto-scheduling to save yourself time?

The Most Useful Posts of 2017

In years past, I’ve put together a round-up of the best posts. These round-ups have been great to introduce new readers to old posts that are popular, and also to existing readers that may have missed something.  These are posts that got the most traffic, but also were found useful by people based on feedback. I hope you find them useful, too.

#1: How to Always Be Effective at Social Media

This may seem like one of those posts that “promises the moon” if you’ll only “do these certain steps”. I hope it didn’t come off that way. My goal in writing this post, was to show how easy it can be to be more effective at social media if you remember and practice some basics. None of this stuff is rocket science, and it’s not meant to be. In fact, you can probably find the same advice in many blogs, on many sites across the internet. Maybe it’s not all packaged together or packaged all in the same way, but the point is that nothing here is new. That’s actually a good thing, though. Sometimes we get so caught up as marketers and business owners in “trying out the next big thing” that we forget to implement the basics. While the next big thing can certainly boost results, it only lasts for a little while, or at least until the next big thing after that comes around. It’s the basics, though, that keep us going when all else fails. Check out this post to see what I’m talking about.

#2: Which Platforms Work Best for Facebook Contest Marketing

This last year I wrote multiple posts centered around Facebook Contests. I’ve been redoing my Online Course and have come across several little tidbits that I wanted to share for free. This is just one of them!

Did you know that the platform you choose for marketing your Facebook Contest can make a significant difference in how many entries you get? It’s true. In fact one of the smartest things you can do for your contest is to plan out where you’re going to market beforehand.

This blog post helps you do just that with a downloadable worksheet that you can use to narrow down your most beneficial marketing platforms.

#3: 3 Reasons Your Business Needs a Facebook Contest

This post also covers Facebook Contests, but focuses more on the benefits. If you’re on the fence or have run an unsuccessful contest in the past, this post is for you.

Hidden among the benefits are some tips on how to get the most out of your contest. Check it out.

3 Reasons Your Business Needs a Facebook Contest

A Facebook Contest is one of those things that a business is either interested in or they’re not. I think the reason why some are not interested, is because it’s not easy to see the benefits that a contest can produce for your business. There’s actually quite a few, but I’m going to cover just three reasons your business needs a Facebook Contest in this article.

#1: Build Your Email List

The first way a Facebook contest can help your business is to build your email list. During a contest, you naturally want to collect some information in order to contact people when they win. One of the easiest bits of information to collect is an email address. In this way, it is easy to collect email address from entrants. The only thing you need to worry about is the “CAN-SPAM Act” which makes it illegal for any business to email a user without their prior consent. It’s easy to make sure you’re in compliance, though. On your contest page form, just add a checkbox that asks the entrant if they want to opt-in to your email list. You can, of course, change the wording of this to make it a little more appealing. One of the best phrases I’ve found (for those businesses that apply) is “Yes! I would like to receive deals and specials from [insert company name].”

Case Study: Harter House Meats Facebook Contest

A couple of years ago, I ran a contest for Harter House Meats, a well-known grocery store in Springfield, MO who are known for their quality steaks. They wanted to run a contest that would boost their email list. I knew from doing previous contests that the best way to get more emails was to ask for the email, and as little other information as possible. Below is a screenshot from the actual contest page that was built showing that we only asked for the name, email address, and whether they wanted to “opt-in” to receive specials.

Create a Custom Contest Page for your Facebook Contest

NOTE: It’s very important to ask whether an entrant wants to receive marketing emails from you, so that you don’t violate the “CAN-SPAM Act”. This law makes it illegal for any business to email a user without their prior consent.

Components of Contest

  • Custom-designed Facebook contest page
  • Only asked for necessary Information
  • Pre-checked the “opt-in” email checkbox
  • $50 Facebook ads budget
  • Promotional emails sent to existing list (about 50)
  • Promotional Emails continued weekly throughout the contest to remind people to enter or invite their friends
  • Facebook posts posted throughout the contest enticing users to enter (some of these were boosted with Facebook ads)
  • Signs posted in-store to tell customers about the contest with a QR Code that took them directly to the page.
  • Flyers with the same information as above, which cashiers handed out.

Results

Beginning Emails: 50

Ending Emails: 712

Email Growth Rate: 1324% (in just 30 days)

Opt-in rate (entrants to contest): 92%.

Opt-in Rate (entrants vs. actual email opt-ins): 83%

Facebook Like Growth: 786 Total Likes

I’ve managed other contests with similar results, but this is my favorite because of the results they received when they were first starting out!

#2: Increase engagement

Contests are exciting! That’s why people share them. And exciting on social media, leads to more shares, more comments, and, ultimately, more followers (sometimes more than you could possibly imagine). In fact, people will naturally share your contest because it is so exciting.

Ways to Increase Engagement On Your Contest

  • Post to your Facebook Page about the contest.
  • Ask people if they like the contest/item you’re giving away.
  • Ask people to tag their friends who might like the contest.
  • Boost posts with Facebook ads. You can do this for as little as $5 per post.
  • Run your contest during a holiday period, and “theme” it for the holiday.
  • Choose an exciting prize.

NOTE: As part of Facebook’s Promotion Rules you can’t ask someone to tag their friend as a condition to enter your contest, or like your page. Check out the full official Facebook Promotion Guidelines.

#3: Increase Awareness

Another way that contests can help you build your business is to increase awareness. As I said before, a contest is naturally exciting. This phenomenon leads users to share your contest with their own friends and connections. People who would normally never be exposed to your business are suddenly seeing your content and getting exposed to your business. This could result in more Likes for your Facebook Page, more entrants to your contest, and even more customers.

It’s hard to measure the impact of awareness. There are a couple of metrics that you can use to see if your awareness seems to be going up. The first is post “Reach”, which looks like the screenshot below when you access it in your Facebook Insights.

Reach only tells you the number of times that your post showed up on a person’s newsfeed, regardless of whether it was clicked on or not. In other words, it doesn’t tell you whether someone actually viewed your post, if they scrolled past it, or if they clicked on it. However, if you see your Reach numbers go up, then you are definitely getting more eyeballs on your content.

The next metrics that you want to keep an eye on are the engagement metrics (likes, comments, and shares). These will tell you if your post is really resonating with your audience. These numbers will always be smaller than reach. Again, though, you want to look for these numbers trending up or at least staying steady. See the screenshot below for what it will look like in your Facebook Insights.

A contest should naturally raise both these numbers. Just be aware that once your contest is over these numbers will likely drop dramatically. However, if you gained followers from your contest, they should be up from what they were before the contest.

Want to learn more about running a successful Facebook Contest?

I’ve created a course to teach you how to build a Facebook contest which will build your email list fast. You can use the techniques I teach to run other types of contests. I focus on one type of contest to get you started, and, also, to give you confidence to run more contests once you see that the system works. Check out my contest course, by clicking on the button below.

Learn More

Why Building an Audience is so Hard

Why Building an Audience is So Hard

Building an Audience

You’re slaving away at your craft and someone comes along and says, “Hey, you should build an audience. That’s the best way to sell online these days.” So you check out how to build an audience and you find many, many posts on how to create content, blog, share on social media, start an email list, etc. Maybe you even try out a few or a lot of the different tactics and strategies you’ve read about. Eventually you realize this “building an audience” thing is a lot harder than that first conversation led you to believe.

Why is Building an Audience Hard?

We (me included) tend to think of our audience as a subset of who our actual audience is: the people who engage with us already or who have already signed up to receive updates via email, social media, etc. However, an audience is actually much bigger than that. It’s also the people who have seen your ad once, but haven’t clicked on it, or that person who liked your Facebook Page, but who always scrolls past your updates. They are also the people who buy from you, or those that have joined your mission in some way.

So, building an audience is tricky, because we’re talking about communicating with people who may or may not want to hear from you at any given moment.

We’ve become an increasingly busy and distracted society. So, even those people who have said they want to hear from you may not be available to receive your message when you send it.

Another reason building an audience is hard, is because it takes a lot of little steps before people actually start engaging with and (hopefully) start buying from you. Unfortunately you can’t just say “I’m going to build an audience” and bam! There they are. Though, that would nice, right?

These little steps may include someone in your audience:

  • Noticing you
  • Coming back for a second glance, or third glance, or… well you get the picture
  • Becoming interested enough to listen to you
  • Starting to engage with you
  • Continue to engage with you
  • Eventually buy from you or become involved in your mission

The real key here is that all these steps can take a long time. Even just getting from the first time someone notices you to the point where they are interested may take a while.  Sometimes these steps happen all at once. I have been known to make impulse buy decisions from people I just found on the internet because I liked what they were saying and I thought they could help me. Sometimes I’m right and sometimes I’m wrong. I know other people have gone through similar experiences.

Is there a Quick Fix?

I’d like there to be. It would be nice if we could hit the easy button and poof our audience into existence. More likely than not, though, there is going to be a lot of hard work and trial and error involved in building your audience.

Is There Anything You Can Do?

Absolutely, there is something you can do! After all, the key to running a profitable business online is finding your audience. You just need to have areas to focus on while you’re trying to figure this out.

Step 1: Build Awareness/Traffic/Interest

The first step is to start putting your content or yourself out there so that people can see you. That’s done a lot of different ways. For instance, you can:

  • Promote and host a webinar
  • Post to your social media accounts
  • Run a contest
  • Advertise
  • Post to your blog (consistently)
  • Optimize your site for search engines
  • Write a book
  • Write a free downloable ebook
  • Host a podcast
  • Appear on a podcast
  • Promote your existing content

There’s actually a lot more that you can do gain awareness, build traffic, etc. I don’t want you to be overwhelmed by this list. Just remember that the main way to build awareness of your products or services is to put content out there and promote it. Pick one or two things from this list to focus on and keep doing them until you start to see results.

Step 2: Build Engagement

The next step is to take that awareness of traffic and turn it into engagement. How do you do that? Simply invite your audience to talk with you.

Inviting your audience to talk with you

While your posting to your social media accounts, why not ask a question once a week or host a Facebook live video where you talk about a topic you know about? Or on your blog, add a way that people can comment. If you’re concerned about spam comments (and who isn’t) you can always use a service like Disqus which helps protect against bad comments and also has an audience building feature.

The idea here is to not assume that people are going to talk to you. Sure, some might, but the majority of your audience is likely to read what you have to say and then go on to something else. So, ask them for their feedback, or to give their own two cents. Then, don’t forget to follow up. Rinse and repeat as necessary.

Step 3: Sales

The whole point of building an audience online is to get them to do business with you or join your cause. To make that jump though, your audience has to trust and like you. The great thing about doing the steps in order, though, is that trust and like between you and your audience will be naturally built.

Think of it like a conversation at a cocktail party. You start off by introducing yourself and then telling someone what you do and who you are. If they’re interested, they might ask you more. Then you have a chance to explain more. This can go back and forth for a while. Eventually, though, you’re going to have to ask for the sale. However, that doesn’t asking for the sale in a “salesy” way. It can be as simple as saying that you are available to answer questions about a problem someone is having or even answering those on the spot.

You don’t have to give your whole business process away, just try to be as helpful as possible and make sure they understand that you sell services and products that can help them further.

What this looks like online is adding links to blog posts that point to a sales pages or a page where they can download something for free that puts them into your email list. It’s also using Facebook ads or other online advertising that gets people to your sales page or contact form to take the next step.

The same things you can do to build awareness and traffic can also aid you in building sales. Just remember to shift your language so that your audience understands you want them to purchase something. Try to avoid sounding “salesy”, though. Show you can help first, then point them in the direction of how you can help them more. Those who want to do business with you, will naturally take the next step.

Bringing it All Together

The process of building an audience naturally happens in steps, but that doesn’t mean that you should work on step one exclusively. In fact, you’ll get more out of the process if you mix something from step two or even step three into your step one tasks. Just be aware that it may take a while before your audience moves from step one to step two or three. Bringing it all together just means making it easier for them to take the next step.

Your Thoughts?

Now it’s your turn. Have you had success in building an audience? How did you do it? What worked for you? What didn’t? Are you struggling in this area? Let me know. We’re all in this together and we all learn from each other.

Which Platforms Work Best for Facebook Contest Marketing?

So you want to run a Facebook Contest… That’s great! Facebook Contests are one of the best ways to build engagement on your Facebook Page and grow your email list. One of the toughest things about running a Facebook Contest, though, is knowing where, when, and how to market it.

I’ve been building, managing, and consulting on Facebook Contests since 2009. At first, I didn’t know the answer to these questions either. It took a lot of trial and error, but eventually I learned a system for maximizing my contest results every single time. In fact, I created a worksheet that will help you figure out which marketing platforms will work best for you.

Download the Free Facebook Contest Marketing Worksheet

How do I Know Where to Market my Facebook Contest?

It starts with listing out all of your current marketing platforms or opportunities. This list may be long, but don’t worry. We’re going to pare it down together.

Below is a screenshot from the first page of the worksheet where I listed all my marketing platforms. It’s important to make sure that you include everything in this list. You don’t want to miss out on a marketing opportunity you may have overlooked.

[feature_box style=”31″ title=”Note” alignment=”center”]Marketing platforms refer to the places and ways you can market. For instance “print advertising” is not a place, but it is a way that you can promote your contest. So, think about all the ways or places where you could market your contest and add them to your worksheet.

[/feature_box]

Which Marketing Platforms are the Best for You?

The last step on the first page of this document is to figure out which marketing platforms will work the best for you. This will mostly depend on audience size, but there are a few other factors to consider here.

Be a Ninja!

I remember reading something years ago about editing. The advice was this: when you edit a story  or a blog post, you must take on the mindset of a ninja and slash anything that doesn’t belong. The same is true in this case. Cross out any platforms you don’t think will work to market this contest. Here’s a few examples of things you might cross out:

[feature_box style=”31″ title=”Note” alignment=”center”]The list below shows a lot of marketing platforms I didn’t include on my list. That’s because I don’t usually use these forms of advertisement. You, however might. These are really just “hypothetical” platforms you might initially include and then cross off of your own list.

[/feature_box]

  • TV
  • Radio
  • Print Advertising
  • Banner ads on other websites
  • Instagram
  • Tumblr
  • Employee Message Board

The first three you might cross out because they will take too long to get ready or they are too expensive.

Banner ads on websites might not be practical, because their audience may not be interested in what you’re giving away.

I included Instagram because you can’t share clickable links directly with an image. This makes it hard to get people  from Instagram to your Facebook Contest, which is the point.

Tumblr is one of those social media platforms that tend to have unique audiences. If you maintain a Tumblr and your audience regularly engages with content that is similar to what you’re giving away in your contest, then it’s okay to keep on the list. Otherwise, chop it.

I included employee message board as a place that you might post information about your contest because I’ve actually used this before. However, it is not appropriate for all types of contest, or even for every prize you giveaway. Unless you’re sure that your employees will want to help you promote it, I wouldn’t even bother with this one.

Here’s what I crossed out on my list:

Superstars!

The next step is to identify your superstars, or those marketing platforms which you think will help you the most in your promotion.

[feature_box style=”31″ title=”Note” alignment=”center”]I say “think” or “might” a lot for two reasons.

  1. I don’t know your audience.
  2. All marketing is an experiment until you know something works.

[/feature_box]

In the screenshot below, I’ve marked which platforms I want to use to promote my contest with a star. I’m going to walk through why I decided to mark each of these with a star so you understand why I chose them. You may choose your own platforms for different reasons.

The Obvious

  • Facebook Page
  • Facebook Personal Account

I marked my Facebook Page and personal account with stars because we are talking about promoting a Facebook Contest. I wouldn’t want to miss out on the obvious places to market them.

Biggest/Best Audiences

  • Website
  • Twitter
  • Email List
  • Linked In

Other Platforms Which I Think Will Work

  • Instagram (I regularly share social media stuff on that channel and I know how to utilize the link in the bio to get people to my contest page).
  • Friends (I have a few friends who might be interested in helping me promote it)

Do the same on your worksheet.

Want to Know More?

Figuring out which marketing platforms will work best for your contest is just the tip the iceberg to running a successful Facebook Contest. There’s also:

  • Planning out your contest details
  • Deciding what type of contest to run
  • Writing your contest rules
  • Building your contest page
  • Working out the details of your marketing
  • How to build your marketing calendar
  • Choosing the right prize
  • What to do when something goes wrong
  • And so much more!

I cover all of these topics in my course: Build Email Lists Fast with Facebook Contests. It’s a course designed for those who are just getting their feet wet, or who want to get more out of their next Facebook Contest. The course specifically focuses on the “Giveaway” contest type, which is the easiest to manage and the most effective type for building an email list. However, almost everything in the course can be applied to other types of contests including photo submission contests.

If you want to know more, here’s a link to the course detail page. It is currently only $23, since I’m in the middle of a major overhaul, though. The price will go soon, so hurry and get the course at the lower price! If you download this worksheet, you are in my email list and will get a notice when the new course material has been loaded.

Get the Course at the Discounted Price

Don’t Miss the free Facebook Contest Marketing Sheet (download it below)

Download the Free Facebook Contest Marketing Worksheet