The Problem: A Stagnant Email List
Building an email list (and nurturing that list) is by far one of the best things you can do for your business. After a while, though, you’ll notice that people on your list will naturally become less responsive.
This is totally normal.
People get bored, distracted, or sometimes they just don’t want to hear from you anymore. Don’t take it personally. It happens to everyone. Some of these people will unsubscribe and some won’t. This is what we call “churn”, and it is just something you have to deal with when you build an email list.
Without managing this churn your email list will become stagnant and basically useless. There are two things you can do about this: manage those people who aren’t opening or interacting with your emails anymore and adding new people to your list.
Managing your reluctant unsubscribers is not in the scope of this post. Though, it’s a great idea for a later post. Instead, we’re going to look at solution number two: adding new people to your email list. Specifically, we’ll be focusing on how to put your email list growth on autopilot. what steps you can take to make sure people always have the opportunity to join your email list, and not just when you run a promotion or offer a free eBook.
Grow Your Email List Continually, Even When You’re Not Promoting It
Most email list growth tactics involved a giveaway or a contest of some sort. Those work great for giving your email list growth a huge boost. Those tactics only work for a short amount of time, though. You need a system that will give you a steady stream of people who want to join your email list even when you’re not promoting a free eBook. Enter the Automated Email Opt-In System.
The Automated Email Opt-In System
It takes three main steps to build your automated email sign-up system. Each of these steps can take a little while to implement, but once they’re set up, you’ll have a fully functioning system for continual email list growth.
- Add Email Signup to site & blog posts
- SEO
- Promote
Step 1: Setting Up the Email Opt-In
Most people have an email signup form somewhere on their site. Usually, it’s just in one place, like a pop up or as a welcome mat that shows up when a person first visits the website. There are many other places you can add a form to your website that will help put your email list building on autopilot. One of the best places is at the bottom of all your blog posts.
If you have WordPress, and don’t already have a plugin to add your email opt-in at the bottom of every blog post, I would suggest using Hustle from WPMU Dev. There’s a free version from on the WordPress plugins directory that you can use if you don’t want to pay for their pro version. It supports a lot of different email programs out of the box, including:
- AWeber
- ActiveCampaign
- Campaignmonitor
- MailChimp
- ConstantContact
- ConvertKit
- GetResponse
- Hubspot
- Sendy
- Mad Mimi
- Mautic
- Infusionsoft
- SendinBlue
It’s also got a pretty simple wizard for building your popup. Below is a quick tutorial on how to use it.
Setting Up an Email Opt-In to Continually Grow Your List With Hustle
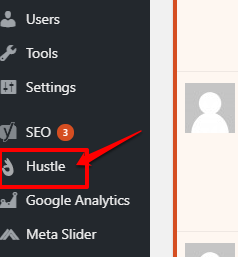
To get started find the “Hustle” menu item in your WordPress Dashboard and click it.
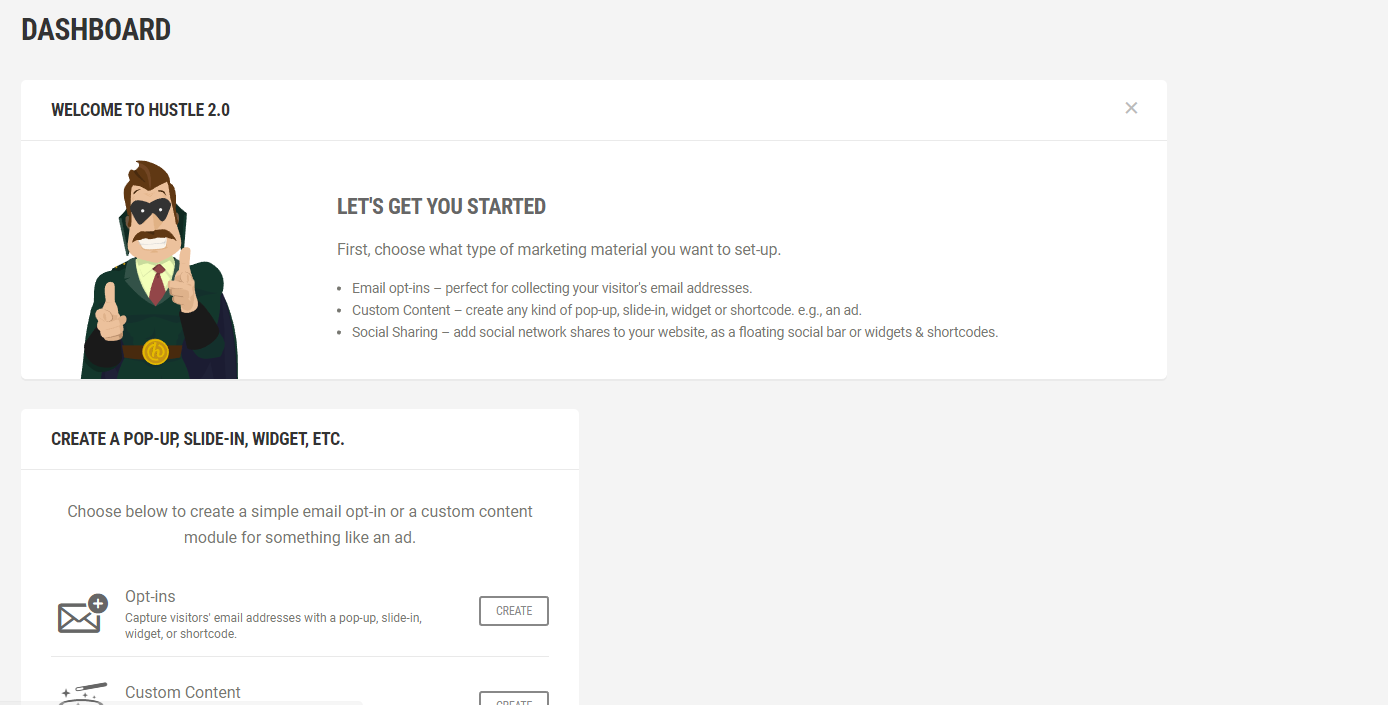
Below is a screenshot of what the first page looks like.
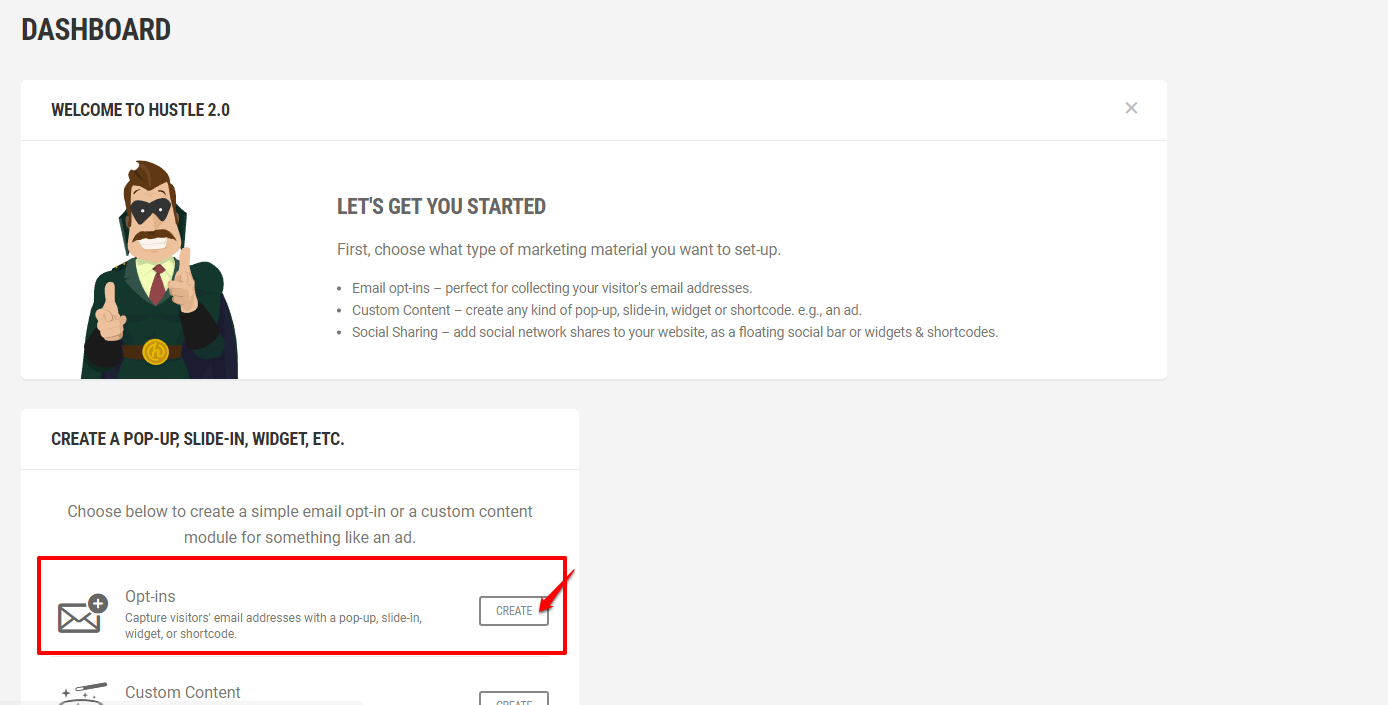
Since we’re going to be creating an opt-in to an email list, click “Create” beside the Opt-Ins option. There is a lot more you can use this plugin for, but for now let’s focus on getting that awesome email opt-in going.
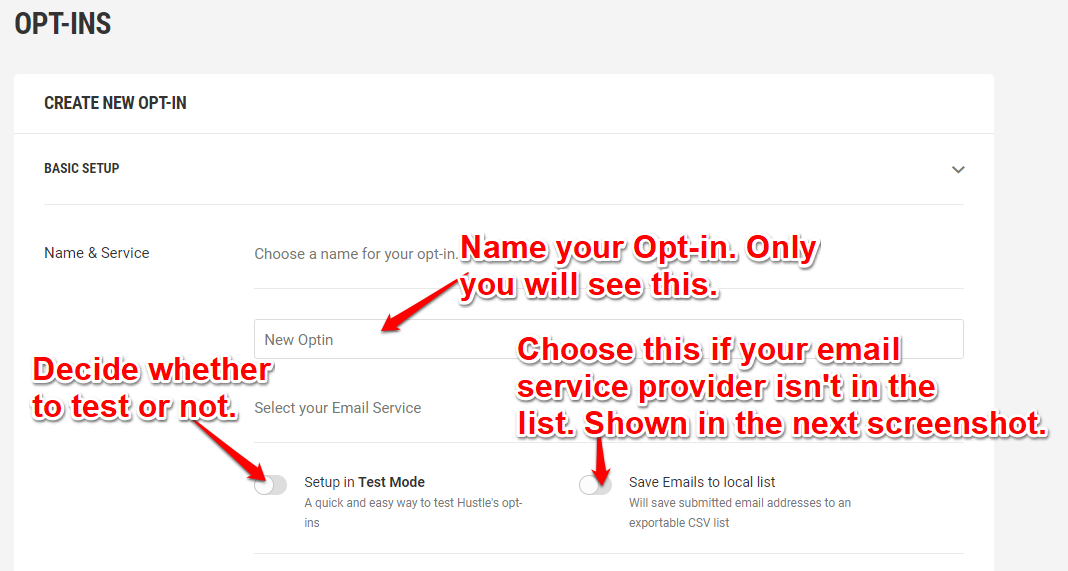
The first bit of information you need to fill out is to give it a name. Only you will see this, so don’t worry about what you name it. Just make sure you can recognize it. Then decide whether you want to run the opt-in in test mode. This is probably a good idea if you don’t know what to expect. If your email provider isn’t in the list (see list above) then click to save your emails to a local list. Once people start signing up, you can set a reminder on your calendar to check this once a week, and export them out to upload them to your email provider. If your email provider is on the list, then don’t worry. Your emails will be added directly to your list once you set it up.
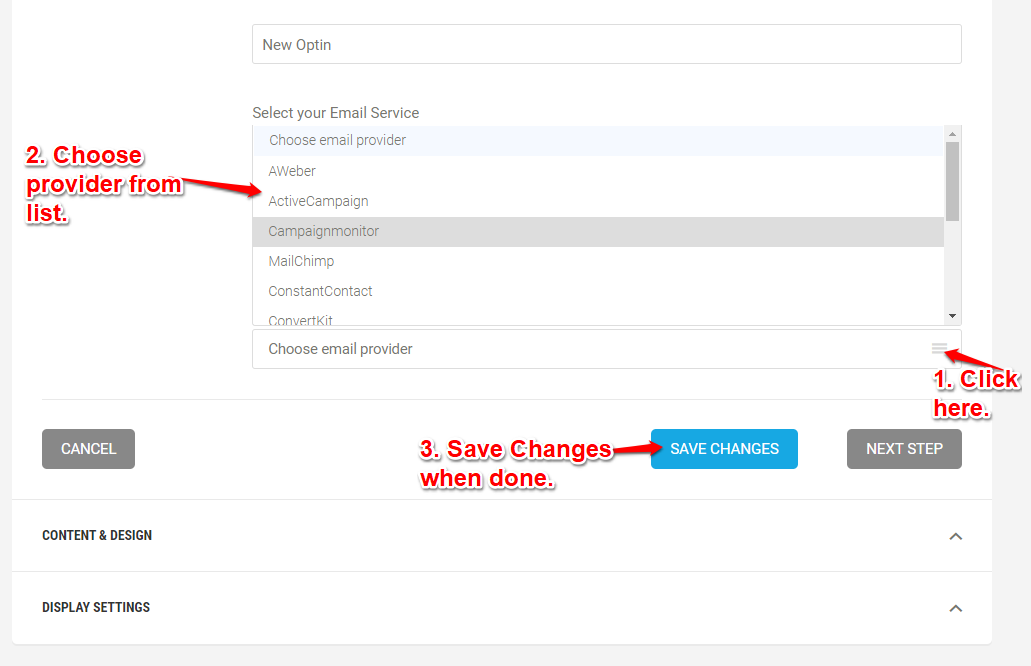
The screenshot below shows a partial list of the email providers that Hustle integrates with. It actually integrates with quite a few. The full list is near the beginning of this section.
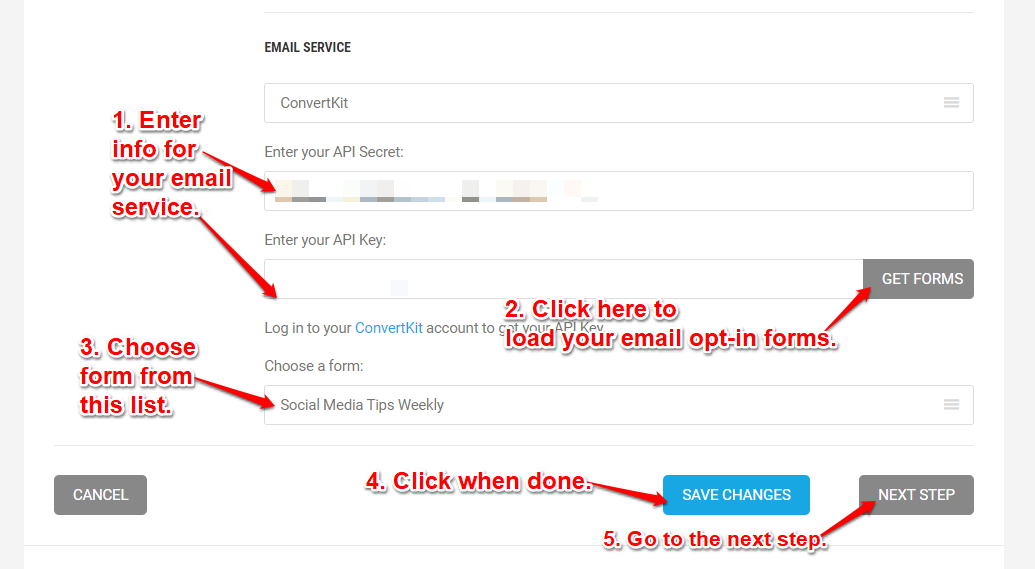
In the next section you’ll connect to your email service. Each email service will ask for different information, and I can’t cover them all. When in doubt check the help files of your email service provider to find out where to get the information to connect. Once it’s connected, you’ll be able to choose which email list or form you want a new subscriber to be added to.
Designing Your Opt-In
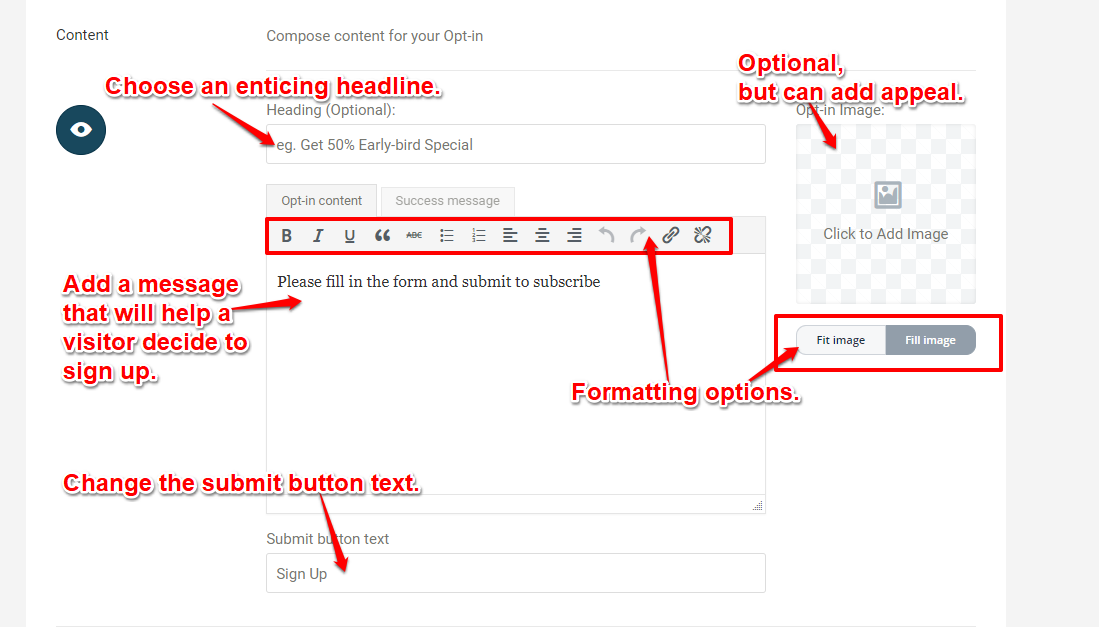
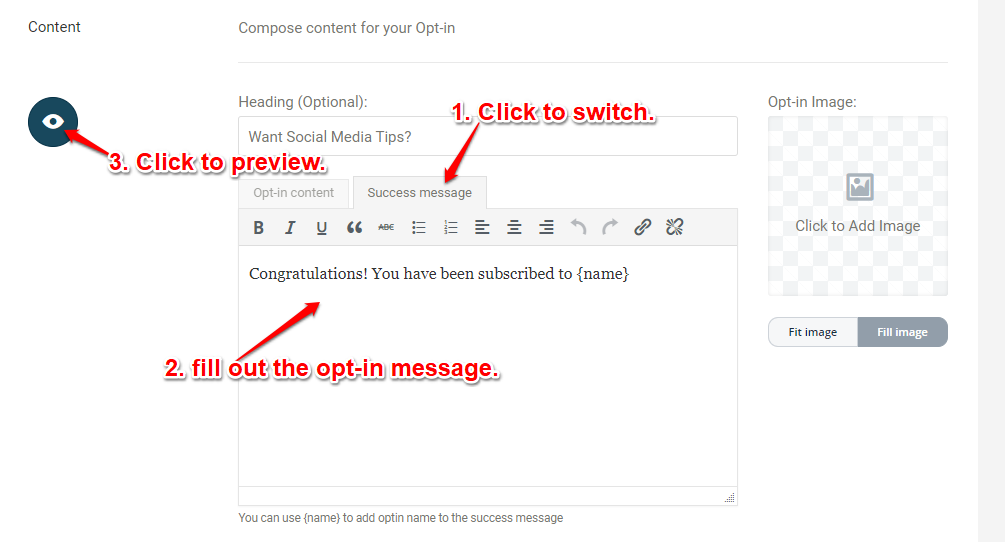
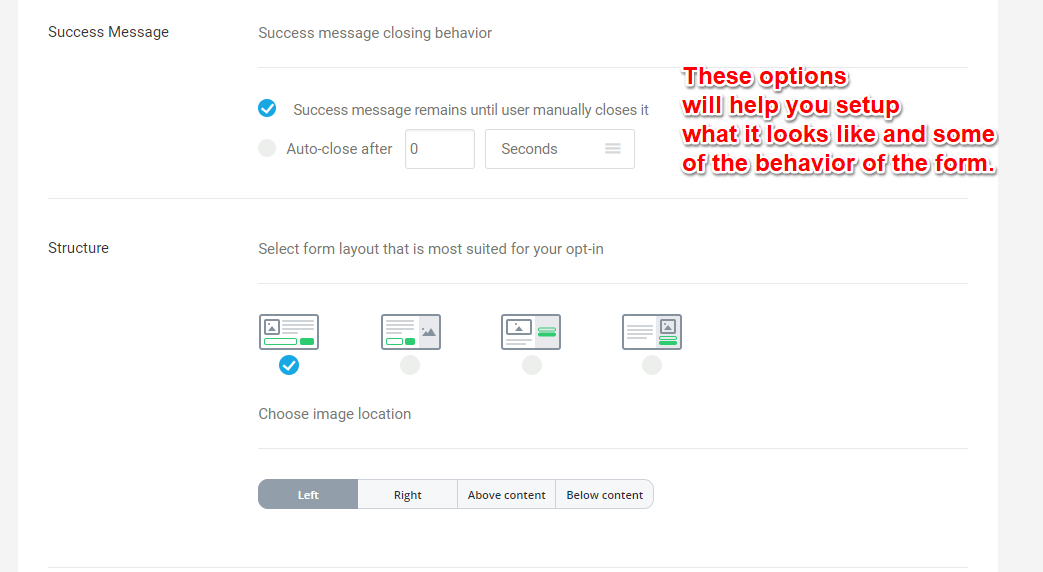
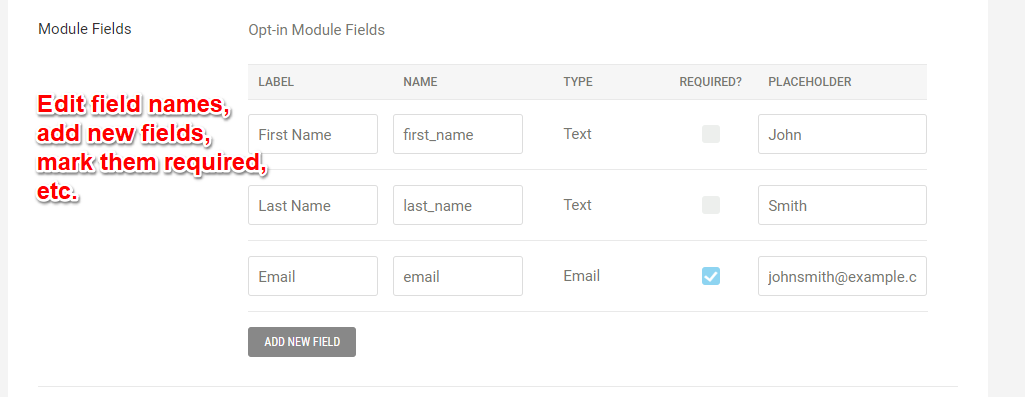
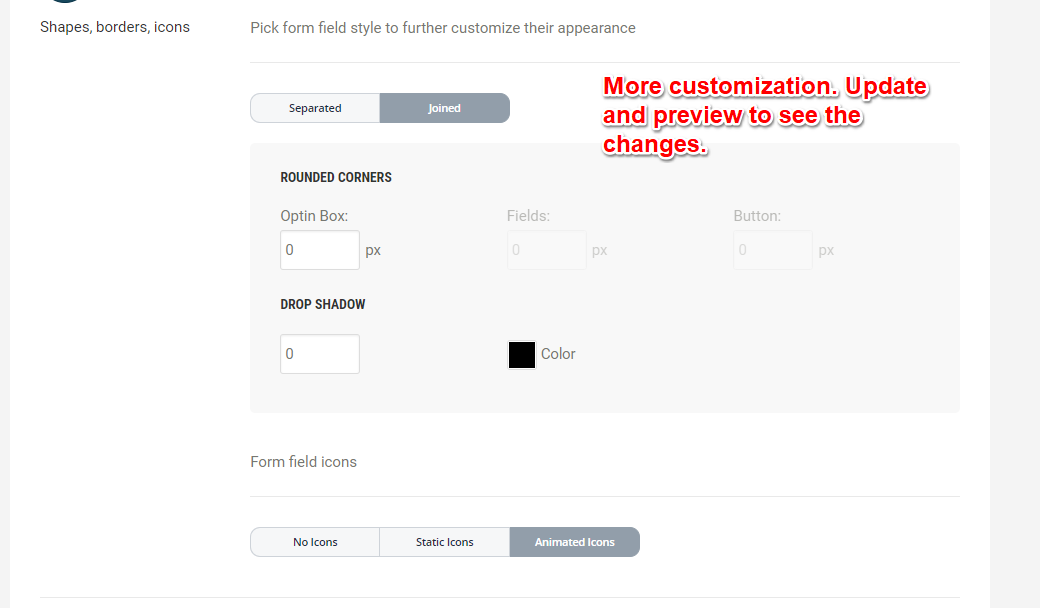
The next section is where you’ll start designing the way your opt-in looks. There are two schools of thought on this: to make the colors mimic your design and to make the colors stand out from your design. I would try to stick close to your website’s overall design, but don’t be afraid to deviate a little bit in order to get a potential subscriber to notice your opt-in. The next seven screenshots show the formatting options available through the Hustle plugin.
Step 1:
Step 2:
Step 3:
Step 4:
Step 5:
Step 6:
Step 7:
Step 8:
Previewing Your Opt-In
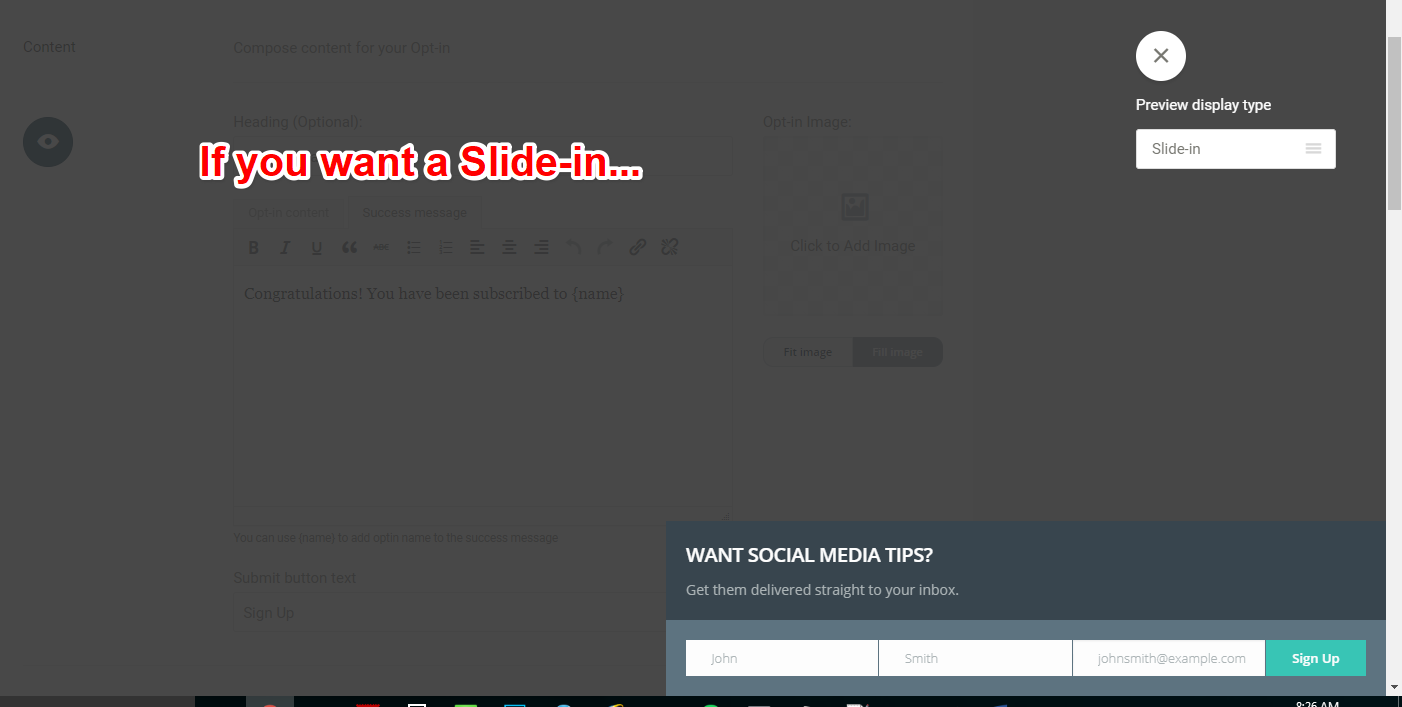
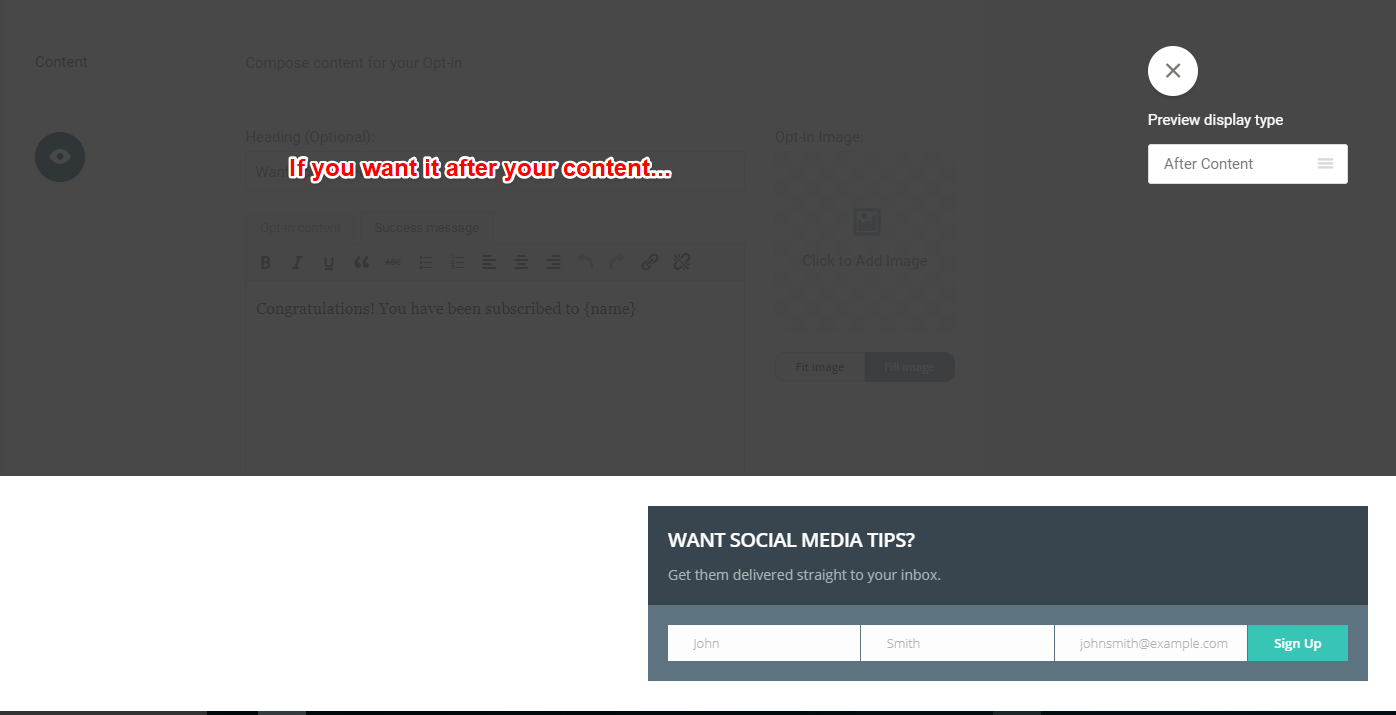
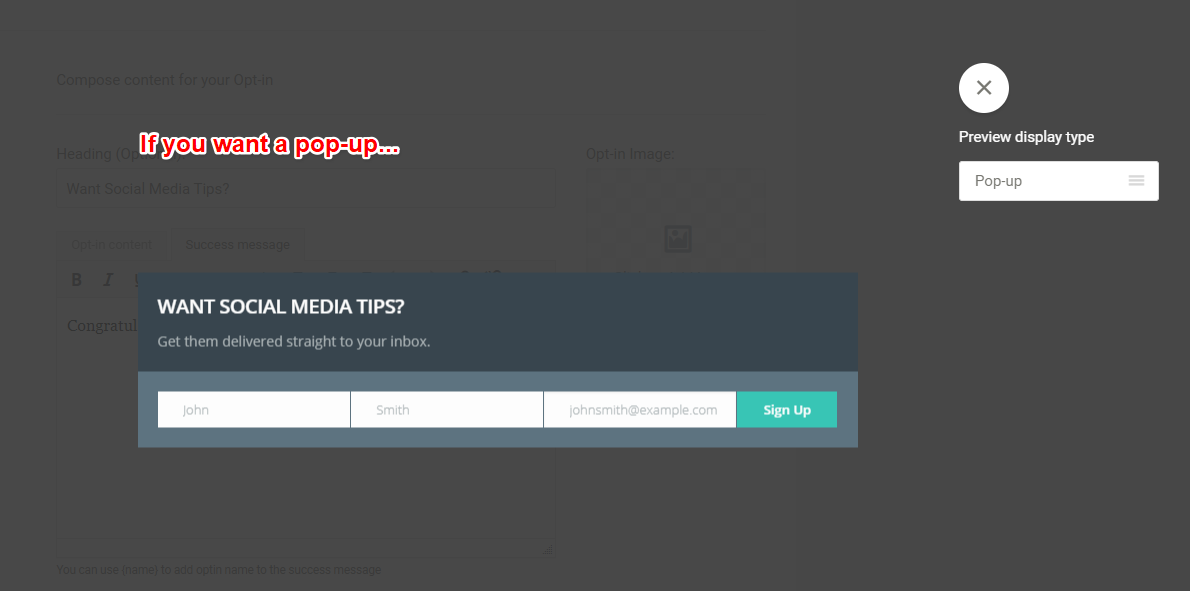
When you are ready, click on the eyeball icon to preview your opt-in. The next three screenshots shows the different display options for your email signup: Slide-In, After Content, and Pop Up. Since we’re talking about an opt-in that’s different from a normal pop-up or welcome mat, I would stick with either the slide-in or after content options. These options work really well when you add them to every blog post, because they’ll seem more like a natural extension of a blog post rather than an advertisement.
Choose one display option to work on and use the formatting options in the previous section to make sure that your opt-in looks the way you want it to. You may need to do go back and forth multiple times between the formatting options and the preview before you are satisfied with the way it looks.
Slide In Preview:
After Content Preview:
Pop-Up Preview:
Turning On Your Email Opt-In
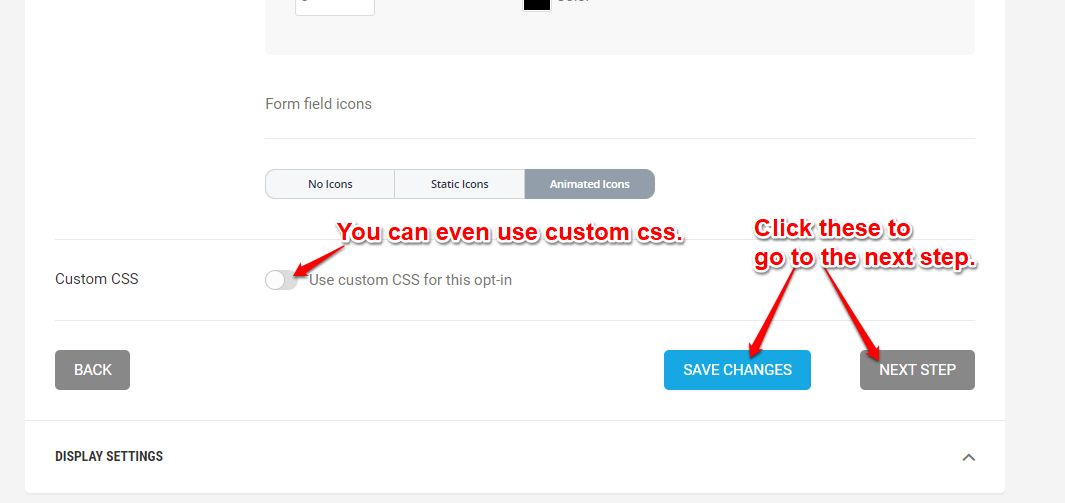
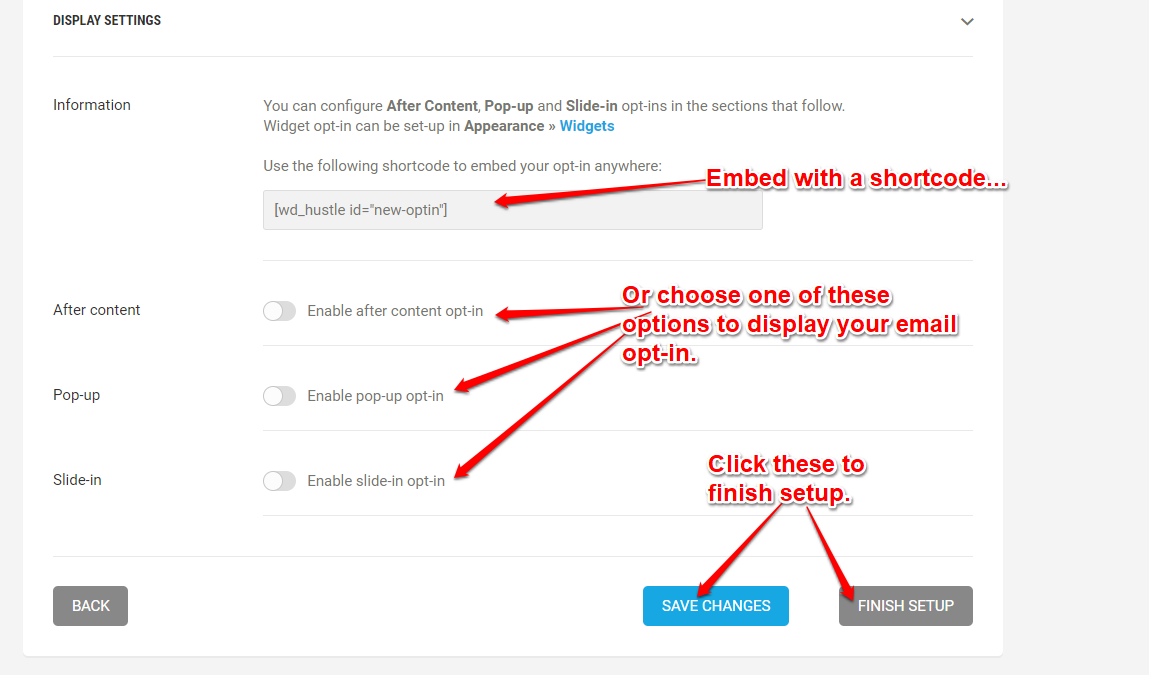
When you are ready to finish setting it up, Click the “Next Step” button at the end of the formatting options. Now you are ready to display the opt-in somewhere on your website. To get the most out of these tips, I would suggest turning on the “Enable after content opt-in” or “Enable slide-in opt-in” methods. If you know what you are doing, you can also use the shortcode to embed the form anywhere on your website.
Test, Test, Test
The last thing to do is to test it out and make sure that it works like you want it to. When I set mine up, I discovered that the color of some of the text was a dark color against a dark background, so it was virtually unreadable. It took just a moment to tweak it with css, but it’s always a good idea to test things out and make sure they are working right.
If you don’t want to mess with setting this up yourself, drop me a line. I’ve set up lots of email opt-ins for client’s websites and my rates are very reasonable.
Why Does this Work?
Usually when people see a popup if they don’t want to sign up for your email list, they will just dismiss it and forget about it. Even if the popup comes up again on another page, they may still dismiss it. As effective as pop ups are, they can become a tad annoying after a while. So, the form at the bottom of your blog post gives them another opportunity to join your email list, and it comes after you’ve already provided value to them through a tutorial, lesson, or however your blog post helped them. Once you help someone they are more inclined to listen to you again. Hitting them with an email signup at this point is a great way to capitalize on those feelings of goodwill.
Step 2: SEO the Shit Out of that Content
Now that you’ve gotten your form added to the bottom of all your blog posts. The next step is to get more people to read your blog posts. There are two ways you can do this: work on your search engine optimization (SEO), and promote your content. First, let’s talk about SEO. Search engine optimization is simply making sure your content is formatted so that Google will index and rank it for the keywords you think people will use to find your content.
The easiest way to do this on WordPress is to install and use the Yoast SEO plugin to optimize each blog post.
Choose Your Focus Keyword
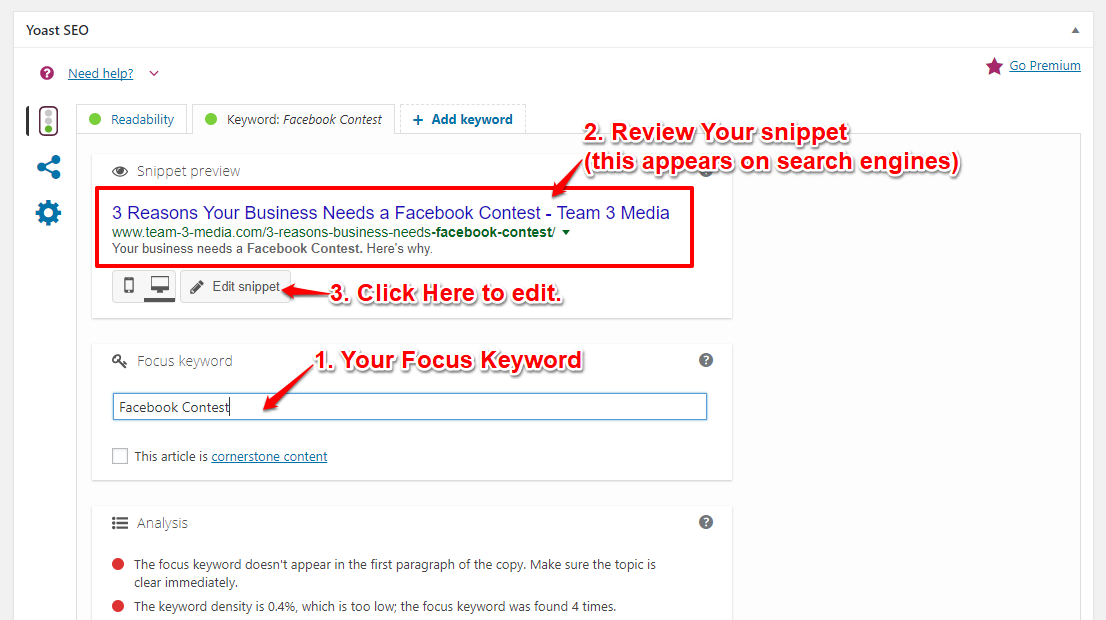
Once the plugin is installed, navigate to a post you want to optimize for search engines and edit it. Once in the editing screen, scroll down until you see a section similar to the screenshot below. In the focus keyword box type in your focus keyword phrase. By focusing on one phrase, instead of many for a blog post, you can make sure that your keyword use is more effective.
If you’re having trouble figuring out what your keyword should be, think about what problem your post is trying to solve or what subject it’s talking about. Try to put yourself into the mind of your reader and think about how they would search. Then test out those keywords by searching Google yourself. By clicking on the different posts, you should be able to see how other websites have optimized their posts and get ideas for alternative keyword phrases. You may have to do quite a bit of research before you figure out a good keyword phrase to go for.
Optimizing Your Blog Post
Now that you have chosen a focus keyword phrase, the real work begins. To begin, review the snippets (what Google shows to searchers) to make sure your keyword phrase appears in your title, your url, and the excerpt. You can see where the snippet preview appears in the screenshot above. When you’re ready to change it, click the “Edit snippet” button.
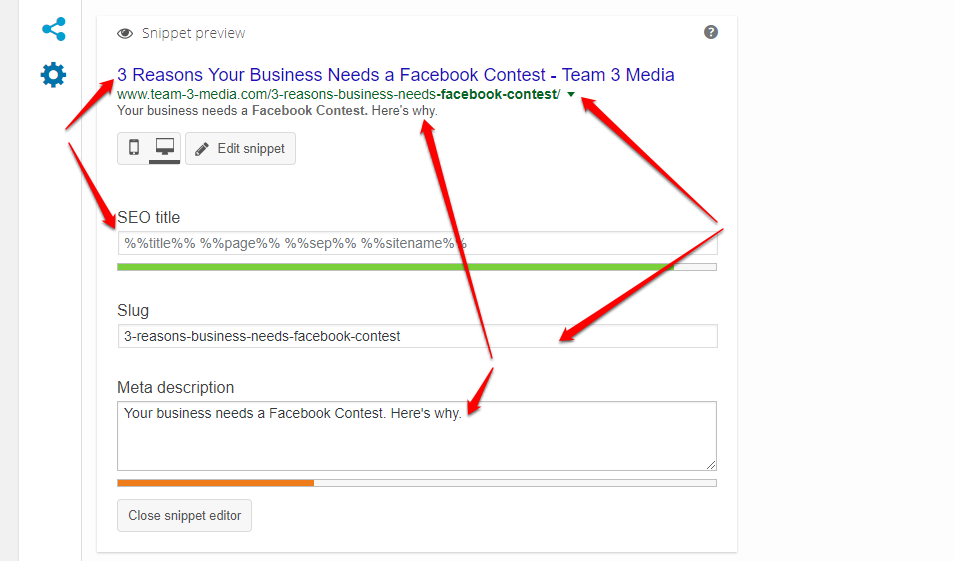
The screenshot below shows where the SEO title, slug (url or address to post), and meta description are in the snippet. Edit the boxes to make sure your keyword phrase appears in each one. Make sure, however, that the keyword phrase sounds natural, and not forced. When you’re done click “Close snippet editor”.
Your SEO Checklist for Success
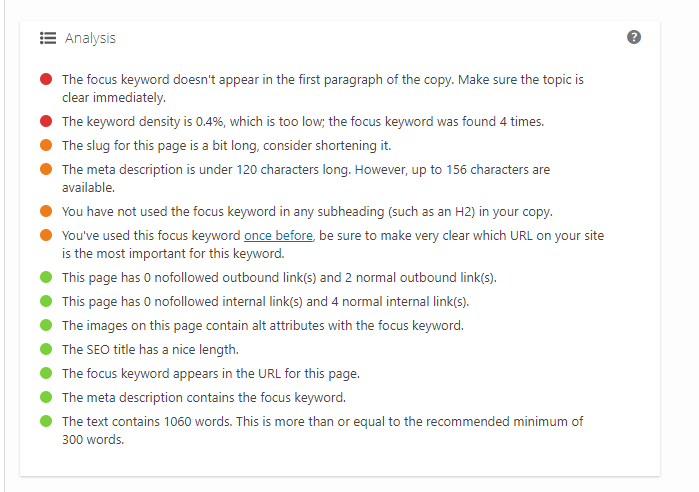
The screenshot below shows a convenient checklist that Yoast provides to help you optimize your blog post. Use it to identify areas to improve on your blog post. Improving these areas will help improve your ranking.
Why Does this Work to Continually Grow Your Email List?
When you optimize your post for SEO you’re helping Google and other search engines understand what type of content you’re delivering. This leads to more people seeing and (hopefully) clicking on your posts in search. Even though this is a small part of the automated email opt-in system, it’s important, because it’s building traffic to your email opt-in. Click to Tweet this.
Step 3: Promote, Promote, Promote
The next step after you SEO your blog posts is to start promoting them. This is why having social media accounts is important.
Did you know that you can promote your old blog posts over and over again and not just right after you publish?
In fact, if you setup your blog post promotion on a recurring schedule, you’ll increase the views on those blog posts and your website in general a lot more than if you didn’t.
For scheduling posts to social media over and over again, I prefer to use Buffer. I know that some people also use Meet Edgar, but I haven’t tried it out yet. Below is a tutorial on how promote your blog posts on a recurring schedule using Buffer.
First, Sign Up for Buffer
If you don’t already have buffer, I would suggest signing up for it. If you are really just trying it out, they have a free plan which allows you to hook up 1 social media account/platform: 1 Facebook Page or account, 1 Twitter account, 1 LinkedIn account, etc. It only allows you to schedule 10 posts per social account at a time, but that should be enough for you to test it out.
I’ve used Buffer for years to auto-schedule my social media posts. Buffer is a type of “social media scheduling tool” which you can use like others by “scheduling” your posts for a specific date and time or you can add your posts to your “queue”. The “queue” is basically a set of times your social media posts will go out. It could be only 1 time per day, or multiple. Buffer helps you not only plan out your social media posts and share them ahead of time, but also helps you share your posts at more “optimal” times.
Once you’ve signed up, you’ll want to hook up some social media accounts so you can auto-schedule some posts.
Add the Buffer Button to Your Browser
The next thing to do is add the Buffer button to your browser. This will allow you to start setting up your blog post promotion schedule with just one click.
Setting Up Your Blog Post Promotion Schedule With the “Power” Scheduler
The power scheduler is the best way to share that blog post to your social media accounts over and over again, so you can get the most of your new automated email opt-in system.
Launch Buffer
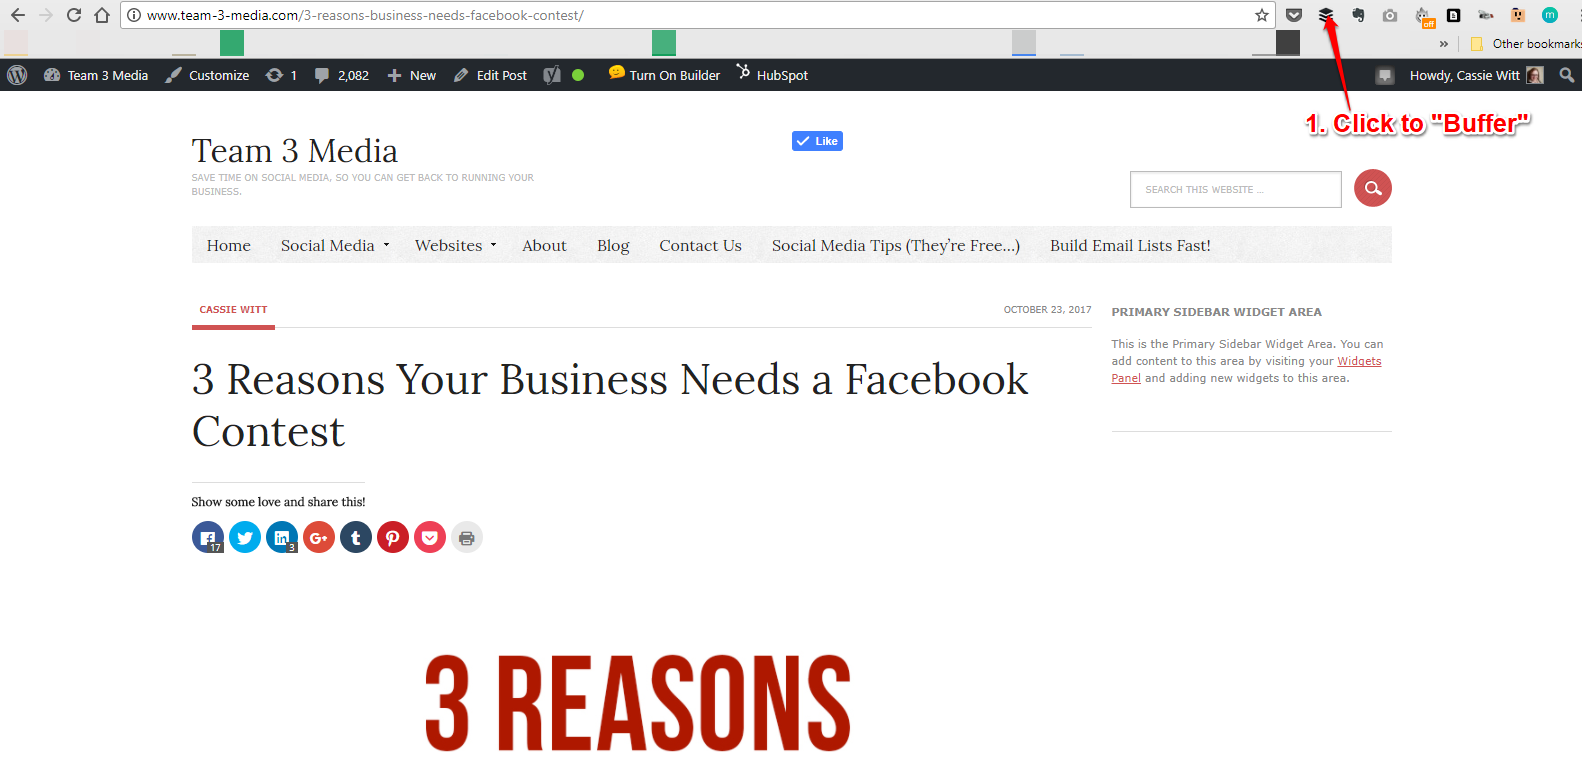
First, go to the post you want to share. Then click the Buffer button in your browser. It looks like the button in the screenshot below.
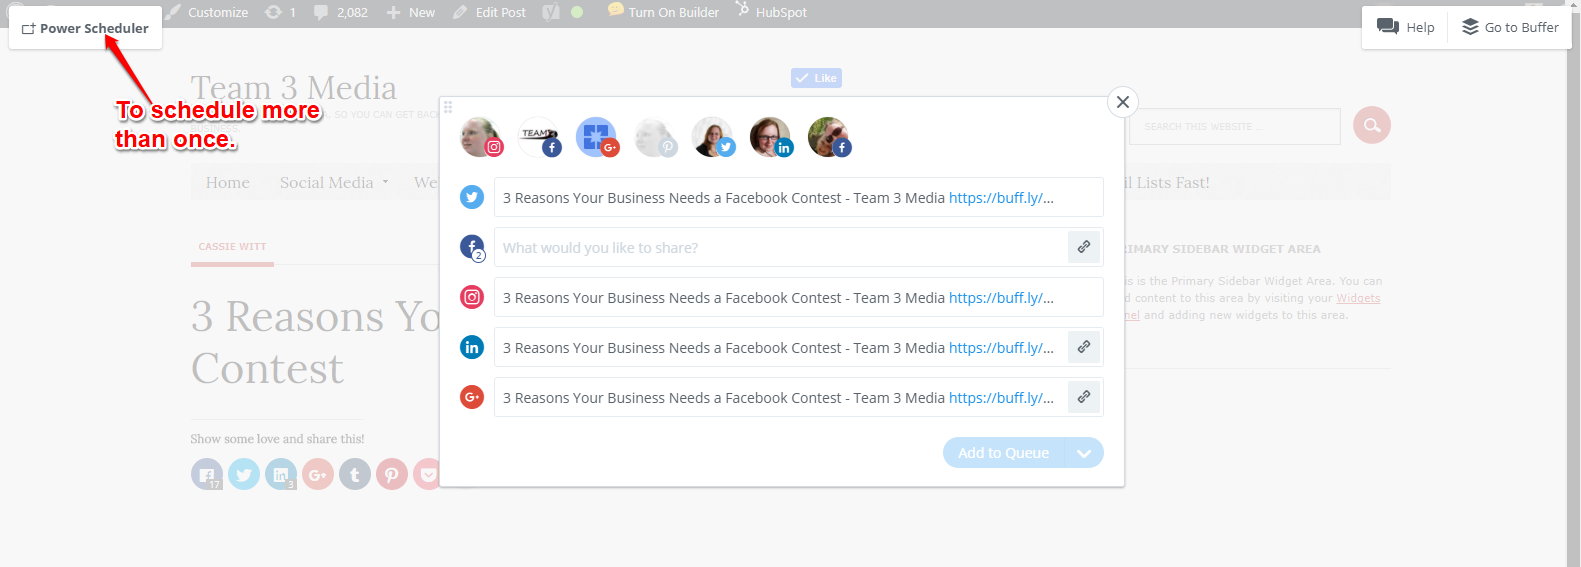
The buffer window will popup showing all of the accounts you can share to, along with some pre-set text for your post. This will only allow you to share your post once, though. We want to automate sharing the post over and over again. To do that, click on “Power Scheduler” in the top left.
Power Scheduling to Continually Grow Your Email List
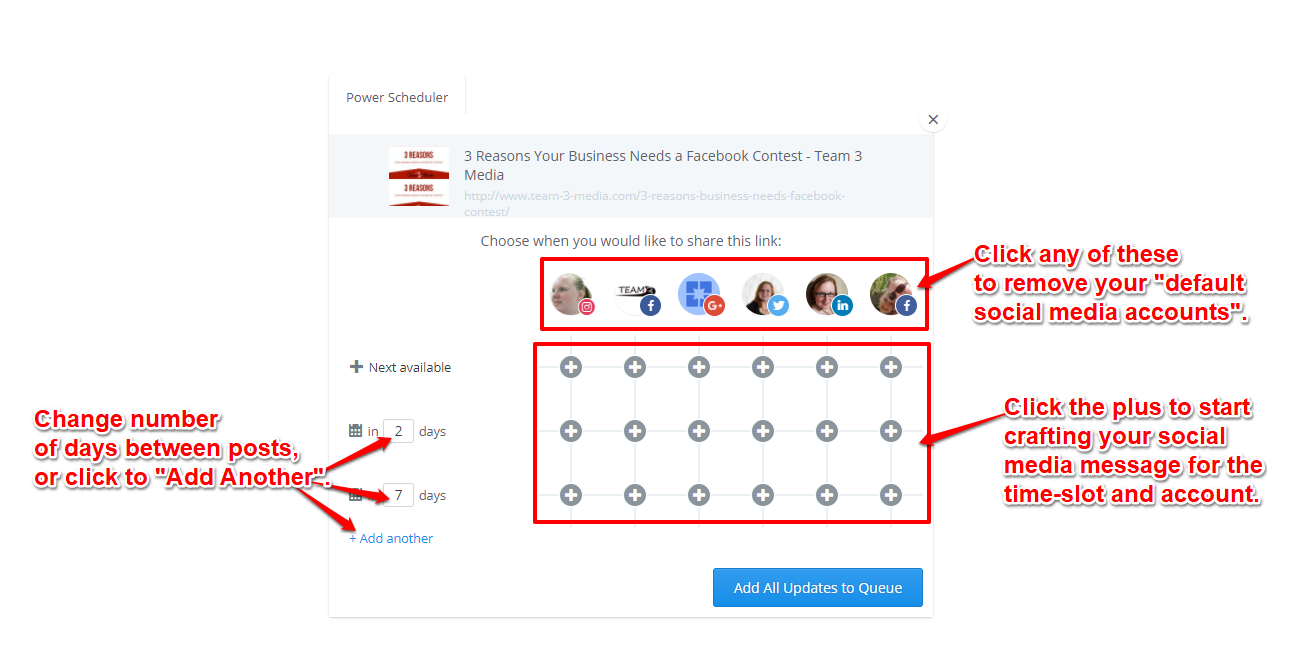
A new window will open with the Power Scheduler in it. Your window will look similar to mine (with your own blog post and social media accounts, of course). There are several options, but once you know what they are, they are pretty easy to understand.
Across the top of the grid with pluses are your social media accounts. Click on any of them to remove that account, so you don’t share to it.
On the left is the “schedule” for your posts. You can change any of the numbers, except for the top, “Next Available”. The “Next Available” slot will schedule it in your buffer for the next available slot in your queue. IYou don’t have to use this slot, if you don’t want to. Just don’t click on any of the “+” symbols in that row. You can also add more time slots. I usually leave the times for the 2nd and 3rd slot the same: 2 days and 7 days. After that, I add 14 days, then 30 days, and so on. That way my post gets shared over and over again, driving traffic back to my blog, which means more pop-ups and more chances for people to opt-in to my list.
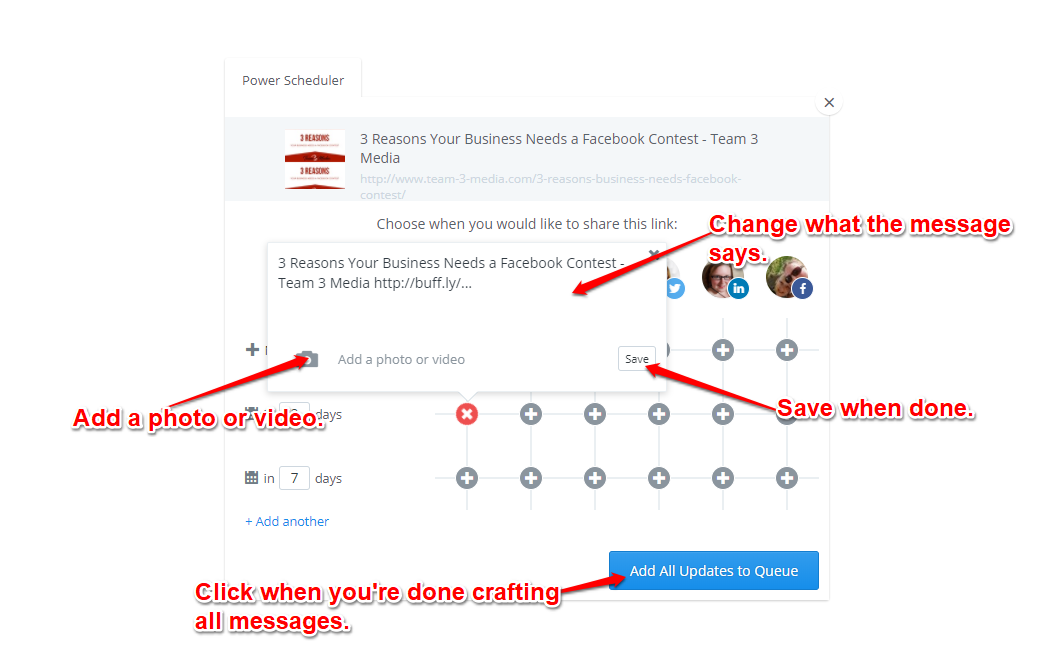
Once you have your times, figured out, start clicking on those “+” symbols to begin crafting your messages. Here’s is where it gets a little tedious. You will need to craft a message for each account, and for each time slot. However, Buffer makes this simpler by copying the last message used. So, if you want to share the same message across multiple social media accounts you can. The only social media account it will not copy for is Facebook. That’s because Facebook wants you to post something unique to their platform, and they ask their 3rd Party providers to uphold this.
Try to mix up the type of message that you share. Use different words, ask questions instead of making statements, use an image, etc. There are many, many options for the types of posts that you can craft. The point here is to get people interested enough to click. Avoid using “click-bait” tactics, and try to think about what interests your customer or potential customer. Knowing your audience is at least half the battle here.
Why Does this Work?
By promoting your blog posts on social media on a recurring schedule, you’ll ensure that your audience is getting multiple chances to see them. Also, being more consistent with your social media posts can grow your audience on those platforms. This also works for any page on your website and not just blog posts. So, start thinking about pages you can promote.
Continually Grow Your Email List
To be clear this isn’t a tactic for building your email list really fast, but a way to make sure that your email list is always growing. Click to Tweet this. It’s slower than giving away a free ebook in exchange for an email sign up, but no less sure. In fact, I would hazard to say that it is more effective in the long run. After a while, a promotion like a free ebook will be less effective because most of your audience has already seen it. If you’re promoting your existing and new content your audience has more opportunities to sign up. Even if you’re not producing new content, implementing these steps will set your email list growth on autopilot.
- Closing My Email Lists - December 14, 2021
- No More [Random] Location Tagging from Third-party Apps to Facebook and Instagram - November 25, 2020
- How to Create Quick Shareable Social Media Images [Tutorial] - October 20, 2020

