[convertkit]

Get More Likes On Facebook by Adding your Facebook Page Username to your Business Card

This post is a part of the “Get More Facebook Likes” series. Each one of these articles will detail a single tactic for growing your Facebook Likes. Not all tactics are created equal, but each will contribute to your success. Find more ways of growing your Facebook Likes by viewing all the posts in the series here.

Why your business card?

There are many ways to get more Facebook Likes, but most of them aren’t quite as simple as putting your Facebook Page username (or Page link) on your business card. It’s a super low-level way to generate more likes (especially if you do a lot of networking). It’s also a tactic that’s often overlooked.

So, why is it effective?

When someone takes your business card at a networking event or even picks one up from a visit to your office, it makes them curious. They want to know more about your business and more about you. Often times they will visit your website. This is also a great opportunity to point them towards your social media accounts.

Someone who wants to know more about you will also check you out on social media, because this is the place where most businesses “let loose” and show their personality. Seeing what a business posts on social media is often a deciding factor in whether or not they want to do business with you.

So, how do you get your Facebook Page username on your business card, so people will follow you? Can’t you just slap the link on the next print run of your business cards? Sure you could, but there are a few things you want to keep in mind before you do.

How to Setup Your Facebook Username, Vanity URL, etc.

First, you want to make sure that your Facebook Page username is setup correctly. In this past, this was called a “vanity url”. Some people (myself included) also refer to it as a Facebook Page link, because that’s ultimately what it accomplishes. Just for clarification, though, your Facebook username is the text that appears at the end of the link (once you setup your username). That’s the “YourBusinessName” part of this link: Facebook.com/YourBusinessName. Your Facebook Page username is also the part after the “@” symbol that someone can use to tag your business when they post something. Your Facebook Page link is the entire link that someone would need to type into a search engine to find your Page.

First, let’s take a look at what a Facebook Page link looks like before you claim your Facebook username. You can see an example below.

http://facebook.com/Your-Business-Name/1234567

Just between you and me, this is an ugly link! Could you imagine trying to tell someone to type this in? They would probably quit right away.

Now I know that most people would just go to Facebook and use the search bar to find your business. And that can work. The problem comes in when there are multiple businesses with the same name. How will someone know which Page to actually like? Better yet, why would you give them the opportunity to Like the wrong page.

The simple answer to this problem is to go claim your Facebook Page username and start advertising it, so this doesn’t happen. Also, if you claim your Facebook username, people will now be able to tag your business in photos or any other posts. This can give your business a larger reach on Facebook than it had before.

So, back to that ugly link…

http://facebook.com/Your-Business-Name/1234567

Not only is this link not as good for search engine optimization (seo). It’s also not very readable on a business card. Below is an example of a good Facebook Page link.

http://www.facebook.com/Team3Media/

The name is easy to read and wouldn’t be too hard for someone to type in.

Now that you know what a good Facebook Page link looks like, it’s time to go claim your Facebook Page username, so you can have a nice one, too. 🙂

But first, let’s go over some helpful tips and guidelines so you can choose the best username possible.

Use Capitalization to make it more readable.

The capital letters aren’t actually necessary. If someone were to type in the link without them, it would still work. However, it makes it infinitely more readable on a business card or any other print material.

Choose the shortest version of your business name or brand possible.

You don’t want people to be typing for-eh-ver in order to get to your Facebook Page. So, make it easy for them. Use a number instead of spelling it out. And use the shortened version of a word where possible, as long as it’s not confusing. The name you choose may be in direct conflict with the name used for SEO. In this case, you may want to use the original version. However, it’s up to you.

Follow the Facebook Page Username guidelines.

Below is an excerpt from their help article on creating custom usernames.

Here are a few things to keep in mind when you create a custom username:

  • You can’t claim a username someone else is already using.
  • Usernames can only contain alphanumeric characters (A-Z, 0-9) or a period (“.”).
  • Periods (“.”) and capitalization don’t count as a part of a username. For example, johnsmith55, John.Smith55 and john.smith.55 are all considered the same username.
  • Usernames must be at least 5 characters long and can’t contain generic terms or extensions (ex: .com, .net).
  • You must be an admin to create or change the username for a Page.
  • Your username must adhere to the Facebook Statement of Rights and Responsibilities.

Check this link for an always updated version of this help article.

[feature_box style=”7″ only_advanced=”There%20are%20no%20title%20options%20for%20the%20choosen%20style” alignment=”center”]

NOTE: One last thing. You used to be able to only change your Facebook Page username twice before you had to get Facebook involved in the process. There is not anything in their guidelines to suggest that this is the case anymore. However, I would still caution against changing it too many times. Remember, your username is tied to your Facebook Page link, so if you change it (after it’s already been set) then any old links to your Page will no longer work!

[/feature_box]

Now, Go Claim Your Facebook Page Username!

Claiming your username is actually a fairly easy process. In fact, it’s much easier to create than it used to be. Before you had to go through a handful of screens to get to the place where you could actually change your Facebook Page username. Now, a couple of clicks and you’re there.

Step 1: Go To Your Page

The first step is to go to your Facebok Page and make sure that you are logged in to the account which is an admin of the page.

Step 2: Edit Page Info

Now just put your cursor over the “More” button and click on “Edit Page Info” from the dropdown.

Claim Your Facebook Page Username - Edit Page Info

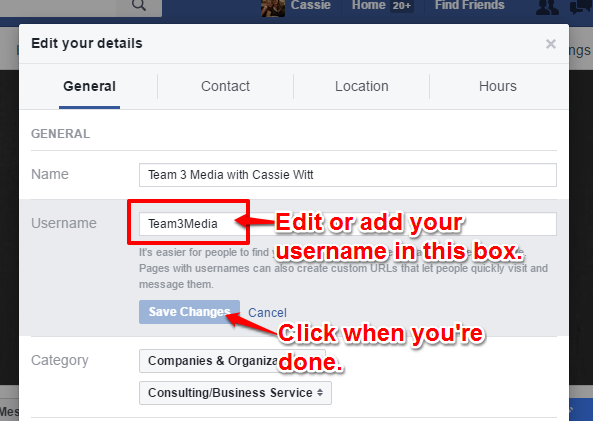
Step 3: Add or Change Your Username

In the “Username” field, either add or edit your Facebook Page username. Then click “save changes” when you’re done.

Edit Facebook Page username

You may have to try a couple of times before you find a username that Facebook will accept. Once you’re done, now it’s time to move on to the big finish.

How to Add Your Facebook Page Link to Your Business Card

Now that you have a nice readable Faceook Page link or username, you can add it to your business card. If you design your own business cards, check out these tips to keep your design clean and make it more likely that someone visits your Facebook Page.

Avoid “busyness” or “clutter”

Try to keep your business card from being cluttered by only providing the information that someone need to either contact you and find out more about you. You don’t have to add every point of contact. Just make sure your business card has the most important information on it. Also, you  want to make sure that adding the Facebook Page link to your card doesn’t make it appear more cluttered. You may need to move things around, take something off, or reduce the fonts in places.

Keep it legible

Another good piece of advice is not to use a really fancy font for your Facebook Page link. Remember, you want the link to be easily readable so you will get more Likes!

Add a Call to Action

When adding your link to your card, you may want to make it more “visible” by adding a “Call to Action”. For instance, most business cards list contact information in a list-like format with very little difference. If you really want to build your likes, you can do something as simple as adding the words “Like” or “Follow Me on Facebook” above or to the left of the Facebook Page link. This will make your link stand out, because it will look different than all the other contact information. You can also add a little more spacing around the link in order to draw attention to it.

Shorten it.

Always, always make sure that your link is the shortest version possible. For instance, you can leave out the “http://”, the “https://”, and even the www. This will not only make the link look cleaner, but it will also take up less space on the business card. Also, a little known fact is that someone doesn’t actually have to type out the full address to get your Page to show up. Modern browsers will “auto-add” the http:// to your link.

If you want to make it the shortest version possible just use your username and add the “@” symbol to the front of it. Be warned, using just the Facebook Page username may confuse the less tech-savvy of your peeps, though.

QR Codes…

Using a QR Code (quick response code) is a way to put your Facebook Page username on your business card which will allow someone to visit your page from their smartphone (once they scan it). We’ll cover QR codes in another blog post. For now, just know that they are dead useful in getting people to take an action from any printed advertisement.

UPDATED: Tutorial Infographic: How to Add An Admin to a Facebook Page

This post was updated on 9/23/2020 to reflect the new look of the desktop Facebook Page interface.

One of the most common questions I hear about Facebook, is how someone can add an admin to a Facebook Page. I put together a tutorial I use to send to my own clients and thought I would share it. This has been updated for the latest changes to the Facebook Page admin area. It’s setup as a one-page downloadable image. You are welcome to save it to your desktop, pin it, or share it with your own audience.  As always, if this was helpful to you, drop me a line in the comments below.


Want to Know How Often You Should Post to Facebook?

FacebookPostingFrequency

So you want to know how often to post to your Facebook Page… So, does everyone else.
In fact, this is the number one question I get asked about business Facebook Pages.

Before we dig into the answer (and why it’s not so cut and dried) let’s look at why this is such a big question.

Why the Heck Does it Matter How Many Times I Post Per Day on my business Facebook Page?!

Did you know the number of times you post per day could be limiting the number of people who see those posts? It’s true.

The reason?

Facebook is ruled by this super-complicated algorithm. Now, no one really knows (except for the people at Facebook) how exactly this algorithm works. But we do know a few things. We know that Facebook calculates the importance, popularity, share-ability, spaminess, etc. of each post that is published. These numbers get modified the longer a post lives.

Now for each of these posts, there’s also another calculation going on. That calculation is based on each user’s preferences. It is highly based on whether a person has liked your page or whether their friend has. Whether they have interacted with any of your content and how often, or the same for their friends. It also depends on how many Facebook Pages they’ve liked, how many friends they have, what else they’ve interacted with in their news feed, how often they interact with the people and/or pages who posted those other stories, and a ton of other factors.

This other calculation is the most important, because it determines which posts show up in a person’s news feed.

As you can see, it gets very complicated very fast.

So what does this have to do with how many times you should be posting to Facebook?

The number of times you post per day is also included in that other calculation.

If you post too little, your posts will eventually be shown less. So, you’d think the opposite would cause your posts to show up more, right? Unfortunately, that is not always true. In fact, you can post too much to Facebook, sending them the signal that you’re “spamming” your followers even if that was never your intention.

So how often should you be posting to your business Facebook Page?

A Case Study: How Often Should You Post to Your Facebook Page?

Ready for a definitive answer? A real solid number you can point to and say “I did that, now what are my results?”. I thought so.

Buffer, an amazing social media scheduling app, has put together some research and a great blog post on how often you should post to social media.

There’s even a great infographic from SumAll (shown below) that lays it out for you.

How Often to Post to Social Media

Infographic via: https://blog.bufferapp.com/how-often-post-social-media

Remember, Your Number May be Different

Now, this isn’t a truly definitive answer. The number of times you should post to get the maximum amount of interaction (what’s called the “sweet spot”) may be different than the number above.

What this is, however, is a starting place. Give it a try, you’ll never know if it works for you unless you do.

Tutorial: Get More Facebook Likes by Adding a Facebook Like Button to Your Website

One of the easiest ways to get more Facebook Likes for your Facebook Page, is to add the Facebook Like button (targeted at your Facebook Page) to your website.

This is a simple and often overlooked tactic which could result in more Likes for your Page. Why does it work?

Consider these two scenarios.

In the first one, a visitor to your website sees the Facebook icon and is enticed to click it. Once they click it, though, they have to actually go to your Facebook Page in order to “Like” it.

In the second one, a visitor to your website sees the Like button and is, also, enticed to click it. Once they do, that Like is immediately translated to your Facebook Page.

It’s so much easier for a person if they only have to click once. Anytime you can make a conversion easier on the consumer, the more likely they are to do it.

How Do You Get the “Magic” Facebook Like Button?

First of all, how does it work like magic? The Facebook Like button works auto-magically with one click as long as that person is logged into Facebook. These days, who isn’t? Honestly, I can’t remember the last time I logged out of Facebook. And I would bet my right arm that you can’t either.

Facebook makes it easy for you to get this code to install on your website. To get started go to: https://developers.facebook.com/docs/plugins/like-button

As you can see from the screenshot below, there are some options that you can choose to enhance the Like button. But they need to be weighed against how much space the button takes up. For example the first set of options makes the button (and all its attributes) really big. The space you want to put it in may not be big enough to hold everything, and it will cut part of it off. All of the attributes are optional, except for your Facebook Page URL.

Facebook Like Button

A Quick Note: The “Width” option will not increase the size of the Facebook Like button (which is quite small). Instead the width controls the overall width of the Like button element. For instance, in the example above, the Like button element area covers the Facebook Like Button, the Facebook Share button, and the words describing the number of likes. So, increasing the width would only increase the space around the entire button set.

The screenshot below shows my Facebook Page address (or URL) in the text box below “URL to Like”. To find your Facebook Page URL, go to your Facebook Page and copy and paste what’s in the address bar into the top-left box (as shown below). That’s step one.

Facebook Like Button Address

The next step is to decide what you want the overall button to look like. I’ve already talked about how the default set of options gives users a lot more information, but makes the button much bigger in size. I’ll explain that extra information, and go through the rest of the options, with screenshots below.

The first set shows the like button in the “Standard Layout” which adds the additional information of the person’s friends (the name here has been covered up for privacy reasons) who Like the Page. This is great for showing “social proof”, which can help your Page seem more Likeable, especially if you have a lot of Likes already. If you have a smaller number of likes though, I’d suggest going with one of the other options. You can also see below that there is an extra button (the share button) and that there are faces shown in the screenshot below. Most of these have been covered up to protect the privacy of people, but I left my own mugshot there, so you can see an example of what they will look like.

Facebok Like Button Standard Layout With Share Button and Faces

If you uncheck the “Show Friends’ Faces” option, it makes the button are look cleaner. This option works well for those who don’t want the added space the “faces” take up and for those who don’t necessarily care about social proof.

Facebook Like Button Standard Layout With Share And Without Faces

You can, of course, disable the share button. Since you’re trying to get people to Like your Facebook Page, adding a Share button only confuses the issue.

Facebook Like Button Standard Layout Without Share Or Faces

The next layout type is the “box_count”. This displays the Like button with a Like count over it, and everything is stacked on top of each other in a, you guessed it, “box” configuration. This layout, and in fact, the rest of the layouts do not show faces. So, if social proof is important to you, go with the standard layout or the Like Box (which I’ll cover later). This option works for those site designs where a more square or vertical section is available to place the button in. It’s also good for those who want to still show off the number of likes they have.

Facebook Like Button BoxCount Layout Share and Without Faces

Since the box count does not come with the option to show faces (even if you check it), the only other option here is to take away the Share button. This makes the button into a nice compact design that could fit almost anywhere.

Facebook Like Button Box Count Layout Without Share

The next layout type is the Button Count. This layout is much like the box count layout, except that the number of likes is on the side instead of on top. This makes this button much more suited to a horizontal space.

Facebook Like Button Button Count Layout With Share

Of course, once you take the Share button away it will fit into an even smaller space. Again, this type of layout with the number of Likes showing appeals to those who want to use social proof to encourage more Likes.

Facebook Like Button Button Count Layout Without Share

The last layout type is the simplest. That’s probably why it’s called the Simple Button layout. It is not only the smallest, but it’s also a great option for those Pages which have a smaller number of Likes, and don’t want to advertise that fact. This button, too, can be combined with the Share button, if you like.

Facebook Like Button Simple Layout With Share


The version without the Share button is tiny, minuscule even. This means you don’t have to worry about where the button will fit.

Facebook Like Button Simple Layout Without Share

Warning: Code Ahead!

A quick warning: this next section involves some html no-how. If you don’t know what you’re doing, forward this article on to your web developer or admin and have that person complete these steps.

Now that you know which button types are available, take a moment to choose which is right for your site.  Then, click on “Get Code”. You should see a box like the one below pop up. As you can see, there are 4 options for the code. I bet you thought you were done with options! We are almost done, I promise. 😉

The first three options require a little bit more work to install them and give you some more options for how much information you get when someone presses the Facebook Like button from your website. However, they are not necessary, in most cases.

Facebook Like Button Code Page

The easiest code type to use, and the one that will not bog down your site is the “URL” type. Which is just as it sounds, it installs a URL, which points directly to your Facebook Page, but has the added benefit of allowing someone to Like your Page with one click! Woot! Your next step here is to copy and paste the code into the html of your website where you want the button to appear. Again, if you don’t know what you’re doing get someone knowledgeable to handle it for you.

Facebok Like Button URL Code

Alternatives to the Facebook Code

There are some alternatives to just grabbing the code off Facebook. If your website is on WordPress, then there’s several options in the form of “plugins” you can install with no programming knowledge. I won’t detail all the options here. Just make sure to check out the number of stars each of these plugins has, check out some of the reviews, and make sure it’s compatible with your version of wordpress before you install.

There are also plugins for drupal, joomla, wixia, and other website builders or (content management systems). Just use Google to search for them.

Whether you choose to grab the code from Facebook, or use a plugin, installing the Facebook Like button is just one way that you can increase your Facebook Page Likes.

Likes Are Just the Beginning

Remember, though, that Facebook Likes are only the first step in the journey. It’s great to say that you have 1,000, 10,000, or whatever number of Likes, but it’s not your end game. Those Likes represent real people who (hopefully) want to buy from you. Even if they don’t want to buy from you, they have indicated that they’re interested in your business in some way. Now it’s your turn to give something back to them. Give them a reason to read your posts, and keep them coming back for more. This is the way that you start cultivating relationships online that lead to sales.

Consistency in Social Media is Queen

This week’s social media tip… be consistent.

 ConsistencyinSocialMediaisQueen

If content is king, consistency is queen. Consistently posting to your social media accounts is incredibly important for several reasons.

  1.  It trains your audience that you always have something to say, so they come back for more.
  2. It helps keep your engagement steady during those times that you’re not heavily promoting something.
  3. It gets you in the habit of publishing content, which may be the best reason of all.

But what does consistency look like? It’s not just about posting a certain number of times a day. Though this is important.  Consistent content is also about what you post. Remember that your brand voice is important. If you’re going to post something make sure it aligns with what people expect you to say.

Here’s 3 Rules for Posting Consistency

1. Pay Attention to Voice

Your voice matters. I can’t say that enough. Your audience doesn’t just recognize you from your profile photo online, they recognize you from your voice. If you suddenly switch up your voice, your followers may not recognize that it’s you. In extreme cases, they may even take offense to something you say or get confused. Remember the goal of social media is to get followers and keep them engaged. Voice is particularly important to this goal. Without it, people won’t have something to identify with. That connection with your followers is one of the real powers of social media. It’s part of what gets businesses the results they do on this marketing medium.

2. Post roughly the same number of times per day.

There’s a rule that most of us in the industry follow. That’s to pick the number of times you’re going to post each day and stick with it. Again the reason this is important is largely based on what your followers have come to expect from you. If you start posting more often or less often, you might see unfavorable results. The one place you can see this rule in action is on Facebook. It is here that you might see people unlike you or (even worse) hide your posts if you suddenly start spamming them. It is also here that you will start to see less engagement than you did before if you are posting less. The same is true for other platforms, but Facebook is the biggest offender when it comes to violating this rule.

That’s not to say that you can’t experiment with the number of times you post. Experimenting can actually be very important to figuring out what gives you the most engagement. If you’re going to experiment, though, do it slowly. Increase or decrease your posting by 1 post at a time and keep at that for a while. This will give you the best data on whether something works or not.


3. Post Around the Same Time Each Day.

This is another industry rule that works for a lot of different businesses. Posting at about the same time every day is another way that people can expect to read your content. It’s also important when you’re first starting out to establish a “baseline” that you can experiment against later. If you’ve been posting at the same time for the last couple of months, but feel you could get better results by changing it up, then you already have some data to compare it to. Just remember to keep any experimenting to a minimum.


Remember also, the time you post depends on your audience. For some businesses, posting just after people get off work gives them the best results. For others, it could be later in the evening. Again, posting at the same time each day will help you determine whether it’s the right time for you to be posting.
If you remember and practice these three keys to consistency, your results should also become more consistent. Which, is a good thing. 🙂

Pinterest Will Sell Your Products for Free?!

 selling on pinterest

So, I, as usual, was looking through my email before I went to bed. A bad habit, I know. It usually keeps me up long past when I wanted to go to bed. Especially if there’s a good newsletter or blog post in there. I usually take a look at my non-important stuff at this time, trying to decide if it’s worth my time or not. I saw an email from Pinterest and almost passed it up. I really don’t need another email on the 10 best DIY projects for this fall. But then I saw the subject line: “Your pins price has dropped!”. Hmm…not a DIY project email, after all. So, I clicked on it and lo-and-behold, I saw this.

PinterestWillHelpYouSell

Until I got this email, I had complete forgotten about this business feature of Pinterest! To be fair, it’s not something that they toot their horn about. Although, in my opinion, they should. I think more businesses might jump on the Pinterest bandwagon if they knew that Pinterest would sell their product for them.

This beauty of an email was informing me that a book I had pinned was now cheaper. I already bought this book, so why is this important? Because your business could benefit from this, too!

How To Get Prices On Your Pins

A while back, Pinterest launched a feature which you could integrate into your website called “Rich Pins“. You install a line of code onto your website that will  add price, size, color, product description, or other data to product pins that come from your website. Basically, it gives the user the information needed to make the purchase decision. One less hurdle to the buying-decision means that the sell is easier to make. Check out this link to see the steps involved in adding it to your website.
You’ll need someone knowledgeable to help you install the code and integrate it with whatever tags you have setup. Or get them setup, if they’re not already. Then the last step is to test and apply for your data to show up on Pinterest. It can take a couple of weeks to hear back. Once you do, though, people pinning from your site will now see the price and other data on their pins. And, more importantly, so will their friends!

How Can You Use The “Price Dropped On Pin” Feature?

Once you’ve got the code installed and integrated it with your extra tags, all you need to do is setup a “sale”. A lot of ecommerce platforms and plugins let you do this easily. My favorite, for WordPress, is WooCommerce. It’s free, and fairly easy to use. Once you do that, Pinterest will see the data and send out an email notification to anyone who has pinned the product with it’s original price information. It’s as simple as that!
For those of you thinking about the holidays, think about what this could do for an online sales.

Need Help?

Let me know if you need help getting the code installed on your site and applying for your rich pin data. In most cases it takes a couple of hours to add the code, test, and start the application process. Each install will be custom (since I don’t know how your website is set up ahead of time). So, every project will get a customized quote. If you’re interested, fill out the form below with your information and I’ll get back to you.

Pinterest Rich Pin Setup

  • Phone number with area code.
  • Optional. If you give me your website address ahead of time, I can check it out before and have a quote ready for you. 🙂

20 Ways You Can Get More Likes On Your Facebook Page

Think it’s hard to get more Facebook Likes? Try out these twenty tactics to get more likes on your Facebook Page for life.

  1. Add a “Like” button to your website.
  2. Put your Facebook Page link on your business card.
  3. Put a QR code (pointing to your Facebook Page) on any printed advertisement.
  4. Interact with another page on Facebook (while logged into your Page).
  5. Post more content on your Facebook Page.
  6. Embed a Facebook post on your blog or website.
  7. Put a “follow” button at the top of every website page.
  8. Put a “follow” button at the bottom of every blog post.
  9. Add a Facebook share button to every blog post and website page.
  10. Share your Facebook Page content to your personal Facebook profile.
  11. Add your Facebook Page link to your invoices (especially if you send them by email).
  12. Add a paragraph about what fans will get if they like your Page (i.e. coupons, free tips, updates on new products or services) to the about section.
  13. Write a post that’s controversial.
  14. Use Facebook ads to get more Likes to your Page.
  15. Add a “follow” button to your marketing emails.
  16. Add a link to your Facebook Page to the signature of your emails.
  17. Share your Facebook link on your other social media sites.
  18. Promote or “boost” a post from your Facebook Page. Bonus points if you promote a post that got a lot of engagement.
  19. Add a “Like” box to your website or blog.
  20. Promote a Facebook post that did well, by linking to it on your other social media networks.