• Skip to primary navigation
  • Skip to content
  • Websites
  • Contact Us
  • Blog

Blog

Get More Likes On Facebook by Adding your Facebook Page Username to your Business Card

By Cassie Witt on August 16, 2016 1

This post is a part of the “Get More Facebook Likes” series. Each one of these articles will detail a single tactic for growing your Facebook Likes. Not all tactics are created equal, but each will contribute to your success. Find more ways of growing your Facebook Likes by viewing all the posts in the series here.

Why your business card?

There are many ways to get more Facebook Likes, but most of them aren’t quite as simple as putting your Facebook Page username (or Page link) on your business card. It’s a super low-level way to generate more likes (especially if you do a lot of networking). It’s also a tactic that’s often overlooked.

So, why is it effective?

When someone takes your business card at a networking event or even picks one up from a visit to your office, it makes them curious. They want to know more about your business and more about you. Often times they will visit your website. This is also a great opportunity to point them towards your social media accounts.

Someone who wants to know more about you will also check you out on social media, because this is the place where most businesses “let loose” and show their personality. Seeing what a business posts on social media is often a deciding factor in whether or not they want to do business with you.

So, how do you get your Facebook Page username on your business card, so people will follow you? Can’t you just slap the link on the next print run of your business cards? Sure you could, but there are a few things you want to keep in mind before you do.

How to Setup Your Facebook Username, Vanity URL, etc.

First, you want to make sure that your Facebook Page username is setup correctly. In this past, this was called a “vanity url”. Some people (myself included) also refer to it as a Facebook Page link, because that’s ultimately what it accomplishes. Just for clarification, though, your Facebook username is the text that appears at the end of the link (once you setup your username). That’s the “YourBusinessName” part of this link: Facebook.com/YourBusinessName. Your Facebook Page username is also the part after the “@” symbol that someone can use to tag your business when they post something. Your Facebook Page link is the entire link that someone would need to type into a search engine to find your Page.

First, let’s take a look at what a Facebook Page link looks like before you claim your Facebook username. You can see an example below.

http://facebook.com/Your-Business-Name/1234567

Just between you and me, this is an ugly link! Could you imagine trying to tell someone to type this in? They would probably quit right away.

Now I know that most people would just go to Facebook and use the search bar to find your business. And that can work. The problem comes in when there are multiple businesses with the same name. How will someone know which Page to actually like? Better yet, why would you give them the opportunity to Like the wrong page.

The simple answer to this problem is to go claim your Facebook Page username and start advertising it, so this doesn’t happen. Also, if you claim your Facebook username, people will now be able to tag your business in photos or any other posts. This can give your business a larger reach on Facebook than it had before.

So, back to that ugly link…

http://facebook.com/Your-Business-Name/1234567

Not only is this link not as good for search engine optimization (seo). It’s also not very readable on a business card. Below is an example of a good Facebook Page link.

http://www.facebook.com/Team3Media/

The name is easy to read and wouldn’t be too hard for someone to type in.

Now that you know what a good Facebook Page link looks like, it’s time to go claim your Facebook Page username, so you can have a nice one, too. 🙂

But first, let’s go over some helpful tips and guidelines so you can choose the best username possible.

Use Capitalization to make it more readable.

The capital letters aren’t actually necessary. If someone were to type in the link without them, it would still work. However, it makes it infinitely more readable on a business card or any other print material.

Choose the shortest version of your business name or brand possible.

You don’t want people to be typing for-eh-ver in order to get to your Facebook Page. So, make it easy for them. Use a number instead of spelling it out. And use the shortened version of a word where possible, as long as it’s not confusing. The name you choose may be in direct conflict with the name used for SEO. In this case, you may want to use the original version. However, it’s up to you.

Follow the Facebook Page Username guidelines.

Below is an excerpt from their help article on creating custom usernames.

Here are a few things to keep in mind when you create a custom username:

  • You can’t claim a username someone else is already using.
  • Usernames can only contain alphanumeric characters (A-Z, 0-9) or a period (“.”).
  • Periods (“.”) and capitalization don’t count as a part of a username. For example, johnsmith55, John.Smith55 and john.smith.55 are all considered the same username.
  • Usernames must be at least 5 characters long and can’t contain generic terms or extensions (ex: .com, .net).
  • You must be an admin to create or change the username for a Page.
  • Your username must adhere to the Facebook Statement of Rights and Responsibilities.

Check this link for an always updated version of this help article.

[feature_box style=”7″ only_advanced=”There%20are%20no%20title%20options%20for%20the%20choosen%20style” alignment=”center”]

NOTE: One last thing. You used to be able to only change your Facebook Page username twice before you had to get Facebook involved in the process. There is not anything in their guidelines to suggest that this is the case anymore. However, I would still caution against changing it too many times. Remember, your username is tied to your Facebook Page link, so if you change it (after it’s already been set) then any old links to your Page will no longer work!

[/feature_box]

Want Better Results From Your Social Media?

Check out the Social Media Audits

Learn More

Now, Go Claim Your Facebook Page Username!

Claiming your username is actually a fairly easy process. In fact, it’s much easier to create than it used to be. Before you had to go through a handful of screens to get to the place where you could actually change your Facebook Page username. Now, a couple of clicks and you’re there.

Step 1: Go To Your Page

The first step is to go to your Facebok Page and make sure that you are logged in to the account which is an admin of the page.

Step 2: Edit Page Info

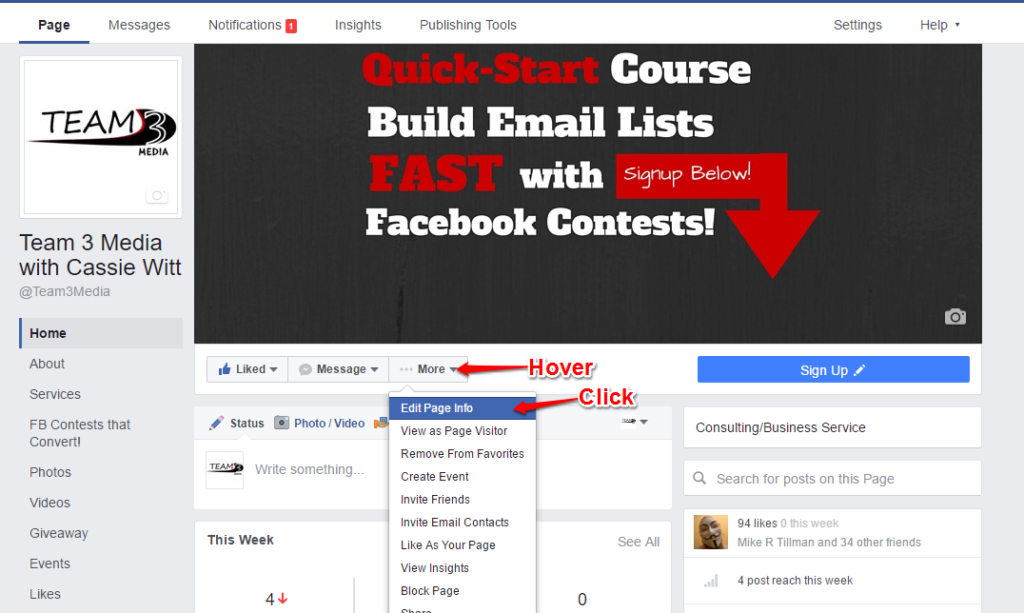
Now just put your cursor over the “More” button and click on “Edit Page Info” from the dropdown.
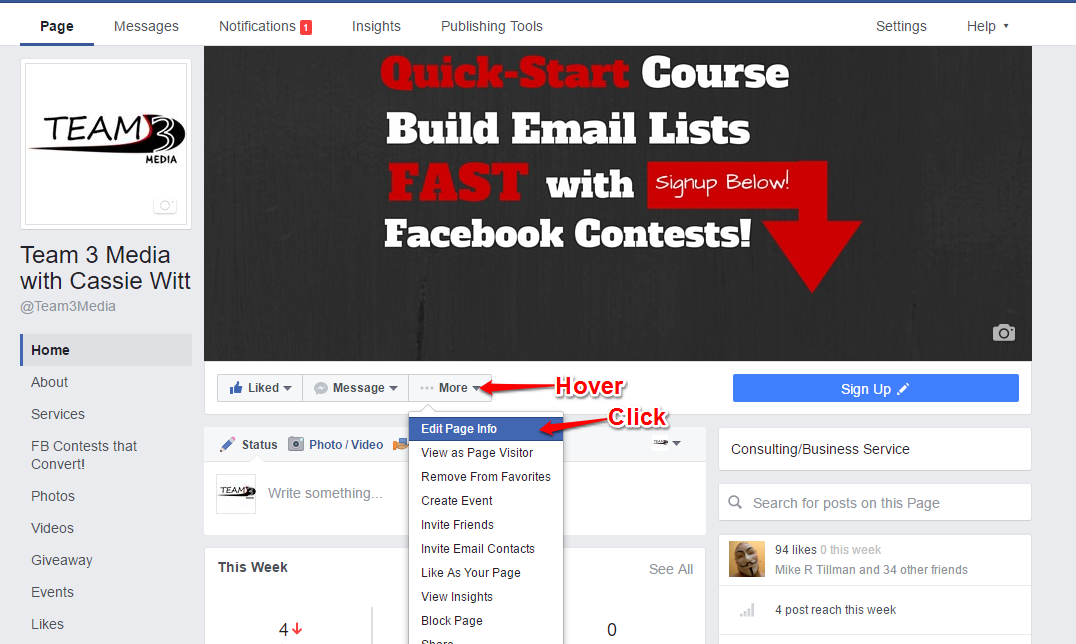
Claim Your Facebook Page Username - Edit Page Info

Step 3: Add or Change Your Username

In the “Username” field, either add or edit your Facebook Page username. Then click “save changes” when you’re done.
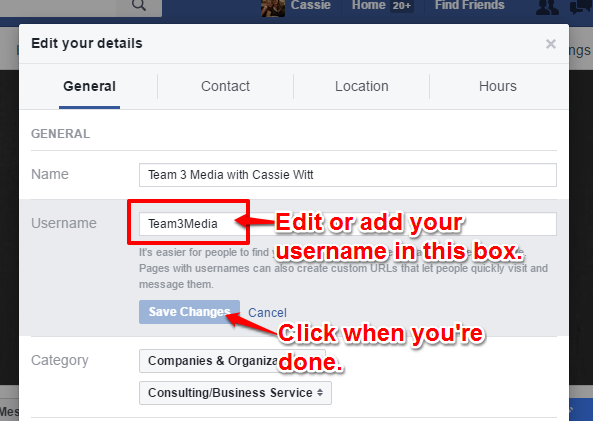
Edit Facebook Page username

You may have to try a couple of times before you find a username that Facebook will accept. Once you’re done, now it’s time to move on to the big finish.

How to Add Your Facebook Page Link to Your Business Card

Now that you have a nice readable Faceook Page link or username, you can add it to your business card. If you design your own business cards, check out these tips to keep your design clean and make it more likely that someone visits your Facebook Page.

Avoid “busyness” or “clutter”

Try to keep your business card from being cluttered by only providing the information that someone need to either contact you and find out more about you. You don’t have to add every point of contact. Just make sure your business card has the most important information on it. Also, you  want to make sure that adding the Facebook Page link to your card doesn’t make it appear more cluttered. You may need to move things around, take something off, or reduce the fonts in places.

Keep it legible

Another good piece of advice is not to use a really fancy font for your Facebook Page link. Remember, you want the link to be easily readable so you will get more Likes!

Add a Call to Action

When adding your link to your card, you may want to make it more “visible” by adding a “Call to Action”. For instance, most business cards list contact information in a list-like format with very little difference. If you really want to build your likes, you can do something as simple as adding the words “Like” or “Follow Me on Facebook” above or to the left of the Facebook Page link. This will make your link stand out, because it will look different than all the other contact information. You can also add a little more spacing around the link in order to draw attention to it.

Shorten it.

Always, always make sure that your link is the shortest version possible. For instance, you can leave out the “http://”, the “https://”, and even the www. This will not only make the link look cleaner, but it will also take up less space on the business card. Also, a little known fact is that someone doesn’t actually have to type out the full address to get your Page to show up. Modern browsers will “auto-add” the http:// to your link.

If you want to make it the shortest version possible just use your username and add the “@” symbol to the front of it. Be warned, using just the Facebook Page username may confuse the less tech-savvy of your peeps, though.

QR Codes…

Using a QR Code (quick response code) is a way to put your Facebook Page username on your business card which will allow someone to visit your page from their smartphone (once they scan it). We’ll cover QR codes in another blog post. For now, just know that they are dead useful in getting people to take an action from any printed advertisement.

Most Useful Social Media Posts for 2015

By Cassie Witt on January 12, 2016 0

I thought I’d put together a round-up of the best posts from 2015, in case you missed them.  These are posts that got the most traffic, but also were found useful by people based on feedback. I hope you find them useful, too.

#1: Optimize Your Facebook Page Description (an excerpt from 31 Days to an Awesome Facebook Page) — NEED TO REVAMP

I wrote this post to jumpstart the writing of an ebook I wanted to publish called 31 Days to an Awesome Facebook Page. Though that project has been tabled for a little while, it was still a post that was not only popular, but that was fun to write.

The reason for this post was not only to jumpstart the book, but to also help people write better Facebook Page descriptions (found in your “About”) section. Did you know that your Facebook Page description is important to boost your Facebook Page in Google’s rankings? That’s because it’s one of the pieces of text that “stays put”. In other words, it’s not a post, that will be replaced by another one, so the text is always accessible by the search engines. That means this section is the perfect place to tell people what your all about and work in some of those keywords (without stuffing, of course)! If you want to see what I’m talking about you can see how to improve your Facebook Page description text here.

#2: Pinterest Will Sell Your Products for Free?!

selling on pinterest

I got an email from Pinterest about a book I had pinned which sparked the idea for this blog post. The email told me that a book I had pinned was now “on sale”. I was not only delighted by this news, but I also realized how useful it could be to people who sell online.

The basic idea works like this. If you have installed and setup “rich pins” for products on your site, when you put something on sale, it will not only show up on the pin, but Pinterest will actually email people who have pinned it to tell them about the sale! How awesome is that?! This is my favorite kind of automation. It does take some coding know-how to install the pinterest rich pin setup.  You are welcome to read more on how to do that here.

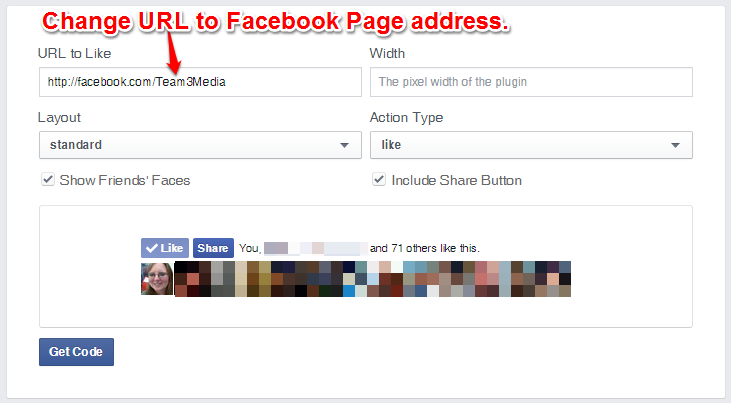
#3: Tutorial: Website Facebook Like Button

Facebook Like Button Address

The Facebook Like button is an often-overlooked way to get more likes on your Page, because it’s dead simple. Sure, you could add a follow bottom to your header or footer, but it doesn’t allow someone to automatically Like your Facebook Page. That’s the real magic of the Like button. Find out how to get this little magic button by going here.

#4: Buying Facebook Likes Doesn’t Buy Engagement or Sales

Buying Facebook Likes Doesn't Buy Engagement Or Sales

Another popular post dealt with buying Facebook Likes. Unfortunately, this is a lesson that I’ve seen a lot of small business owners make. At first, it seems like a great idea: get more likes (without the work) and your Facebook Page looks more legitimate and your posts will now show up in people’s newsfeeds. The problem is that these Likes are rarely “quality” likes as they usually come from countries outside the U.S. If you’re running a local business this is especially detrimental to your Facebook strategy, because the people who have Liked your page (and presumably will engage with it) have nothing to do with your local customers. This means that your Page content actually has an even smaller chance of showing up in newsfeeds than if you had a low number of “local” Likes. Check out this blog post to read more about the problem.

#5: Want to Know How Often You Should Post to Facebook?

FacebookPostingFrequency

The last popular post is about how often you should post to Facebook. Unfortunately, there is no easy or correct answer to this. However, the Buffer team ran a case study and has come up with an answer you can use to start testing out your own optimal number of posting. Read on to learn what their findings were and how you can apply it to your own posting strategy.

All of these posts offered advice or were “how-to” type posts, which tells me that there was a definite need for this. Quite a bit of my content strategy for 2016 will also focus on these types of posts.

Did you find any of these articles useful? Let me know in the comments below. 🙂

My 3 Words for 2016

By Cassie Witt on January 3, 2016 5

My3WordFor2016

I don’t do New Year’s Resolutions any more. I’ve never been good at them. I do, however, choose “areas of focus” for my next year. The idea is called “3 Words for (insert year here)”. I borrowed this idea from Chris Brogan, who’s been doing it for 10 years now.

The concept is simple. Take a moment to think of three things you’d like to work on this year. Then come up with three words that remind you of those three things. Write them down. Look at them everyday and try to make your reality match those words. At least this is how I think of the process. Chris Brogan describes it a little more elegantly here.

I’ve only been doing this for a couple of years, but I really like the practice. The first year, I was not very successful at fulfilling those words. But last year I made progress. This year I’m hoping to make even more progress. So, without further ado…

My three words for 2016 are Brave, Writer, and Finish.

Brave

Lately, I’ve been feeling the pull, again, to do more.

It’s always followed, by being afraid, though. Every time I venture out of the little cubby hole that is my life and try new things, I feel afraid.

Who am I to try this? I haven’t been doing it long enough. I don’t know enough about it. I can’t possibly think I’d be any good at it.

These are the thoughts that run through my head.

It doesn’t happen right away, though. Oh no, it waits until I’m in the middle of a project. It waits until I’ve become firmly entrenched in the thing I want to do. Until, I’m actually getting excited about it.

Steven Pressfield calls this resistance in his book “The War of Art”. I call it the naysayer. It’s that kid on the playground who always thinks your idea of a game is stupid. It’s the person who tells you how hard something is going to be when you declare that you want to do something new with your life. It’s all the crabs who pull the one crab (desperately reaching for freedom) back into the bucket.

And the real ugly truth is, that it doesn’t have to be that way.

I love my son. I know, I’m a Mother, I have to say that. But it’s true. I love him, but not just because he came from me or that he’s changed my life (literally and figuratively). I love him, because he is fearless. He’s not afraid to be himself.

Actually, that’s not true. It’s not that he’s not afraid. He doesn’t even know that he can be afraid (or ashamed) of who he is. He hasn’t learned that yet. And I hope he never learns it. But I have a feeling that he will. In fact, he’s recently learned that some other kids think he’s “weird”, and that they have this incessant need to mock him for it.

It’s sad, because being weird and unique is one of the greatest things about living this life.

But for now, he’s still at that point in his life where he’s oblivious. It’s a glorious thing to behold.

I remember being like that once. Freer, happier, and completely oblivious to anything but my own joy. The joy of living.

There’s this really great quote that Eddard Stark tells his son Bran in “A Game of Thrones” about being brave. Bran asks, “can a man still be brave if he’s afraid?” His father answers, “That is the only time a man can be brave”.

And it’s true. You can’t have one without the other. You can’t feel like you need to brave your way through something without being scared. It’s impossible.

So, Brave is one of the words I choose.

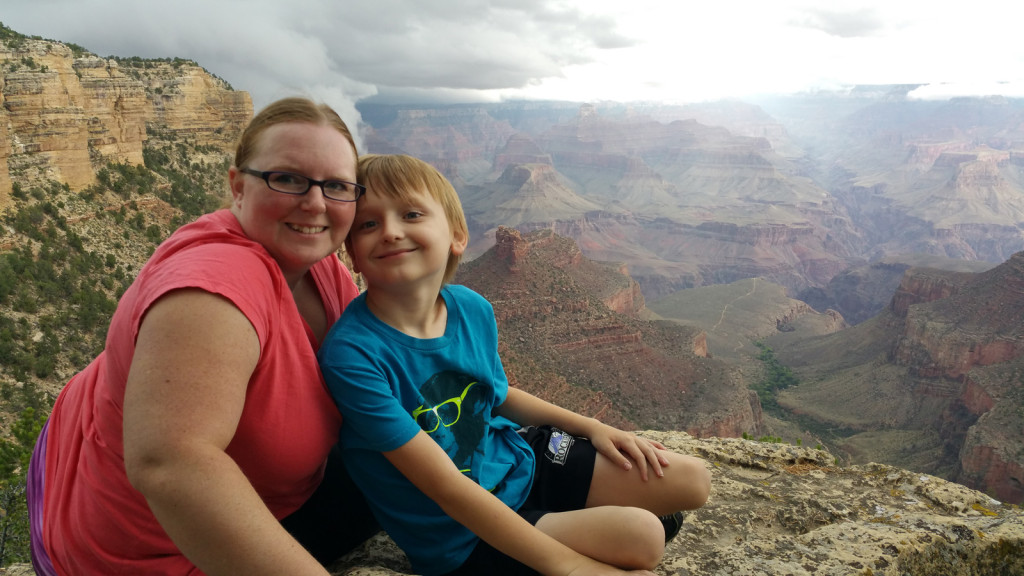
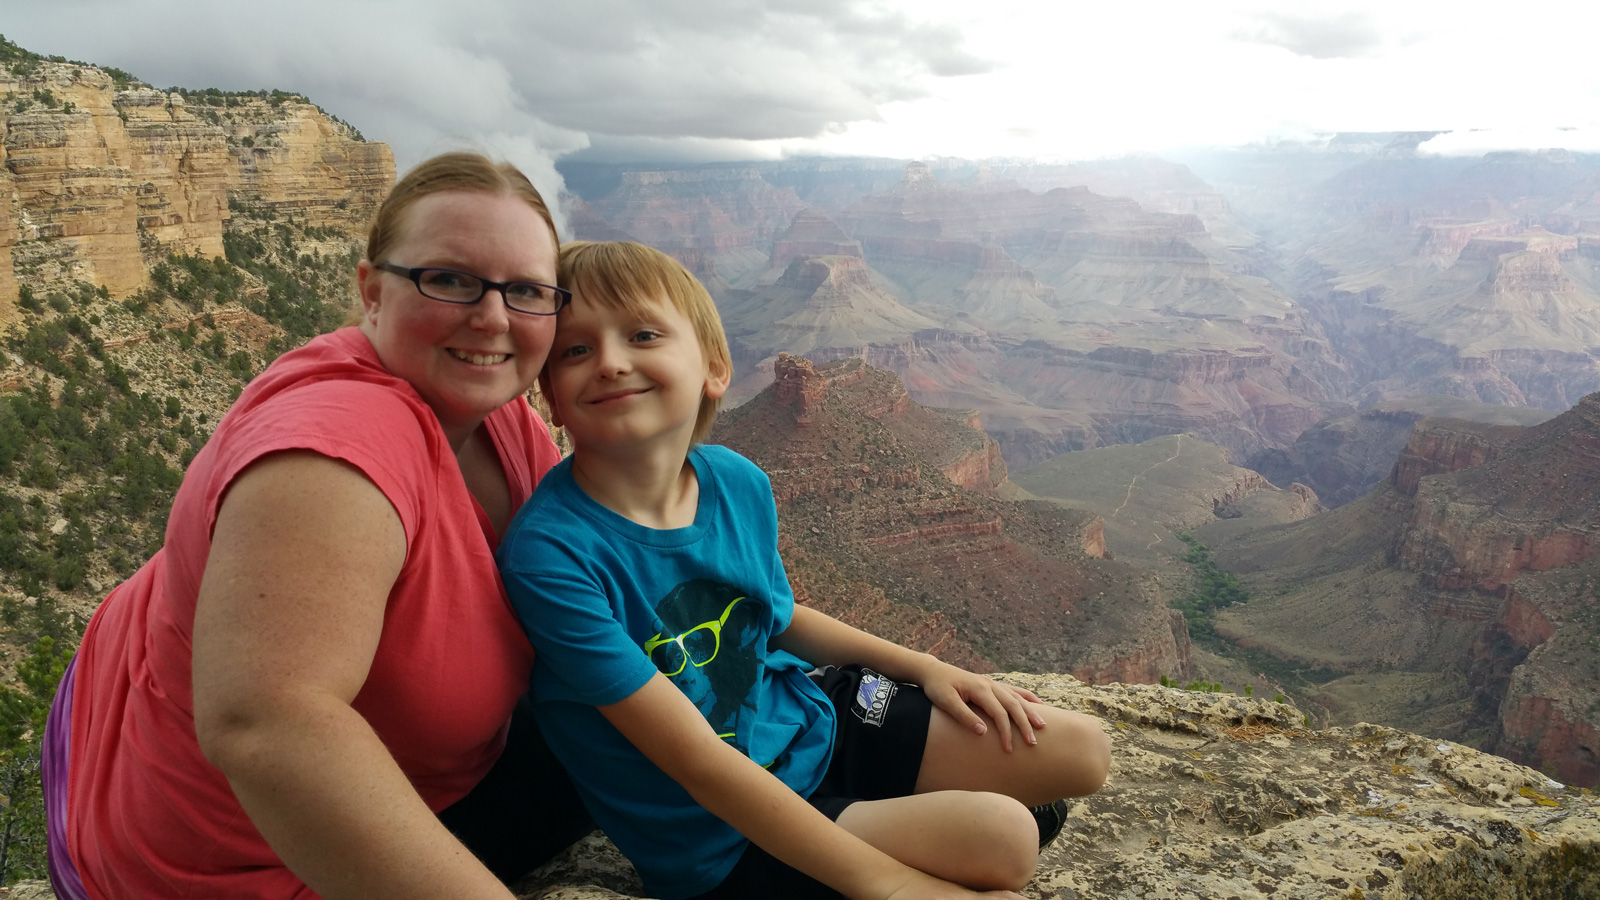
Some of the best times in my life happened when I was being brave. Finishing writing my first story, when I was in 7th grade, and then telling everyone about it. Telling my husband (my then boyfriend) that I loved him for the first time. Getting married. Giving birth to my son. Climbing the rock wall in high school for the first time, even though I was afraid of heights. Doing my first debate. Acting in my first play. Singing on stage for the first time in 5th grade. Giving my first presentation on social media. Winning my first consulting client. Giving my first social media workshop. Leaving my job of three years to take a job with a place that really wanted me. Declaring that I was going to freelance full-time when I was laid off from that job. Joining BNI to bring in more clients to my fledgling business. Taking a job full-time with the business that was helping me get most of my work. Visiting a location of a client in Urbandale, Iowa to do a “Marketing Walkthrough” of their store. Starting my own blog. Moving to California from Missouri (which I had lived in for pretty much my whole life) in less than 2 weeks. Sitting at the edge of the Grand Canyon, looking over the edge (and I’m still afraid of heights). Every single time I have to get up in front of people and talk about something (especially if I’m the “so-called” expert). Every time I send a newsletter to my list. Every time I publish a blog post. I’m scared writing this now, because it’s deeply revealing. I’ll be scared in a couple of weeks when I take my first beginner salsa class. I don’t think I’ll ever stop being scared.

But that’s kind of the point. You’re not going to stop being scared. Life is scary, especially when it’s new and untamed.

Each of those times, I was able to walk through the fear and get through the other side. I still don’t exactly understand why I was able to. In some instances I can point to the fact that I “had to do it”, but in others, I just did. Maybe by trying to be more brave I will learn what gets me through, and I’ll be able to replicate it more.

Last year, I found that just looking at the words everyday to remind myself was not enough. I had to tie specific actions to those words, or nothing was going to be done.

Brave is hard to tie an action to. Sure, it can be an action word. But how the heck do you define brave as an action?

Even since I started writing this post, I’ve felt more aware of when I’m not being brave, and that’s a good thing. It’s given me some ideas on how I can take brave from just a word to something I can actually implement.

The first part of that is to try more stuff. Signing up for my first beginner salsa class is a great example of trying something new. I also have my eye on some writer’s meetups, which I’ll try to schedule in during the next couple of months.

The second way for me to be brave is to finish more things that I start. I’ll talk more about this later with my third word.

Writer

This is one of the things that I’ve always wanted to do with my life. In fact, it’s the thing I’ve wanted to do longest. Despite all my false starts and stops, I know it’s a thing I want to continue to do. So, why should I stop hiding it?

Again, though, you can’t have results without action. So, i’m tieing this word to a daily goal. I’m going to pledge to write at least 250 words a day of fiction. I just did the math, and a 90,000 word book will take me just under a year to write at 250 words per day.

On the other side of the coin, I also love to write blog posts, especially when they teach something. So, “writer”, is also to remind myself to do that as much as possible. I have another action for this. It is to finish 52 blog posts this year. I used to scoff at any goal I tried to set where I would publish 1 blog post per week. My mind would immediately counter with “that’s not nearly enough”, and then I would decide to do 2 per week. The problem with this goal was that I wrote even less because of it. Just the thought of writing a ton more than I was already outputting seemed to cripple me. So, I’m sticking with a more realistic goal this year.

Finish

Hi, my name is Cassie, and I’m a chronic “starter”. I rarely finish things. Even small projects like cleaning up my desk tend to get derailed. I know part of the problem is being in the middle of a project, and suddenly, finding myself scared to finish (for whatever reason). However, I also tend to get distracted by new ideas a lot. This has caused me to start a lot more projects than I could ever hope to finish.

So, the question that I will endeavor to ask myself the next time something shiny comes along is, “will I finish this?” I have to try to answer this in the most brutally honest way possible. Because my track record speaks for itself.

Again, though, I have finished things in the past. But just like the word “Brave”, I don’t understand why some things got finished and others didn’t. This year will be just as much about learning what motivates me to finish as it does actually finishing things.  

I’m going to also start documenting those projects which I do start, so that I can see what gets finished and what doesn’t. I’ve learned from running social media campaigns that if you need to have the data to back up whatever you are declaring as true. You can’t fake data. You can misinterpret it, or it can be skewed, but pure data only gives you numbers. Numbers just are.

Finish is also a reminder that I already have projects or irons in the fire that either need to be finished, redefined as something other than a project, or dropped completely. One of the most important things i’ve learned in the last couple of years is that it’s okay to not finish something. In fact, not finishing a project has taught me more about myself than anything else.

I’m still going to shoot for finishing more projects than not, but sometimes a project just isn’t meant to be finished.

How am I going to put finish into action? I’ve thought about this a lot, because starting and not finishing things is a major problem I want to overcome this year. It took me a while to hit on a plan that I think will work. I won’t know, though, until I work the system.

Here’s my plan. I have a list of the current projects that I am working on and want to work on in the next month. This is sort-of a high-level to do list, or a goals list. Then I have a second list. I call it my “queue”. These are all the things that I want to accomplish after my current projects are done. Everything that comes into my head, will need to go on the queue list until there’s room for it to move to the current projects list. I will schedule time to work on the things on my current projects list, and try to resist the urge to work on anything that is not on my current list. At the end of the month, I’ll assess my current list and see if there’s room to move anything from my queue. This will also be a good time to see how much progress I’ve made on a project. It’s not a perfect system, but I think it will work well.

So those are my 3 words for 2016, the reasons why I’m choosing them, and the plans I have in place to actually work on them.

How about you? Do you set New Year’s Resolutions, or do you focus on areas you want to improve? Would you like to join me in the 3 words for 2016? Drop me a line in the comments and let me know your plans.

The Basic System to Rock Any Social Media Platform Part 1: The 3 Phases of Social Media Success

By Cassie Witt on October 26, 2015 1

ThreePhasesOfSocialMediaSuccess

Anyone worth their salt as a consultant will tell you that you need a plan to get the most out of social media. This is absolutely crucial to your success. What’s missing from most social media plans, though, is a system. A set of rules, if you will that governs how effective a plan can be. It’s a way to implement the goals that you have and an order to do them in.

I’ve seen and built a lot of social media plans. Some were successful, and some were not. The ones that were successful had one thing in common: they setup their plan with a systemized approach. In other words, everything in the plan is built to fulfill a specific purpose. Nothing in the plan deviates from that purpose.

There is a better word than purpose, though. Some people like to call them “goals”. I like to call them “phases”, because you can have multiple goals within a phase and still be working towards that one purpose.

There’s really only three major phases that you can shoot for in social media. They are:

  1. Building an Audience
  2. Building Engagement
  3. Converting Followers

Want to know what the most successful social media plans had going for them? They tackled these phases one a time and in order.

Phase 1: Build Your Audience

When I first started in social media, the company I was working for didn’t have a social media presence. Since this was my first social media job, I had to learn how to set them up and make them work. I had read a lot of stuff about how social media was so powerful. About how it could increase your sales and popularity far beyond what you could achieve normally. So, I had hope that it would work.

When we first started with Facebook, it was still pretty early for businesses to be jumping on. It was easier to build an audience then. But that’s not what I was focused on. Instead, I was doing all kinds of things. And I didn’t understand why I wasn’t getting the engagement that I had heard about. Or why I wasn’t getting people to bring in the coupons we would post, or respond to our online sales.

It wasn’t until we ran a big “Like Us” contest that I really started to see engagement and conversions on our Page. In fact, our audience grew so much from that contest, that the engagement and conversions had also skyrocketed. It was then, that I understood how social media works.

See, the simple truth is, you have to have an audience that will support the engagement and conversions. If you don’t, it won’t happen. No amount of pie in the sky thinking will deliver that for you.

No matter what platform you’re on, you have to build an audience first. Unfortunately, building an audience is actually one of the hardest parts of the whole process because it’s a step that consists of three separate objectives.

The first objective is to get people to show up. The second is to get them to pay attention. The third is to get them to want to come back and read more. We’ll tackle how to get all of these to work together in a later post. For now, let’s just look at the basic activities you need to do to get started.

  1. Post content consistently.
  2. Use the basic tools of the platform (e.g. Twitter = hashtags, Facebook = shares and likes).
  3. Ask questions.
  4. Be funny.
  5. Be real.
  6. Use what’s working on the platform now (e.g. Facebook = video)
  7. Look outside of the platform for followers (e.g. Facebook Like Button)
  8. Run a Contest or Promotion to generate excitement.
  9. Find your voice.

Want Better Results From Your Social Media?

Check out the Social Media Audits

Learn More

Phase 2: Build Engagement

The next phase to tackle once you’ve built your audience is to get them engaged. If they’re already engaged, then that just means you have an advantage. But if they’re not, you may have a hard road ahead of you.

My first success had really taught me that you could be achieve your goals with social media if you focused on the right phase at the right time. But, later, I struggled with building engagement on other platforms and social media accounts.

A couple of years after I started doing social media, I started to take on other clients on a freelance basis. I thought I knew what I was doing by that point. After a few months, though, it became clear that I really didn’t.

I used what I knew worked: I focused on building an audience before building engagement. But I wasn’t getting the same results. I didn’t understand why it seemed to only work once. I thought, that must have been a fluke. But I questioned that assumption, because I had read so many articles telling me different. So, I decided to dig deeper and figure out why it had worked so well the first time. I did this by trying a ton of different things to build engagement (including running more contests).

My conclusion was this: in those early days we had grown our audience so fast by harnessing the excitement that a contest produces. This meant that our audience was already engaged. It gave us a leg up when it was time to move to this next phase. Because we were also posting consistently to Facebook, and we understood what was working on the platform, we were able to keep that engagement going.

Once I understood that, I knew that the key to getting more engagement was to give it a kick-start. Contests work well for this purpose, but they’re not the only answer. Sometimes, they’re not even the right answer for the client.

There are lots of activities that build engagement. Most of these same activities you’ll notice are also ones that are used to build an audience. That’s because the same characteristics of social media that build connections, also help spread those connections farther than they would normally go.

Below are a list of activities that you can use to build engagement.

  1. Post content consistently.
  2. Run a Contest or Promotion to generate excitement. In fact, run these multiple times throughout the year to get the most benefit out of them.
  3. Ask questions.
  4. Be funny.
  5. Be real.
  6. Find your voice.
  7. Connect with your audience.
  8. Use tools outside of the platform (e.g. share buttons on your blog)
  9. Use the basic tools of the platform (e.g. Twitter = hashtags, Facebook = shares and likes).
  10. Use what’s working on the platform now (e.g. Facebook = video, Twitter = Twitter chats)
  11. Bring them into your sales funnel.

Step 3: Convert

Conversions matter in social media. It’s the return part of “Return on Investment” that we’ve been hoping for. That doesn’t mean that we don’t enjoy the warm fuzzy feeling and the connections we make with our community. Those are important, too, and can keep us going when the conversions aren’t happening like they should. But most of us want to get something more out of it. Most of us want to be able to justify the time we’re spending talking with people, researching content, posting, spending money on ads, and the hundreds of other things you need to do to keep up with your social media accounts.

Conversions are tough to achieve, especially on social media. That’s mostly to do with a glaring difference between a business’ motivation and a person’s motivation on social media. People get on social media to connect, or to find out what’s going on, or even just to unwind. Businesses on the other hand want to connect with their customers, but they also want to make the sale. Those motivations just don’t line up. Often times, this means that social media posts by businesses can be seen as an intrusion. Or at the very least, they can seem out of place.

So if conversions are our goal, then how do we go about getting them?

Some of the same things you do to build an audience and build engagement also work for making conversions on social media. Again, this is because of the way social media works. The main thing that companies who make conversions on social media do, though, is they connect with their followers. They learn what their audience likes to hear, and what they like to talk about. Then they take that information and they apply it to how they sell their product. That’s why these same activities can work for conversions, just as well as building an audience and engagement.

Here’s the list of activities that will help convert your followers into customers:

  1. Post Consistently (tired of seeing that yet?)
  2. Post a sale or a promotion
  3. Run a contest (yep, contests can even be used for conversions!)
  4. Ask questions.
  5. Be funny.
  6. Be real.
  7. Find your voice.
  8. Connect with your audience.
  9. Use the basic tools of the platform (e.g. Twitter = hashtags, Facebook = shares and likes).
  10. Use what’s working on the platform now (e.g. Facebook = video, Twitter = Twitter chats)
  11. Ask for the sale
  12. Run ads or use other promotional tools.
  13. Bring them into your sales funnel.

As you can see, the main difference in most of these phases isn’t the activities, it’s the intention and execution. It’s the focus of the conversation.

I have been successful and have seen others be successful in social media from following other systems. But I’ve achieved the most success when I followed this system step-by-step.

Your turn. Have you found a system that works for you? Are you having trouble building an audience, your engagement, or your conversions? Have you seen success when you focused on one goal at a time? Let me know in the comments below.

I’m leaving on a jet plane…

By Cassie Witt on August 4, 2015 0

Actually, I’m leaving in a Cadillac, but sometimes it feels like a jet plane when I’m driving down the road.

What the heck am I talking about?

Well, some of you may know that I’ve been talking about moving for a while. We were going to move three years ago, so my husband (Jess) could attend a school in Florida, but the plans fell through. Luckily, he was able to do online courses from the Academy of Art University in San Francisco. I think this ended up working in our favor, but we’ll never know where that other path may have lead.

Now, we’re about to embark on a completely new path. On Friday, Jess got the job offer he had been promised for a couple of months. The job is in L.A. which we had anticipated. What we had not anticipated (due to some timing issues) was the fact that we would need to pick up and move in less than a week!

It has been a crazy couple of days, filled with visits, packing, planning, and all the other things that go into a big sudden move. Thank goodness we had the sense to pack a lot of the stuff right after he graduated. Otherwise, this week would have been more hectic than it already is!

So, this means that I will be postponing any blog posts, emails, projects, etc. that I was planning and working on.

I may write on the trip. I am going to be stuck in a car for several hours, after all! But I’m going to make a commitment to not post anything until after we get settled. I don’t know how long that will take, so I can’t give a time frame here. Hopefully not too long, though.

I want to take some time and enjoy this trip with my family. It’s actually the first long car drive we’ve all been on together.

We may end up hating each other by the end of the trip, or we may get closer. Either way, it’s an opportunity I don’t want to miss!

So, until next time, bon voyage! I’ll be writing next time from sunny California. 🙂

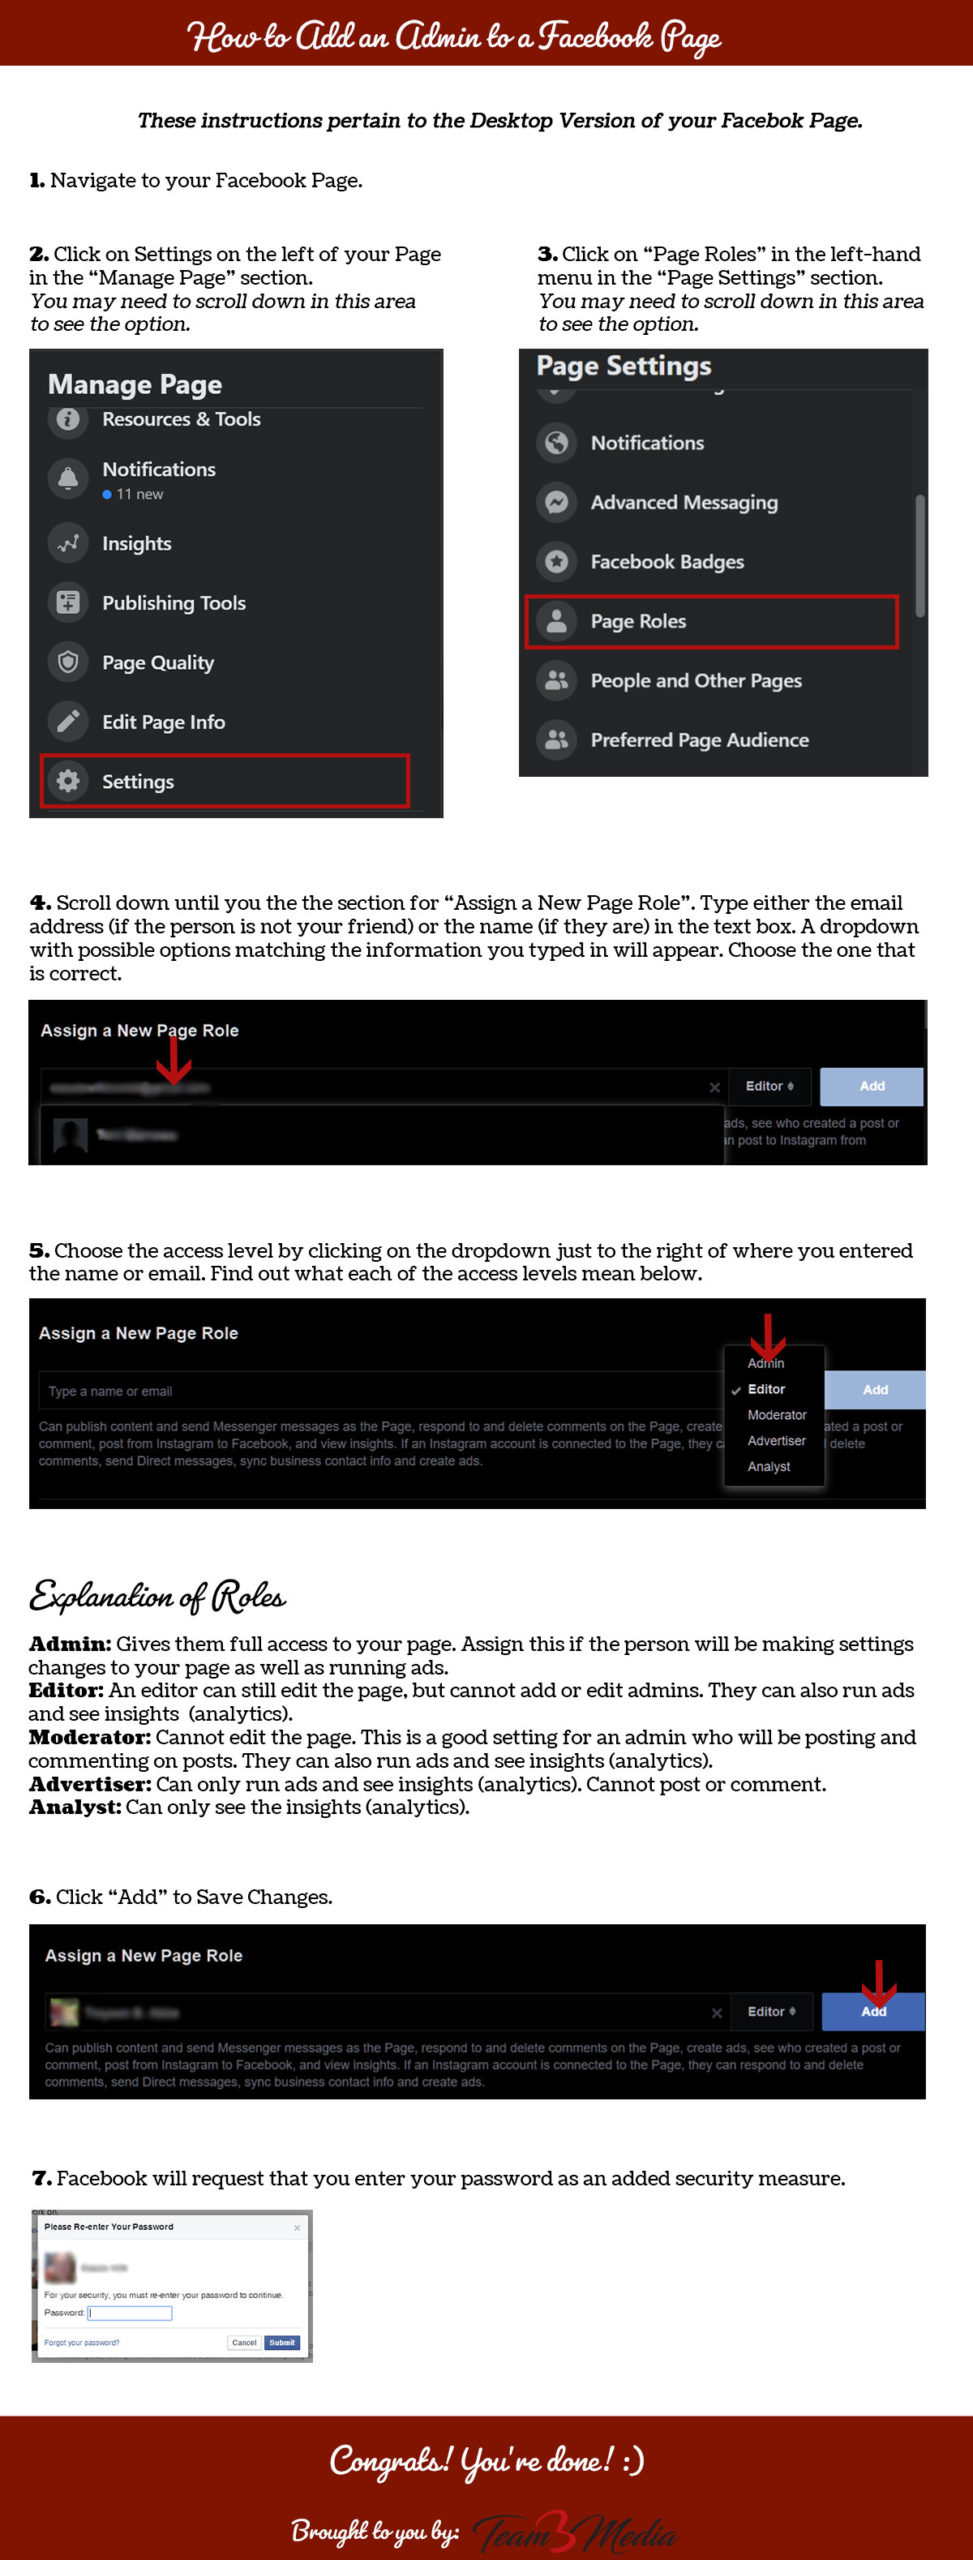
UPDATED: Tutorial Infographic: How to Add An Admin to a Facebook Page

By Cassie Witt on June 10, 2015 0

This post was updated on 9/23/2020 to reflect the new look of the desktop Facebook Page interface.

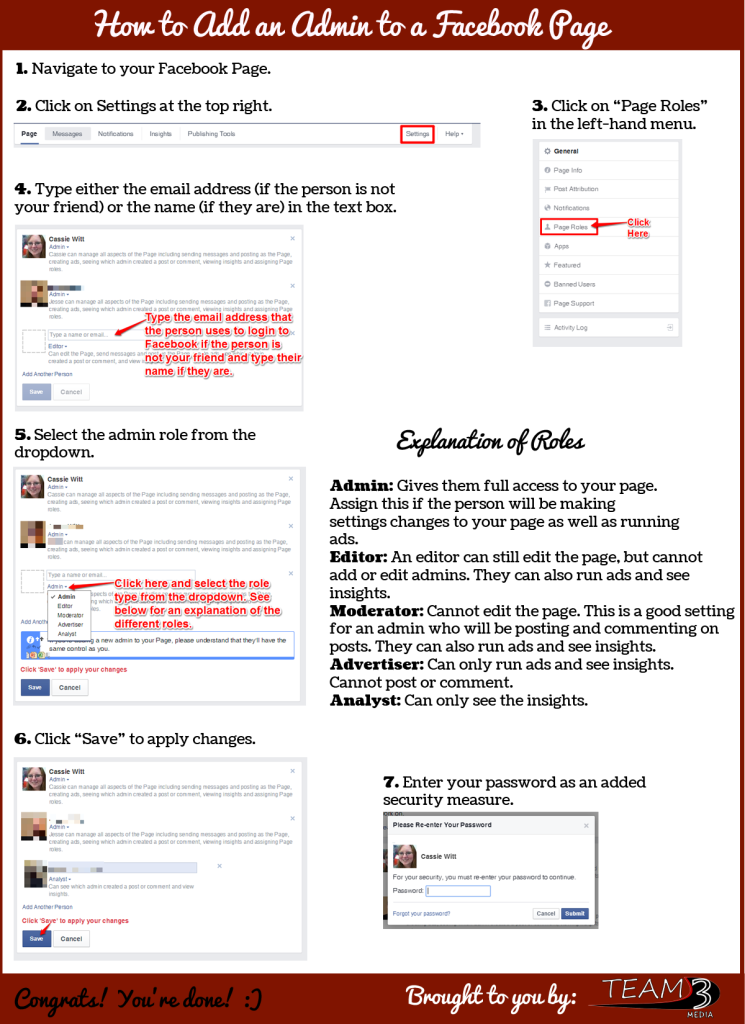
One of the most common questions I hear about Facebook, is how someone can add an admin to a Facebook Page. I put together a tutorial I use to send to my own clients and thought I would share it. This has been updated for the latest changes to the Facebook Page admin area. It’s setup as a one-page downloadable image. You are welcome to save it to your desktop, pin it, or share it with your own audience.  As always, if this was helpful to you, drop me a line in the comments below.


Download PDF Version

Want Better Results From Your Social Media?

Check out the Social Media Audits

Learn More


  • « Previous Page
  • Page 1
  • Page 2
  • Page 3
  • Page 4
  • Page 5
  • …
  • Page 7
  • Next Page »

Copyright © 2024