[convertkit]

How to Always be Effective at Social Media

How to Always be Effective at Social Media

This post is a part of the “Back to Basics” series,  which covers things you need to know to get started with social media. It’s also written towards intermediate social media for business users who are stuck and want to be more effective. It’s been my experience that when in doubt, go back to the basics and make sure you have those down, then you can move onto more advanced tactics and strategies.

We’ve all been there… slaving away at posting to our social media accounts day after day, following and using tactics from the “experts”, and crossing our fingers that the needle moves soon. Even a little bit of improvement would be better than this stagnant crap. Instead, we are forced to sit there, staring at our screens, feeling depressed that all the time and effort we’ve put in has been for nothing.

Whenever this happens, I pull out this list and start at the top. Whenever I ignore this list, my results have plummeted.  

These are not tactics. They are not even strategies. They are rules.

Like a painting, using this list will give you the broad brushstrokes you need to start building your own social media work of art. Don’t be mistaken, social media is an art. It may have certain steps you need to take like a science experiment or an instruction manual. In the end, though, you are really just talking to people, and that, my friends, is truly an art form.

It’s not an art form that’s hard to learn, though. It just takes time.

Understand What Your Audience Wants, Needs, or Desires

The most important thing you can do today for your social media results is to understand what your audience wants, and not what you think they want. That may sound harsh, but it’s true. Your audience may want something completely different than you’re delivering to them. A quick hint: they’re probably not looking directly for your service or product. At least not that they know of.

That’s where listening comes in. There are many different ways to listen. You can listen to your own customers when they tell you why they used your product, or how it helped improve their life. You can poll your customers (if they’re not telling you these things). You can set up keyword searches surrounding the thing that your product helps to improve (or the pain point). You can set up these searches through Google Alerts, or by using Hootsuite or other social media listening services to actually gather what people are saying on their social media accounts right now. You can see how your competitors are positioning their products. No matter how you decide to implement this, you must listen to really start to understand.

Also, listen to what else your audience is talking about, and how they are talking about it. This will give you ideas on the other content you can post to your page.

Listening is not a one-time activity, either. As your customer base grows and evolves, so will the ways they use your products and what they think about them. You need to always have your ear to the ground, observing what your customers are saying, and sometimes, what they’re not saying.

Define How Your Audience’s Needs and Desires Align With What Your Brand Offers

Understanding what your audience wants or needs in their lives is only half the battle. Now, you need to figure out if or how your product fulfills those wants and needs. The most elegant way I’ve ever seen it put is this: “Publications don’t sell horse saddles. Publications sell the idea of horseback riding.” Steve Bryant, who wrote this brilliant post is referring to how magazines sell their products (which for them is ad space and actual copies of their product), but it applies to social media as well. In fact, as he points out, it applies to many other types of content.

You are not selling what product you’re offering, but what that product can do for someone. How your product can save someone time or money, or even how your product can change someone’s life.

The key is to find out how your product delivers a solution to what your customer needs, and why they would choose your product over another to fulfill that need. That’s how you will start to develop your slogan, marketing copy, and graphics. That’s also how you develop the language that you use to interact with your customers online.

I can’t tell you what your language will be, although you are welcome to contact me if you want help with that. All I can tell you is that your language will likely be unique. In fact, it needs to be your own, especially if you want to stand out from the pack.

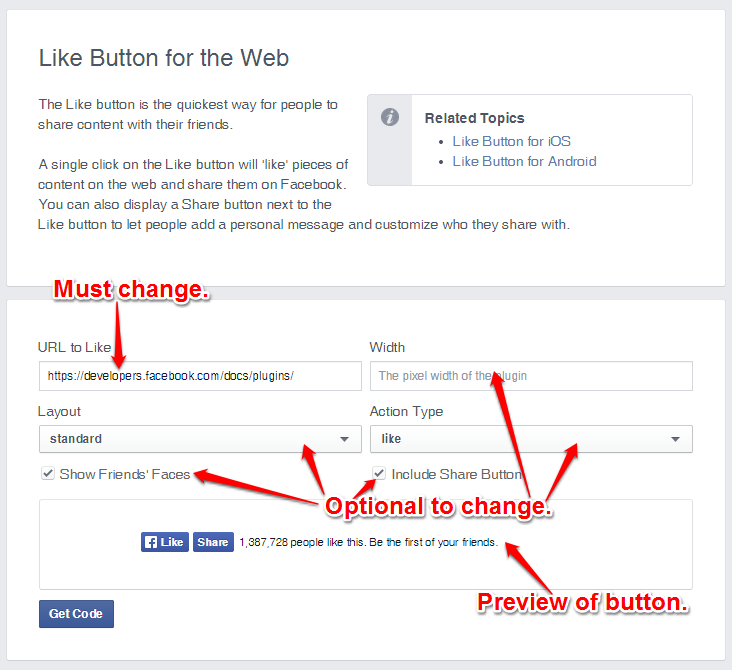
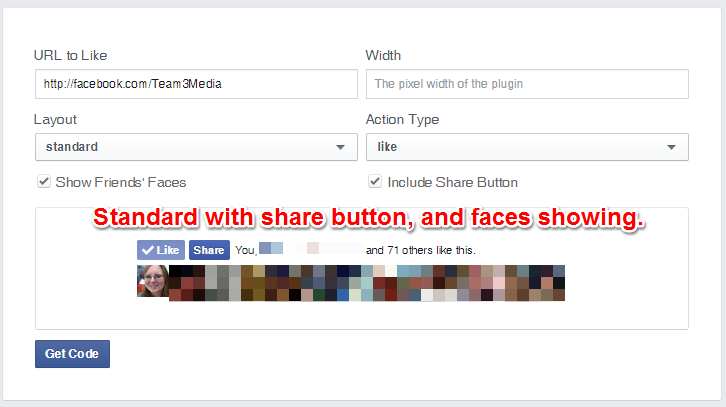
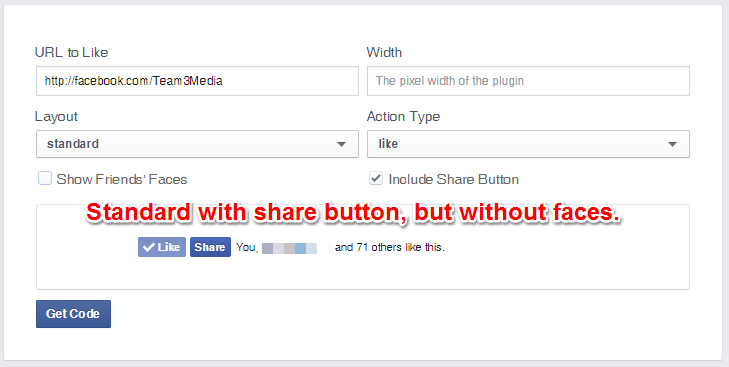
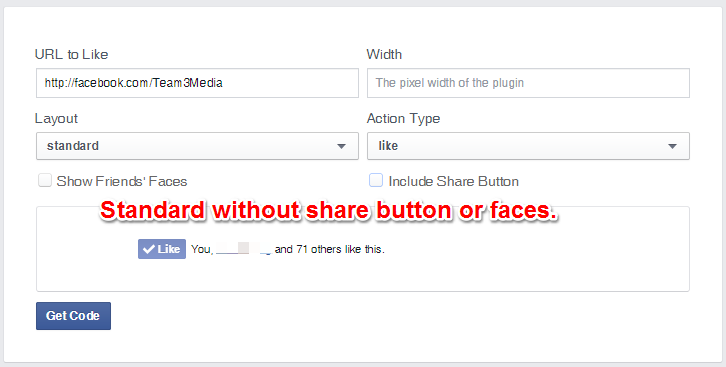
Learn How to Use the Social Media Platforms

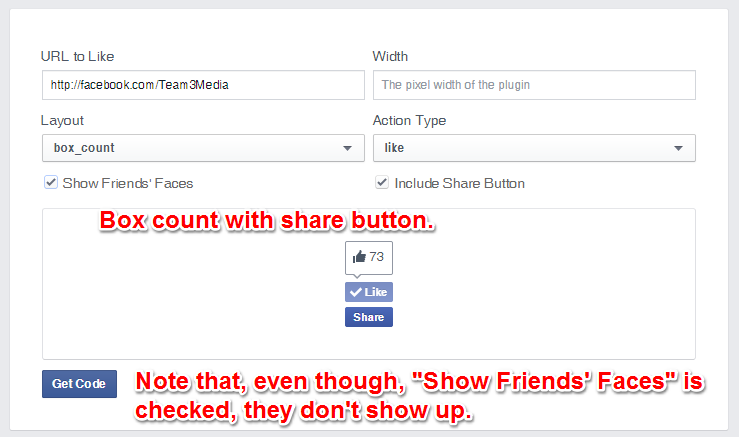
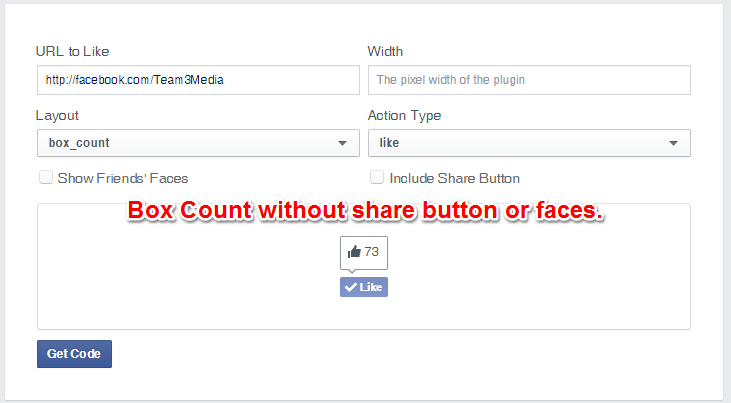
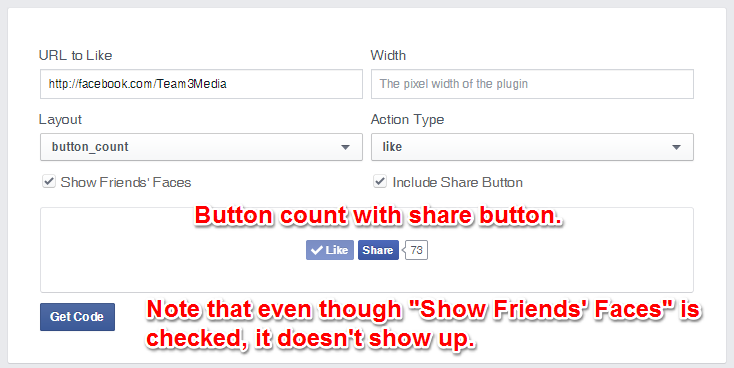
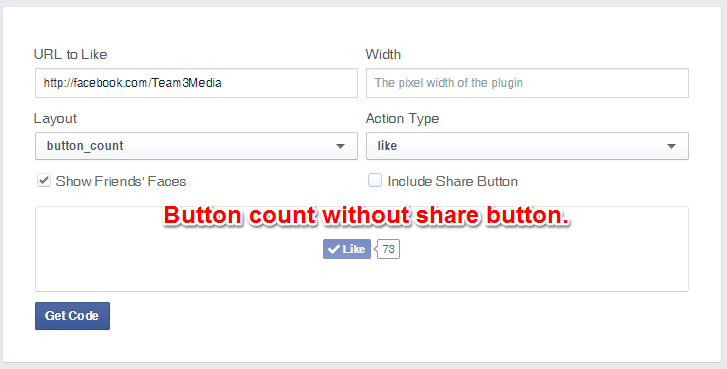
Don’t know how to schedule a post to Facebook? Don’t understand why a post with an image performs better than a post with just text? Then your results are likely suffering. Understanding how the different social media platforms work, what works on them, and how your brand in particular can use those tools is paramount to your success in social media.

Picture this. You walk into a job interview for a management position wearing an old tank top, jeans, and flip flops. You haven’t taken the time to really understand what the position is about, or what you bring to the table that will help the company not only fill their staffing need, but also help them improve the area you would be working in. Not surprisingly, after a short interview, you don’t get the job.

Why? Because job interviews have rules. So do social media platforms. They work a certain way, and you are expected to work within them. Do things outside those rules and you risk the consequences: mediocre results or, worse, getting kicked off the platform entirely.

There are many, many tutorials out there that explain how some features work on a certain social media platform. Most of the social media platforms even have their own set of help files, or you can hire a business like mine to train you on how to use them.

No matter what, though, you need to understand how they work and how you can work within their rules.

Develop Your Unique Voice

Your voice matters. It’s part of what makes you stand out as a company or brand. Anything you can do to differentiate yourself from your competitors is a good thing.

Developing your unique voice isn’t easy, though, and it almost always takes a while. That’s because your voice is not just what you say, but how you say it. It’s the intersection of how you talk about your product, how and what your customers think about your product, and your experiences trying to have conversations about your product.

Your voice, like most things in marketing, will likely evolve over time. Again, it may take a while before you find your voice. That’s why you have to start now, and you need to be willing to do the things below to make it happen.

  1. Experiment, try stuff out. You never know if something’s going to work until you try it out for yourself. Your situation is unique. What works for someone else may not work for you and vice versa.
  2. Read. Read like your life depends on it. Read stuff by your competitors, by bloggers who inspire you, and by those that don’t. Learn how they talk about stuff and then decide if it will work for you.
  3. Be human. Long gone are the days when people expect companies to sound like robots in their content and when they respond to complaints or feedback. Don’t be afraid to be human. To make some mistakes. That’s the only way you’ll learn and understand what your customer-base expects from you.

Be Consistent

Actually this section should be titled “Be a Scientist”, here’s why. In order to test a theory and prove whether it’s true, scientists run experiments over and over again. If done right, each of these experiments has a core set of steps that need to be followed, or the experiment is invalidated. Your social media strategy will benefit from this approach too.

You have to think of your social media accounts like one big experiment that you’re running. Because they are. Until you’re sure that something works, you are really just running an experiment.

How does consistency play into your big experiment?

Remember that an experiment has lots of steps that are done over and over again throughout each iteration? Well, that’s consistency. It’s all in doing the same things over and over again, so you will start to build your own set of steps that you can test other steps and variables against.

How to be consistent

There are many ways to be consistent. It isn’t just about how much you post, but what you post, what times you post at, what types of content you post on different days, and how you craft those posts.

Why does consistency matter?

Because most social media platforms are either very crowded or have some kind of algorithm that keeps everyone who follows you from seeing your posts. Posting at a number of specific times a week or day means that you have more opportunities for more people to see those posts. Being consistent in what you post means that you can start to understand if it’s working. You can’t try something once and expect to know if it succeeded or failed. Maybe you had an off day, or maybe most of your social media followers were not online that day (for whatever reason).

The point is that you need more data before you can decide if something worked. Data comes from consistently doing the same things over and over again, and only tweaking small bits along the way.

Understand the Difference Between Social Media Strategy and Tactics

This is a big one. Strategies and tactics are not the same. Pause for effect… I’ll say that again. Strategies and tactics are not the same. Unfortunately, these terms get used interchangeably by a lot of people, and that’s dangerous because you have to understand what something is before you can understand why it worked.

First, let’s cover the difference between the two.

A strategy is a set of tactics or a plan that is developed in order to achieve a certain goal. Like the “Be Consistent” rule above, this can be likened to the plan that scientists put in place to prove their theories. Basically, it’s a set of steps or rules that you want to follow to try and create the outcome that you want.

Tactics are the actual actions that you take during the strategy. They’re specific and usually involve a specific way to do something.

For instance, a social media tactic that is popular at the moment, is to create an image with a beautiful background overlaid with a quote in fancy text, rather than just posting the quote as text. A strategy would be deciding that you are going to share these images once/week on your social media accounts (along with other links, images, etc.).

For the most part, I have found that strategies work better than tactics in the long run. That’s because tactics are usually short-lived. Once they gain in popularity, then their effectiveness starts to drop off drastically, mostly, because everybody’s using them. Strategies on the other hand are evolved over time and have been proven to work over and over again. Also, tactics that have been proven to work over and over again, can be added to your overall strategy.

Now that you know the difference, the next time you come across a social media tip, you should be able to tell which one it is. This will give you an advantage, because you will be able to tell if it’s just a tactic that will give you a “short boost” or a plan that you can use again and again to get great consistent results.

Effectiveness is Measured in Time

Being effective at social media is not always easy, and it’s not always fun. There’s a lot of work involved, and it takes time. But there are things that you can do to boost that effectiveness. Employing these rules is a good place to start when you want to get better.

On Social Media Automation Fails

I’m the first to admit that automating your social media is not always the best idea. Where I think it comes in handy is in automating those tedious tasks, such as sharing articles that I like to all my social media networks. I use Buffer as part of a strategy for doing just that. It helps a lot, but I wanted a system that could help me save even more time and energy…

Recently, I decided to create a custom automated workflow for curating and sharing content to my social media accounts. What follows is an account of how that social media automation failed, and what I learned from it.

The Path to Social Media Automation

A while ago I was inspired by this article from Jamie Todd Rubin. I have been using pocket in roughly this manner for a while: as a catch-all for web items that I want to “look at later”. For a while, I used it to read, and then share items to my Buffer (an awesome social media sharing app). That worked fine, until it became tedious to remember to do this every time I got done reading an article. Also, sometimes, I would get interrupted and forget to do this step.

My next improvement was to just bulk-read posts, and tag the ones that I wanted to share with a “buffer” tag. Later, I would go in and add these posts one by one to my buffer account. Again, this worked for a while. It wasn’t really any less tedious, but it was less annoying (at least for me). I tend to be one of those people that works well when I cluster tasks together.

But I wanted something better. A system that was much more automated.

Enter the Bright Idea…

I’ve been obsessed for a while with the idea of automation workflows. In fact I’ve used them via Zapier and IFTTT for years to automate other tasks. So, I did a little research. My first stop, as usual, was IFTTT. It is a simpler version of automation that I use before Zapier. Mostly because it’s free. After a while you have to pay for Zapier. I have paid for Zapier in the past, but at the moment I’m trying to save money anywhere I can.

IFTTTs solution worked except for one issue, you can’t share to multiple accounts within buffer. Since I would use the service in this way, that meant it was out.

Next came Zapier. It had been a while since I used Zapier for anything very complicated. Imagine my surprise when I logged in to my account and found out that I could create “multi-step” Zaps. Effectively, this would allow me to do what IFTTT wouldn’t!  Note: I did end up paying for Zapier at this point, because multi-step zaps are not included in the free version, but I was happy to pay for these extra features.

So, I got to work creating a Zap that would take the items in pocket with a specific tag and auto-share them through Buffer. It took me roughly 15 minutes to set up and turn on. Of course, I tested it to make sure I was good with the way it worked.

It had been running for a few weeks, and I loved it! I was saving time, and I didn’t have to worry about remembering to share content to Buffer, because it was apart of my everyday todos to read articles and tag them in Pocket.

That’s when this happened:

Social Media Automation Fail

D’oh!

That section outlined in red in the image above is the excerpt that was pulled from the article.

The first problem is that I definitely don’t make that much money blogging. That would be nice, though, right? The excerpt that was pulled in from Pocket made it look like these were my own words. Not really a big deal in the large scheme of things, but it’s not true. I try very hard to avoid that.

Also, pulling the excerpt as a separate item was unnecessary for Facebook. I temporarily forgot that Facebook pulls it’s own excerpt out of the page and puts it into that nice little “preview” window. So, adding the excerpt, in this case, is not only unnecessary, it’s also confusing.

I only found out about this issue when one of my friends congratulated me. At first, I was confused, then I looked at the post and realized what she was seeing.

Needless to say, I went in and manually deleted that excess excerpt, and then edited my Zap to take it out of future buffers.

So, What’s the Problem?

Now I have a new problem, though. Any links I share will consist of just the image, title, and excerpt preview. For me, this feels unfinished. I like to add my own two cents and explain something I found interesting or insightful about what I’m sharing. It’s not really a big deal, but now I’m less excited about the social media automation that I tried to set up.

What I want is a step in the automation where I can add my own observations or notes into the post before it goes out. Sadly, you can’t attach notes to pocketed items, and even if you could, that’s not information that you can harvest in Zapier. I know, I looked. You also can’t create drafts in Buffer, which would be another nice work-around.

I thought of maybe adding the article information into a Google Sheet, or, possibly, Evernote. Then make a separate Zap where it will pull out that information (once I’ve added my note) and insert it into Buffer, but I’d like something with less steps.

So, I’m on the hunt. I’ve already come across several options that may work. I won’t know without testing and tweaking, though. Once I get a better system down, I fully intend to reveal it so that other people can save time curating and sharing content to their social media accounts.

Now, over to you. What do you use to save time curating and sharing content? Do you have any social media automation tips? Or do you have your own automation fail story that we could learn from?


Get More Likes On Facebook by Adding your Facebook Page Username to your Business Card

This post is a part of the “Get More Facebook Likes” series. Each one of these articles will detail a single tactic for growing your Facebook Likes. Not all tactics are created equal, but each will contribute to your success. Find more ways of growing your Facebook Likes by viewing all the posts in the series here.

Why your business card?

There are many ways to get more Facebook Likes, but most of them aren’t quite as simple as putting your Facebook Page username (or Page link) on your business card. It’s a super low-level way to generate more likes (especially if you do a lot of networking). It’s also a tactic that’s often overlooked.

So, why is it effective?

When someone takes your business card at a networking event or even picks one up from a visit to your office, it makes them curious. They want to know more about your business and more about you. Often times they will visit your website. This is also a great opportunity to point them towards your social media accounts.

Someone who wants to know more about you will also check you out on social media, because this is the place where most businesses “let loose” and show their personality. Seeing what a business posts on social media is often a deciding factor in whether or not they want to do business with you.

So, how do you get your Facebook Page username on your business card, so people will follow you? Can’t you just slap the link on the next print run of your business cards? Sure you could, but there are a few things you want to keep in mind before you do.

How to Setup Your Facebook Username, Vanity URL, etc.

First, you want to make sure that your Facebook Page username is setup correctly. In this past, this was called a “vanity url”. Some people (myself included) also refer to it as a Facebook Page link, because that’s ultimately what it accomplishes. Just for clarification, though, your Facebook username is the text that appears at the end of the link (once you setup your username). That’s the “YourBusinessName” part of this link: Facebook.com/YourBusinessName. Your Facebook Page username is also the part after the “@” symbol that someone can use to tag your business when they post something. Your Facebook Page link is the entire link that someone would need to type into a search engine to find your Page.

First, let’s take a look at what a Facebook Page link looks like before you claim your Facebook username. You can see an example below.

http://facebook.com/Your-Business-Name/1234567

Just between you and me, this is an ugly link! Could you imagine trying to tell someone to type this in? They would probably quit right away.

Now I know that most people would just go to Facebook and use the search bar to find your business. And that can work. The problem comes in when there are multiple businesses with the same name. How will someone know which Page to actually like? Better yet, why would you give them the opportunity to Like the wrong page.

The simple answer to this problem is to go claim your Facebook Page username and start advertising it, so this doesn’t happen. Also, if you claim your Facebook username, people will now be able to tag your business in photos or any other posts. This can give your business a larger reach on Facebook than it had before.

So, back to that ugly link…

http://facebook.com/Your-Business-Name/1234567

Not only is this link not as good for search engine optimization (seo). It’s also not very readable on a business card. Below is an example of a good Facebook Page link.

http://www.facebook.com/Team3Media/

The name is easy to read and wouldn’t be too hard for someone to type in.

Now that you know what a good Facebook Page link looks like, it’s time to go claim your Facebook Page username, so you can have a nice one, too. 🙂

But first, let’s go over some helpful tips and guidelines so you can choose the best username possible.

Use Capitalization to make it more readable.

The capital letters aren’t actually necessary. If someone were to type in the link without them, it would still work. However, it makes it infinitely more readable on a business card or any other print material.

Choose the shortest version of your business name or brand possible.

You don’t want people to be typing for-eh-ver in order to get to your Facebook Page. So, make it easy for them. Use a number instead of spelling it out. And use the shortened version of a word where possible, as long as it’s not confusing. The name you choose may be in direct conflict with the name used for SEO. In this case, you may want to use the original version. However, it’s up to you.

Follow the Facebook Page Username guidelines.

Below is an excerpt from their help article on creating custom usernames.

Here are a few things to keep in mind when you create a custom username:

  • You can’t claim a username someone else is already using.
  • Usernames can only contain alphanumeric characters (A-Z, 0-9) or a period (“.”).
  • Periods (“.”) and capitalization don’t count as a part of a username. For example, johnsmith55, John.Smith55 and john.smith.55 are all considered the same username.
  • Usernames must be at least 5 characters long and can’t contain generic terms or extensions (ex: .com, .net).
  • You must be an admin to create or change the username for a Page.
  • Your username must adhere to the Facebook Statement of Rights and Responsibilities.

Check this link for an always updated version of this help article.

[feature_box style=”7″ only_advanced=”There%20are%20no%20title%20options%20for%20the%20choosen%20style” alignment=”center”]

NOTE: One last thing. You used to be able to only change your Facebook Page username twice before you had to get Facebook involved in the process. There is not anything in their guidelines to suggest that this is the case anymore. However, I would still caution against changing it too many times. Remember, your username is tied to your Facebook Page link, so if you change it (after it’s already been set) then any old links to your Page will no longer work!

[/feature_box]

Now, Go Claim Your Facebook Page Username!

Claiming your username is actually a fairly easy process. In fact, it’s much easier to create than it used to be. Before you had to go through a handful of screens to get to the place where you could actually change your Facebook Page username. Now, a couple of clicks and you’re there.

Step 1: Go To Your Page

The first step is to go to your Facebok Page and make sure that you are logged in to the account which is an admin of the page.

Step 2: Edit Page Info

Now just put your cursor over the “More” button and click on “Edit Page Info” from the dropdown.

Claim Your Facebook Page Username - Edit Page Info

Step 3: Add or Change Your Username

In the “Username” field, either add or edit your Facebook Page username. Then click “save changes” when you’re done.

Edit Facebook Page username

You may have to try a couple of times before you find a username that Facebook will accept. Once you’re done, now it’s time to move on to the big finish.

How to Add Your Facebook Page Link to Your Business Card

Now that you have a nice readable Faceook Page link or username, you can add it to your business card. If you design your own business cards, check out these tips to keep your design clean and make it more likely that someone visits your Facebook Page.

Avoid “busyness” or “clutter”

Try to keep your business card from being cluttered by only providing the information that someone need to either contact you and find out more about you. You don’t have to add every point of contact. Just make sure your business card has the most important information on it. Also, you  want to make sure that adding the Facebook Page link to your card doesn’t make it appear more cluttered. You may need to move things around, take something off, or reduce the fonts in places.

Keep it legible

Another good piece of advice is not to use a really fancy font for your Facebook Page link. Remember, you want the link to be easily readable so you will get more Likes!

Add a Call to Action

When adding your link to your card, you may want to make it more “visible” by adding a “Call to Action”. For instance, most business cards list contact information in a list-like format with very little difference. If you really want to build your likes, you can do something as simple as adding the words “Like” or “Follow Me on Facebook” above or to the left of the Facebook Page link. This will make your link stand out, because it will look different than all the other contact information. You can also add a little more spacing around the link in order to draw attention to it.

Shorten it.

Always, always make sure that your link is the shortest version possible. For instance, you can leave out the “http://”, the “https://”, and even the www. This will not only make the link look cleaner, but it will also take up less space on the business card. Also, a little known fact is that someone doesn’t actually have to type out the full address to get your Page to show up. Modern browsers will “auto-add” the http:// to your link.

If you want to make it the shortest version possible just use your username and add the “@” symbol to the front of it. Be warned, using just the Facebook Page username may confuse the less tech-savvy of your peeps, though.

QR Codes…

Using a QR Code (quick response code) is a way to put your Facebook Page username on your business card which will allow someone to visit your page from their smartphone (once they scan it). We’ll cover QR codes in another blog post. For now, just know that they are dead useful in getting people to take an action from any printed advertisement.

Most Useful Social Media Posts for 2015

I thought I’d put together a round-up of the best posts from 2015, in case you missed them.  These are posts that got the most traffic, but also were found useful by people based on feedback. I hope you find them useful, too.

#1: Optimize Your Facebook Page Description (an excerpt from 31 Days to an Awesome Facebook Page) — NEED TO REVAMP

I wrote this post to jumpstart the writing of an ebook I wanted to publish called 31 Days to an Awesome Facebook Page. Though that project has been tabled for a little while, it was still a post that was not only popular, but that was fun to write.

The reason for this post was not only to jumpstart the book, but to also help people write better Facebook Page descriptions (found in your “About”) section. Did you know that your Facebook Page description is important to boost your Facebook Page in Google’s rankings? That’s because it’s one of the pieces of text that “stays put”. In other words, it’s not a post, that will be replaced by another one, so the text is always accessible by the search engines. That means this section is the perfect place to tell people what your all about and work in some of those keywords (without stuffing, of course)! If you want to see what I’m talking about you can see how to improve your Facebook Page description text here.

#2: Pinterest Will Sell Your Products for Free?!

selling on pinterest

I got an email from Pinterest about a book I had pinned which sparked the idea for this blog post. The email told me that a book I had pinned was now “on sale”. I was not only delighted by this news, but I also realized how useful it could be to people who sell online.

The basic idea works like this. If you have installed and setup “rich pins” for products on your site, when you put something on sale, it will not only show up on the pin, but Pinterest will actually email people who have pinned it to tell them about the sale! How awesome is that?! This is my favorite kind of automation. It does take some coding know-how to install the pinterest rich pin setup.  You are welcome to read more on how to do that here.

#3: Tutorial: Website Facebook Like Button

Facebook Like Button Address

The Facebook Like button is an often-overlooked way to get more likes on your Page, because it’s dead simple. Sure, you could add a follow bottom to your header or footer, but it doesn’t allow someone to automatically Like your Facebook Page. That’s the real magic of the Like button. Find out how to get this little magic button by going here.

#4: Buying Facebook Likes Doesn’t Buy Engagement or Sales

Buying Facebook Likes Doesn't Buy Engagement Or Sales

Another popular post dealt with buying Facebook Likes. Unfortunately, this is a lesson that I’ve seen a lot of small business owners make. At first, it seems like a great idea: get more likes (without the work) and your Facebook Page looks more legitimate and your posts will now show up in people’s newsfeeds. The problem is that these Likes are rarely “quality” likes as they usually come from countries outside the U.S. If you’re running a local business this is especially detrimental to your Facebook strategy, because the people who have Liked your page (and presumably will engage with it) have nothing to do with your local customers. This means that your Page content actually has an even smaller chance of showing up in newsfeeds than if you had a low number of “local” Likes. Check out this blog post to read more about the problem.

#5: Want to Know How Often You Should Post to Facebook?

FacebookPostingFrequency

The last popular post is about how often you should post to Facebook. Unfortunately, there is no easy or correct answer to this. However, the Buffer team ran a case study and has come up with an answer you can use to start testing out your own optimal number of posting. Read on to learn what their findings were and how you can apply it to your own posting strategy.

All of these posts offered advice or were “how-to” type posts, which tells me that there was a definite need for this. Quite a bit of my content strategy for 2016 will also focus on these types of posts.

Did you find any of these articles useful? Let me know in the comments below. 🙂

My 3 Words for 2016

My3WordFor2016

I don’t do New Year’s Resolutions any more. I’ve never been good at them. I do, however, choose “areas of focus” for my next year. The idea is called “3 Words for (insert year here)”. I borrowed this idea from Chris Brogan, who’s been doing it for 10 years now.

The concept is simple. Take a moment to think of three things you’d like to work on this year. Then come up with three words that remind you of those three things. Write them down. Look at them everyday and try to make your reality match those words. At least this is how I think of the process. Chris Brogan describes it a little more elegantly here.

I’ve only been doing this for a couple of years, but I really like the practice. The first year, I was not very successful at fulfilling those words. But last year I made progress. This year I’m hoping to make even more progress. So, without further ado…

My three words for 2016 are Brave, Writer, and Finish.

Brave

Lately, I’ve been feeling the pull, again, to do more.

It’s always followed, by being afraid, though. Every time I venture out of the little cubby hole that is my life and try new things, I feel afraid.

Who am I to try this? I haven’t been doing it long enough. I don’t know enough about it. I can’t possibly think I’d be any good at it.

These are the thoughts that run through my head.

It doesn’t happen right away, though. Oh no, it waits until I’m in the middle of a project. It waits until I’ve become firmly entrenched in the thing I want to do. Until, I’m actually getting excited about it.

Steven Pressfield calls this resistance in his book “The War of Art”. I call it the naysayer. It’s that kid on the playground who always thinks your idea of a game is stupid. It’s the person who tells you how hard something is going to be when you declare that you want to do something new with your life. It’s all the crabs who pull the one crab (desperately reaching for freedom) back into the bucket.

And the real ugly truth is, that it doesn’t have to be that way.

I love my son. I know, I’m a Mother, I have to say that. But it’s true. I love him, but not just because he came from me or that he’s changed my life (literally and figuratively). I love him, because he is fearless. He’s not afraid to be himself.

Actually, that’s not true. It’s not that he’s not afraid. He doesn’t even know that he can be afraid (or ashamed) of who he is. He hasn’t learned that yet. And I hope he never learns it. But I have a feeling that he will. In fact, he’s recently learned that some other kids think he’s “weird”, and that they have this incessant need to mock him for it.

It’s sad, because being weird and unique is one of the greatest things about living this life.

But for now, he’s still at that point in his life where he’s oblivious. It’s a glorious thing to behold.

I remember being like that once. Freer, happier, and completely oblivious to anything but my own joy. The joy of living.

There’s this really great quote that Eddard Stark tells his son Bran in “A Game of Thrones” about being brave. Bran asks, “can a man still be brave if he’s afraid?” His father answers, “That is the only time a man can be brave”.

And it’s true. You can’t have one without the other. You can’t feel like you need to brave your way through something without being scared. It’s impossible.

So, Brave is one of the words I choose.

Some of the best times in my life happened when I was being brave. Finishing writing my first story, when I was in 7th grade, and then telling everyone about it. Telling my husband (my then boyfriend) that I loved him for the first time. Getting married. Giving birth to my son. Climbing the rock wall in high school for the first time, even though I was afraid of heights. Doing my first debate. Acting in my first play. Singing on stage for the first time in 5th grade. Giving my first presentation on social media. Winning my first consulting client. Giving my first social media workshop. Leaving my job of three years to take a job with a place that really wanted me. Declaring that I was going to freelance full-time when I was laid off from that job. Joining BNI to bring in more clients to my fledgling business. Taking a job full-time with the business that was helping me get most of my work. Visiting a location of a client in Urbandale, Iowa to do a “Marketing Walkthrough” of their store. Starting my own blog. Moving to California from Missouri (which I had lived in for pretty much my whole life) in less than 2 weeks. Sitting at the edge of the Grand Canyon, looking over the edge (and I’m still afraid of heights). Every single time I have to get up in front of people and talk about something (especially if I’m the “so-called” expert). Every time I send a newsletter to my list. Every time I publish a blog post. I’m scared writing this now, because it’s deeply revealing. I’ll be scared in a couple of weeks when I take my first beginner salsa class. I don’t think I’ll ever stop being scared.

But that’s kind of the point. You’re not going to stop being scared. Life is scary, especially when it’s new and untamed.

Each of those times, I was able to walk through the fear and get through the other side. I still don’t exactly understand why I was able to. In some instances I can point to the fact that I “had to do it”, but in others, I just did. Maybe by trying to be more brave I will learn what gets me through, and I’ll be able to replicate it more.

Last year, I found that just looking at the words everyday to remind myself was not enough. I had to tie specific actions to those words, or nothing was going to be done.

Brave is hard to tie an action to. Sure, it can be an action word. But how the heck do you define brave as an action?

Even since I started writing this post, I’ve felt more aware of when I’m not being brave, and that’s a good thing. It’s given me some ideas on how I can take brave from just a word to something I can actually implement.

The first part of that is to try more stuff. Signing up for my first beginner salsa class is a great example of trying something new. I also have my eye on some writer’s meetups, which I’ll try to schedule in during the next couple of months.

The second way for me to be brave is to finish more things that I start. I’ll talk more about this later with my third word.

Writer

This is one of the things that I’ve always wanted to do with my life. In fact, it’s the thing I’ve wanted to do longest. Despite all my false starts and stops, I know it’s a thing I want to continue to do. So, why should I stop hiding it?

Again, though, you can’t have results without action. So, i’m tieing this word to a daily goal. I’m going to pledge to write at least 250 words a day of fiction. I just did the math, and a 90,000 word book will take me just under a year to write at 250 words per day.

On the other side of the coin, I also love to write blog posts, especially when they teach something. So, “writer”, is also to remind myself to do that as much as possible. I have another action for this. It is to finish 52 blog posts this year. I used to scoff at any goal I tried to set where I would publish 1 blog post per week. My mind would immediately counter with “that’s not nearly enough”, and then I would decide to do 2 per week. The problem with this goal was that I wrote even less because of it. Just the thought of writing a ton more than I was already outputting seemed to cripple me. So, I’m sticking with a more realistic goal this year.

Finish

Hi, my name is Cassie, and I’m a chronic “starter”. I rarely finish things. Even small projects like cleaning up my desk tend to get derailed. I know part of the problem is being in the middle of a project, and suddenly, finding myself scared to finish (for whatever reason). However, I also tend to get distracted by new ideas a lot. This has caused me to start a lot more projects than I could ever hope to finish.

So, the question that I will endeavor to ask myself the next time something shiny comes along is, “will I finish this?” I have to try to answer this in the most brutally honest way possible. Because my track record speaks for itself.

Again, though, I have finished things in the past. But just like the word “Brave”, I don’t understand why some things got finished and others didn’t. This year will be just as much about learning what motivates me to finish as it does actually finishing things.  

I’m going to also start documenting those projects which I do start, so that I can see what gets finished and what doesn’t. I’ve learned from running social media campaigns that if you need to have the data to back up whatever you are declaring as true. You can’t fake data. You can misinterpret it, or it can be skewed, but pure data only gives you numbers. Numbers just are.

Finish is also a reminder that I already have projects or irons in the fire that either need to be finished, redefined as something other than a project, or dropped completely. One of the most important things i’ve learned in the last couple of years is that it’s okay to not finish something. In fact, not finishing a project has taught me more about myself than anything else.

I’m still going to shoot for finishing more projects than not, but sometimes a project just isn’t meant to be finished.

How am I going to put finish into action? I’ve thought about this a lot, because starting and not finishing things is a major problem I want to overcome this year. It took me a while to hit on a plan that I think will work. I won’t know, though, until I work the system.

Here’s my plan. I have a list of the current projects that I am working on and want to work on in the next month. This is sort-of a high-level to do list, or a goals list. Then I have a second list. I call it my “queue”. These are all the things that I want to accomplish after my current projects are done. Everything that comes into my head, will need to go on the queue list until there’s room for it to move to the current projects list. I will schedule time to work on the things on my current projects list, and try to resist the urge to work on anything that is not on my current list. At the end of the month, I’ll assess my current list and see if there’s room to move anything from my queue. This will also be a good time to see how much progress I’ve made on a project. It’s not a perfect system, but I think it will work well.

So those are my 3 words for 2016, the reasons why I’m choosing them, and the plans I have in place to actually work on them.

How about you? Do you set New Year’s Resolutions, or do you focus on areas you want to improve? Would you like to join me in the 3 words for 2016? Drop me a line in the comments and let me know your plans.

The Basic System to Rock Any Social Media Platform Part 1: The 3 Phases of Social Media Success

ThreePhasesOfSocialMediaSuccess

Anyone worth their salt as a consultant will tell you that you need a plan to get the most out of social media. This is absolutely crucial to your success. What’s missing from most social media plans, though, is a system. A set of rules, if you will that governs how effective a plan can be. It’s a way to implement the goals that you have and an order to do them in.

I’ve seen and built a lot of social media plans. Some were successful, and some were not. The ones that were successful had one thing in common: they setup their plan with a systemized approach. In other words, everything in the plan is built to fulfill a specific purpose. Nothing in the plan deviates from that purpose.

There is a better word than purpose, though. Some people like to call them “goals”. I like to call them “phases”, because you can have multiple goals within a phase and still be working towards that one purpose.

There’s really only three major phases that you can shoot for in social media. They are:

  1. Building an Audience
  2. Building Engagement
  3. Converting Followers

Want to know what the most successful social media plans had going for them? They tackled these phases one a time and in order.

Phase 1: Build Your Audience

When I first started in social media, the company I was working for didn’t have a social media presence. Since this was my first social media job, I had to learn how to set them up and make them work. I had read a lot of stuff about how social media was so powerful. About how it could increase your sales and popularity far beyond what you could achieve normally. So, I had hope that it would work.

When we first started with Facebook, it was still pretty early for businesses to be jumping on. It was easier to build an audience then. But that’s not what I was focused on. Instead, I was doing all kinds of things. And I didn’t understand why I wasn’t getting the engagement that I had heard about. Or why I wasn’t getting people to bring in the coupons we would post, or respond to our online sales.

It wasn’t until we ran a big “Like Us” contest that I really started to see engagement and conversions on our Page. In fact, our audience grew so much from that contest, that the engagement and conversions had also skyrocketed. It was then, that I understood how social media works.

See, the simple truth is, you have to have an audience that will support the engagement and conversions. If you don’t, it won’t happen. No amount of pie in the sky thinking will deliver that for you.

No matter what platform you’re on, you have to build an audience first. Unfortunately, building an audience is actually one of the hardest parts of the whole process because it’s a step that consists of three separate objectives.

The first objective is to get people to show up. The second is to get them to pay attention. The third is to get them to want to come back and read more. We’ll tackle how to get all of these to work together in a later post. For now, let’s just look at the basic activities you need to do to get started.

  1. Post content consistently.
  2. Use the basic tools of the platform (e.g. Twitter = hashtags, Facebook = shares and likes).
  3. Ask questions.
  4. Be funny.
  5. Be real.
  6. Use what’s working on the platform now (e.g. Facebook = video)
  7. Look outside of the platform for followers (e.g. Facebook Like Button)
  8. Run a Contest or Promotion to generate excitement.
  9. Find your voice.

Phase 2: Build Engagement

The next phase to tackle once you’ve built your audience is to get them engaged. If they’re already engaged, then that just means you have an advantage. But if they’re not, you may have a hard road ahead of you.

My first success had really taught me that you could be achieve your goals with social media if you focused on the right phase at the right time. But, later, I struggled with building engagement on other platforms and social media accounts.

A couple of years after I started doing social media, I started to take on other clients on a freelance basis. I thought I knew what I was doing by that point. After a few months, though, it became clear that I really didn’t.

I used what I knew worked: I focused on building an audience before building engagement. But I wasn’t getting the same results. I didn’t understand why it seemed to only work once. I thought, that must have been a fluke. But I questioned that assumption, because I had read so many articles telling me different. So, I decided to dig deeper and figure out why it had worked so well the first time. I did this by trying a ton of different things to build engagement (including running more contests).

My conclusion was this: in those early days we had grown our audience so fast by harnessing the excitement that a contest produces. This meant that our audience was already engaged. It gave us a leg up when it was time to move to this next phase. Because we were also posting consistently to Facebook, and we understood what was working on the platform, we were able to keep that engagement going.

Once I understood that, I knew that the key to getting more engagement was to give it a kick-start. Contests work well for this purpose, but they’re not the only answer. Sometimes, they’re not even the right answer for the client.

There are lots of activities that build engagement. Most of these same activities you’ll notice are also ones that are used to build an audience. That’s because the same characteristics of social media that build connections, also help spread those connections farther than they would normally go.

Below are a list of activities that you can use to build engagement.

  1. Post content consistently.
  2. Run a Contest or Promotion to generate excitement. In fact, run these multiple times throughout the year to get the most benefit out of them.
  3. Ask questions.
  4. Be funny.
  5. Be real.
  6. Find your voice.
  7. Connect with your audience.
  8. Use tools outside of the platform (e.g. share buttons on your blog)
  9. Use the basic tools of the platform (e.g. Twitter = hashtags, Facebook = shares and likes).
  10. Use what’s working on the platform now (e.g. Facebook = video, Twitter = Twitter chats)
  11. Bring them into your sales funnel.

Step 3: Convert

Conversions matter in social media. It’s the return part of “Return on Investment” that we’ve been hoping for. That doesn’t mean that we don’t enjoy the warm fuzzy feeling and the connections we make with our community. Those are important, too, and can keep us going when the conversions aren’t happening like they should. But most of us want to get something more out of it. Most of us want to be able to justify the time we’re spending talking with people, researching content, posting, spending money on ads, and the hundreds of other things you need to do to keep up with your social media accounts.

Conversions are tough to achieve, especially on social media. That’s mostly to do with a glaring difference between a business’ motivation and a person’s motivation on social media. People get on social media to connect, or to find out what’s going on, or even just to unwind. Businesses on the other hand want to connect with their customers, but they also want to make the sale. Those motivations just don’t line up. Often times, this means that social media posts by businesses can be seen as an intrusion. Or at the very least, they can seem out of place.

So if conversions are our goal, then how do we go about getting them?

Some of the same things you do to build an audience and build engagement also work for making conversions on social media. Again, this is because of the way social media works. The main thing that companies who make conversions on social media do, though, is they connect with their followers. They learn what their audience likes to hear, and what they like to talk about. Then they take that information and they apply it to how they sell their product. That’s why these same activities can work for conversions, just as well as building an audience and engagement.

Here’s the list of activities that will help convert your followers into customers:

  1. Post Consistently (tired of seeing that yet?)
  2. Post a sale or a promotion
  3. Run a contest (yep, contests can even be used for conversions!)
  4. Ask questions.
  5. Be funny.
  6. Be real.
  7. Find your voice.
  8. Connect with your audience.
  9. Use the basic tools of the platform (e.g. Twitter = hashtags, Facebook = shares and likes).
  10. Use what’s working on the platform now (e.g. Facebook = video, Twitter = Twitter chats)
  11. Ask for the sale
  12. Run ads or use other promotional tools.
  13. Bring them into your sales funnel.

As you can see, the main difference in most of these phases isn’t the activities, it’s the intention and execution. It’s the focus of the conversation.

I have been successful and have seen others be successful in social media from following other systems. But I’ve achieved the most success when I followed this system step-by-step.

Your turn. Have you found a system that works for you? Are you having trouble building an audience, your engagement, or your conversions? Have you seen success when you focused on one goal at a time? Let me know in the comments below.

I’m leaving on a jet plane…

Actually, I’m leaving in a Cadillac, but sometimes it feels like a jet plane when I’m driving down the road.

What the heck am I talking about?

Well, some of you may know that I’ve been talking about moving for a while. We were going to move three years ago, so my husband (Jess) could attend a school in Florida, but the plans fell through. Luckily, he was able to do online courses from the Academy of Art University in San Francisco. I think this ended up working in our favor, but we’ll never know where that other path may have lead.

Now, we’re about to embark on a completely new path. On Friday, Jess got the job offer he had been promised for a couple of months. The job is in L.A. which we had anticipated. What we had not anticipated (due to some timing issues) was the fact that we would need to pick up and move in less than a week!

It has been a crazy couple of days, filled with visits, packing, planning, and all the other things that go into a big sudden move. Thank goodness we had the sense to pack a lot of the stuff right after he graduated. Otherwise, this week would have been more hectic than it already is!

So, this means that I will be postponing any blog posts, emails, projects, etc. that I was planning and working on.

I may write on the trip. I am going to be stuck in a car for several hours, after all! But I’m going to make a commitment to not post anything until after we get settled. I don’t know how long that will take, so I can’t give a time frame here. Hopefully not too long, though.

I want to take some time and enjoy this trip with my family. It’s actually the first long car drive we’ve all been on together.

We may end up hating each other by the end of the trip, or we may get closer. Either way, it’s an opportunity I don’t want to miss!

So, until next time, bon voyage! I’ll be writing next time from sunny California. 🙂

UPDATED: Tutorial Infographic: How to Add An Admin to a Facebook Page

This post was updated on 9/23/2020 to reflect the new look of the desktop Facebook Page interface.

One of the most common questions I hear about Facebook, is how someone can add an admin to a Facebook Page. I put together a tutorial I use to send to my own clients and thought I would share it. This has been updated for the latest changes to the Facebook Page admin area. It’s setup as a one-page downloadable image. You are welcome to save it to your desktop, pin it, or share it with your own audience.  As always, if this was helpful to you, drop me a line in the comments below.


Want to Know How Often You Should Post to Facebook?

FacebookPostingFrequency

So you want to know how often to post to your Facebook Page… So, does everyone else.
In fact, this is the number one question I get asked about business Facebook Pages.

Before we dig into the answer (and why it’s not so cut and dried) let’s look at why this is such a big question.

Why the Heck Does it Matter How Many Times I Post Per Day on my business Facebook Page?!

Did you know the number of times you post per day could be limiting the number of people who see those posts? It’s true.

The reason?

Facebook is ruled by this super-complicated algorithm. Now, no one really knows (except for the people at Facebook) how exactly this algorithm works. But we do know a few things. We know that Facebook calculates the importance, popularity, share-ability, spaminess, etc. of each post that is published. These numbers get modified the longer a post lives.

Now for each of these posts, there’s also another calculation going on. That calculation is based on each user’s preferences. It is highly based on whether a person has liked your page or whether their friend has. Whether they have interacted with any of your content and how often, or the same for their friends. It also depends on how many Facebook Pages they’ve liked, how many friends they have, what else they’ve interacted with in their news feed, how often they interact with the people and/or pages who posted those other stories, and a ton of other factors.

This other calculation is the most important, because it determines which posts show up in a person’s news feed.

As you can see, it gets very complicated very fast.

So what does this have to do with how many times you should be posting to Facebook?

The number of times you post per day is also included in that other calculation.

If you post too little, your posts will eventually be shown less. So, you’d think the opposite would cause your posts to show up more, right? Unfortunately, that is not always true. In fact, you can post too much to Facebook, sending them the signal that you’re “spamming” your followers even if that was never your intention.

So how often should you be posting to your business Facebook Page?

A Case Study: How Often Should You Post to Your Facebook Page?

Ready for a definitive answer? A real solid number you can point to and say “I did that, now what are my results?”. I thought so.

Buffer, an amazing social media scheduling app, has put together some research and a great blog post on how often you should post to social media.

There’s even a great infographic from SumAll (shown below) that lays it out for you.

How Often to Post to Social Media

Infographic via: https://blog.bufferapp.com/how-often-post-social-media

Remember, Your Number May be Different

Now, this isn’t a truly definitive answer. The number of times you should post to get the maximum amount of interaction (what’s called the “sweet spot”) may be different than the number above.

What this is, however, is a starting place. Give it a try, you’ll never know if it works for you unless you do.

Tutorial: Get More Facebook Likes by Adding a Facebook Like Button to Your Website

One of the easiest ways to get more Facebook Likes for your Facebook Page, is to add the Facebook Like button (targeted at your Facebook Page) to your website.

This is a simple and often overlooked tactic which could result in more Likes for your Page. Why does it work?

Consider these two scenarios.

In the first one, a visitor to your website sees the Facebook icon and is enticed to click it. Once they click it, though, they have to actually go to your Facebook Page in order to “Like” it.

In the second one, a visitor to your website sees the Like button and is, also, enticed to click it. Once they do, that Like is immediately translated to your Facebook Page.

It’s so much easier for a person if they only have to click once. Anytime you can make a conversion easier on the consumer, the more likely they are to do it.

How Do You Get the “Magic” Facebook Like Button?

First of all, how does it work like magic? The Facebook Like button works auto-magically with one click as long as that person is logged into Facebook. These days, who isn’t? Honestly, I can’t remember the last time I logged out of Facebook. And I would bet my right arm that you can’t either.

Facebook makes it easy for you to get this code to install on your website. To get started go to: https://developers.facebook.com/docs/plugins/like-button

As you can see from the screenshot below, there are some options that you can choose to enhance the Like button. But they need to be weighed against how much space the button takes up. For example the first set of options makes the button (and all its attributes) really big. The space you want to put it in may not be big enough to hold everything, and it will cut part of it off. All of the attributes are optional, except for your Facebook Page URL.

Facebook Like Button

A Quick Note: The “Width” option will not increase the size of the Facebook Like button (which is quite small). Instead the width controls the overall width of the Like button element. For instance, in the example above, the Like button element area covers the Facebook Like Button, the Facebook Share button, and the words describing the number of likes. So, increasing the width would only increase the space around the entire button set.

The screenshot below shows my Facebook Page address (or URL) in the text box below “URL to Like”. To find your Facebook Page URL, go to your Facebook Page and copy and paste what’s in the address bar into the top-left box (as shown below). That’s step one.

Facebook Like Button Address

The next step is to decide what you want the overall button to look like. I’ve already talked about how the default set of options gives users a lot more information, but makes the button much bigger in size. I’ll explain that extra information, and go through the rest of the options, with screenshots below.

The first set shows the like button in the “Standard Layout” which adds the additional information of the person’s friends (the name here has been covered up for privacy reasons) who Like the Page. This is great for showing “social proof”, which can help your Page seem more Likeable, especially if you have a lot of Likes already. If you have a smaller number of likes though, I’d suggest going with one of the other options. You can also see below that there is an extra button (the share button) and that there are faces shown in the screenshot below. Most of these have been covered up to protect the privacy of people, but I left my own mugshot there, so you can see an example of what they will look like.

Facebok Like Button Standard Layout With Share Button and Faces

If you uncheck the “Show Friends’ Faces” option, it makes the button are look cleaner. This option works well for those who don’t want the added space the “faces” take up and for those who don’t necessarily care about social proof.

Facebook Like Button Standard Layout With Share And Without Faces

You can, of course, disable the share button. Since you’re trying to get people to Like your Facebook Page, adding a Share button only confuses the issue.

Facebook Like Button Standard Layout Without Share Or Faces

The next layout type is the “box_count”. This displays the Like button with a Like count over it, and everything is stacked on top of each other in a, you guessed it, “box” configuration. This layout, and in fact, the rest of the layouts do not show faces. So, if social proof is important to you, go with the standard layout or the Like Box (which I’ll cover later). This option works for those site designs where a more square or vertical section is available to place the button in. It’s also good for those who want to still show off the number of likes they have.

Facebook Like Button BoxCount Layout Share and Without Faces

Since the box count does not come with the option to show faces (even if you check it), the only other option here is to take away the Share button. This makes the button into a nice compact design that could fit almost anywhere.

Facebook Like Button Box Count Layout Without Share

The next layout type is the Button Count. This layout is much like the box count layout, except that the number of likes is on the side instead of on top. This makes this button much more suited to a horizontal space.

Facebook Like Button Button Count Layout With Share

Of course, once you take the Share button away it will fit into an even smaller space. Again, this type of layout with the number of Likes showing appeals to those who want to use social proof to encourage more Likes.

Facebook Like Button Button Count Layout Without Share

The last layout type is the simplest. That’s probably why it’s called the Simple Button layout. It is not only the smallest, but it’s also a great option for those Pages which have a smaller number of Likes, and don’t want to advertise that fact. This button, too, can be combined with the Share button, if you like.

Facebook Like Button Simple Layout With Share


The version without the Share button is tiny, minuscule even. This means you don’t have to worry about where the button will fit.

Facebook Like Button Simple Layout Without Share

Warning: Code Ahead!

A quick warning: this next section involves some html no-how. If you don’t know what you’re doing, forward this article on to your web developer or admin and have that person complete these steps.

Now that you know which button types are available, take a moment to choose which is right for your site.  Then, click on “Get Code”. You should see a box like the one below pop up. As you can see, there are 4 options for the code. I bet you thought you were done with options! We are almost done, I promise. 😉

The first three options require a little bit more work to install them and give you some more options for how much information you get when someone presses the Facebook Like button from your website. However, they are not necessary, in most cases.

Facebook Like Button Code Page

The easiest code type to use, and the one that will not bog down your site is the “URL” type. Which is just as it sounds, it installs a URL, which points directly to your Facebook Page, but has the added benefit of allowing someone to Like your Page with one click! Woot! Your next step here is to copy and paste the code into the html of your website where you want the button to appear. Again, if you don’t know what you’re doing get someone knowledgeable to handle it for you.

Facebok Like Button URL Code

Alternatives to the Facebook Code

There are some alternatives to just grabbing the code off Facebook. If your website is on WordPress, then there’s several options in the form of “plugins” you can install with no programming knowledge. I won’t detail all the options here. Just make sure to check out the number of stars each of these plugins has, check out some of the reviews, and make sure it’s compatible with your version of wordpress before you install.

There are also plugins for drupal, joomla, wixia, and other website builders or (content management systems). Just use Google to search for them.

Whether you choose to grab the code from Facebook, or use a plugin, installing the Facebook Like button is just one way that you can increase your Facebook Page Likes.

Likes Are Just the Beginning

Remember, though, that Facebook Likes are only the first step in the journey. It’s great to say that you have 1,000, 10,000, or whatever number of Likes, but it’s not your end game. Those Likes represent real people who (hopefully) want to buy from you. Even if they don’t want to buy from you, they have indicated that they’re interested in your business in some way. Now it’s your turn to give something back to them. Give them a reason to read your posts, and keep them coming back for more. This is the way that you start cultivating relationships online that lead to sales.